Pages

Showing posts with label girly. Show all posts

Color Challenge: Bright Pink for Fall

Welcome to the first installment of the Color Challenge!!! 

Color Challenge ::: 7 bloggers, one color, endless creativity!

Spearheaded by the uber-fabulous, uber-cool Mandi, of Vintage Revivals, seven bloggers from different niches (fashion, beauty, home, organizing, DIY, parenting...you get the idea) are incorporating a certain color into their "medium."

Today's challenge color: BRIGHT PINK!!! 
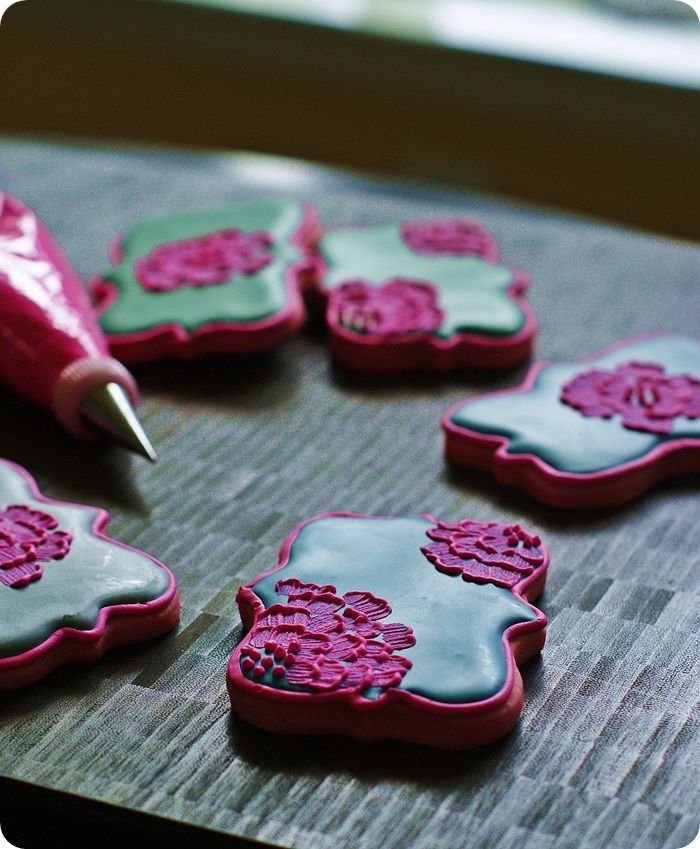
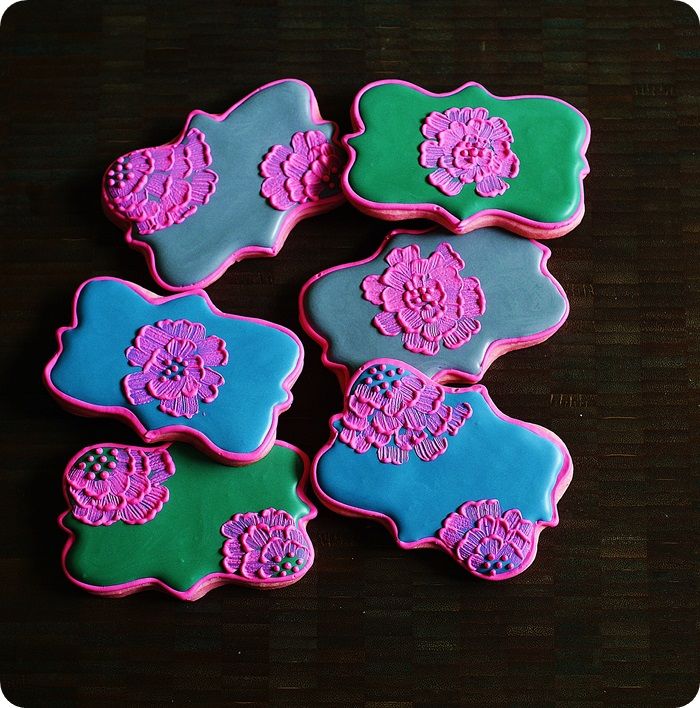
color challenge: bright pink cookies for fall :: bake at 350 blog
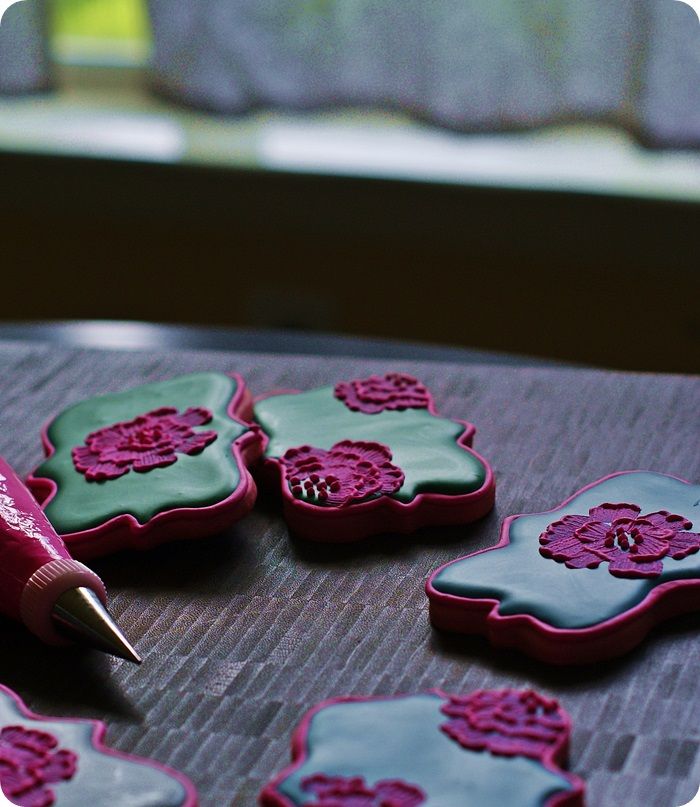
My mind immediately went to summery and bright cookies, but since we're heading into fall, I wanted to bring in those deep, rich tones that really make pink POP!

color challenge: bright pink cookies for fall :: bake at 350 blog
The cookie design itself is simple; I know, it looks fancy.  The technique is called brush embroidery.  I waited years before trying it because I can't sew and the word "embroidery" scared me.  Trust me, this is a perfect cookie for beginners!  (Sewing skills not required.)

color challenge: bright pink cookies for fall :: bake at 350 blog
You could make the design on any shape cookie...square, round, hearts. I chose this awesome plaque cookie cutter from Copper Gifts.

Adding a little black food coloring to the green and navy icing adds a bit of depth and darkness. Add it a bit at a time to avoid turning the icing totally black.  I use a toothpick to dip into the food coloring and then into the icing.

To tint the cookie dough, add in pink gel paste food coloring along with the eggs in the cookie recipe.  Once the flour is added, if the dough needs more color, knead it in by hand.  Don't worry, the pink will wash off of your hands.

To make these Bright Pink brush embroidery cookies, you'll need:
color challenge: bright pink cookies for fall :: bake at 350 blog
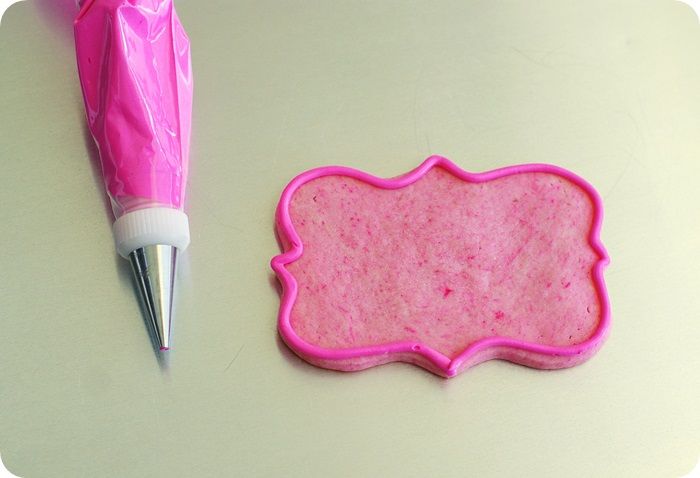
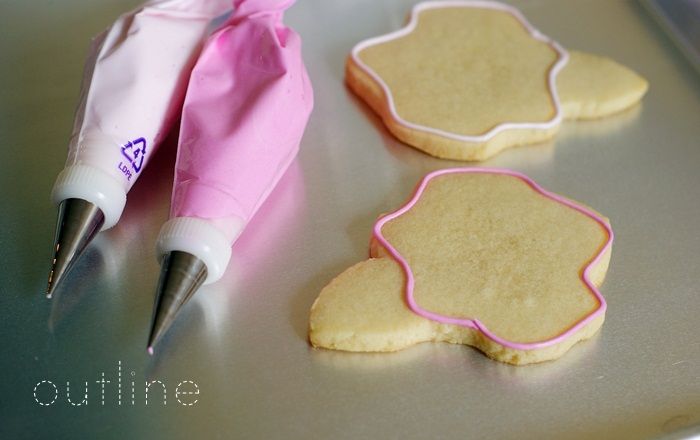
Outline the cookies in pink using a #4 plain tip.  Since we're filling with dark colors, let the outline sit for 30 minutes to an hour before filling to prevent bleeding.

Thin the remaining icings with water, a bit at a time, stirring with a silicone spatula, until it is the consistency of a thick syrup.  You'll want to drop a "ribbon" of icing back into the bowl and have it disappear in a count of "one thousand one, one thousand two." Four is too thick, one is too thin.  Count of 2-3 is good.  Cover with a damp dishcloth and let sit for several minutes.

Stir gently with a silicone spatula to pop and large air bubbles that have formed.  Pour into squeeze bottles.

color challenge: bright pink cookies for fall :: bake at 350 blog
Fill in the outlines with the thinned icing. Use a toothpick to guide to edges and pop large air bubbles.

Let the cookies dry uncovered 6-8 hours, or overnight.
color challenge: bright pink cookies for fall :: bake at 350 blog

color challenge: bright pink cookies for fall :: bake at 350 blog
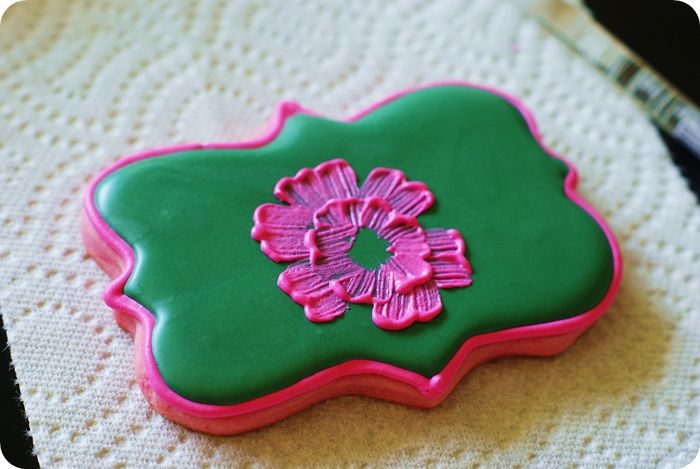
Once the icing is completely dry, use a #2 tip to pipe squiggly lines as an outer layer of petals in pink.

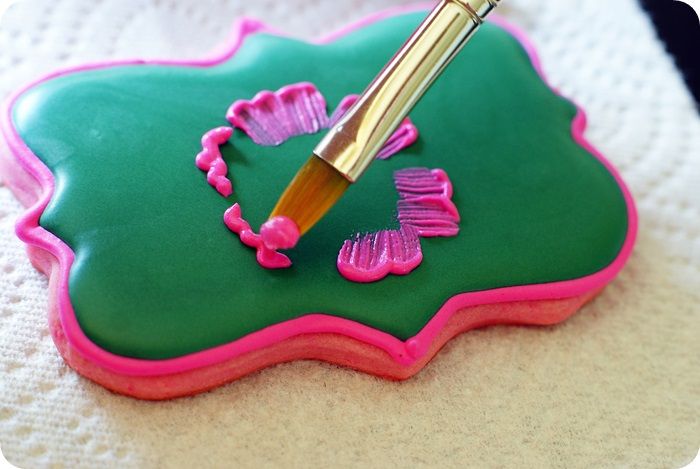
Dampen the brush with water, then blot very well on a paper towel.  Place the brush right into the icing and pull towards the center.

Make another layer,
bright pink cookies for fall, tutorial :: bake at 350 blog

and then another...
bright pink cookies for fall, tutorial ::: bake at 350 blog

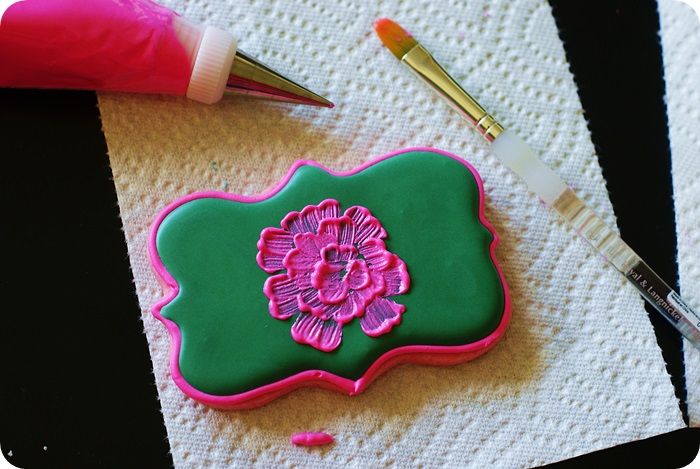
In the center, pipe some dots for the flower center using a #1 tip.

Make some flowers in the center of the cookies, and some off the sides...I like both. 

color challenge: bright pink cookies for fall ::: bake at 350 blog
What do you think about bright pink for fall? 

Image Map
Now.  Go check out the other lovely ladies and their Bright Pink posts!  Seriously.  Go! ;)


Welcome to the first installment of the Color Challenge!!! 

Color Challenge ::: 7 bloggers, one color, endless creativity!

Spearheaded by the uber-fabulous, uber-cool Mandi, of Vintage Revivals, seven bloggers from different niches (fashion, beauty, home, organizing, DIY, parenting...you get the idea) are incorporating a certain color into their "medium."

Today's challenge color: BRIGHT PINK!!! 
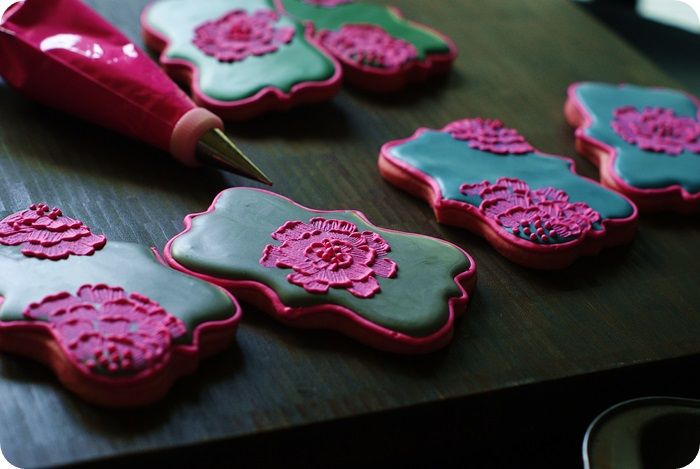
color challenge: bright pink cookies for fall :: bake at 350 blog
My mind immediately went to summery and bright cookies, but since we're heading into fall, I wanted to bring in those deep, rich tones that really make pink POP!

color challenge: bright pink cookies for fall :: bake at 350 blog
The cookie design itself is simple; I know, it looks fancy.  The technique is called brush embroidery.  I waited years before trying it because I can't sew and the word "embroidery" scared me.  Trust me, this is a perfect cookie for beginners!  (Sewing skills not required.)

color challenge: bright pink cookies for fall :: bake at 350 blog
You could make the design on any shape cookie...square, round, hearts. I chose this awesome plaque cookie cutter from Copper Gifts.

Adding a little black food coloring to the green and navy icing adds a bit of depth and darkness. Add it a bit at a time to avoid turning the icing totally black.  I use a toothpick to dip into the food coloring and then into the icing.

To tint the cookie dough, add in pink gel paste food coloring along with the eggs in the cookie recipe.  Once the flour is added, if the dough needs more color, knead it in by hand.  Don't worry, the pink will wash off of your hands.

To make these Bright Pink brush embroidery cookies, you'll need:
color challenge: bright pink cookies for fall :: bake at 350 blog
Outline the cookies in pink using a #4 plain tip.  Since we're filling with dark colors, let the outline sit for 30 minutes to an hour before filling to prevent bleeding.

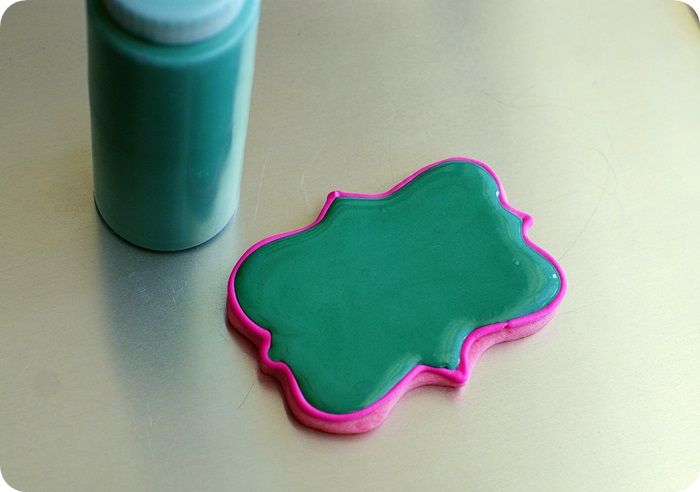
Thin the remaining icings with water, a bit at a time, stirring with a silicone spatula, until it is the consistency of a thick syrup.  You'll want to drop a "ribbon" of icing back into the bowl and have it disappear in a count of "one thousand one, one thousand two." Four is too thick, one is too thin.  Count of 2-3 is good.  Cover with a damp dishcloth and let sit for several minutes.

Stir gently with a silicone spatula to pop and large air bubbles that have formed.  Pour into squeeze bottles.
color challenge: bright pink cookies for fall :: bake at 350 blog
Fill in the outlines with the thinned icing. Use a toothpick to guide to edges and pop large air bubbles.

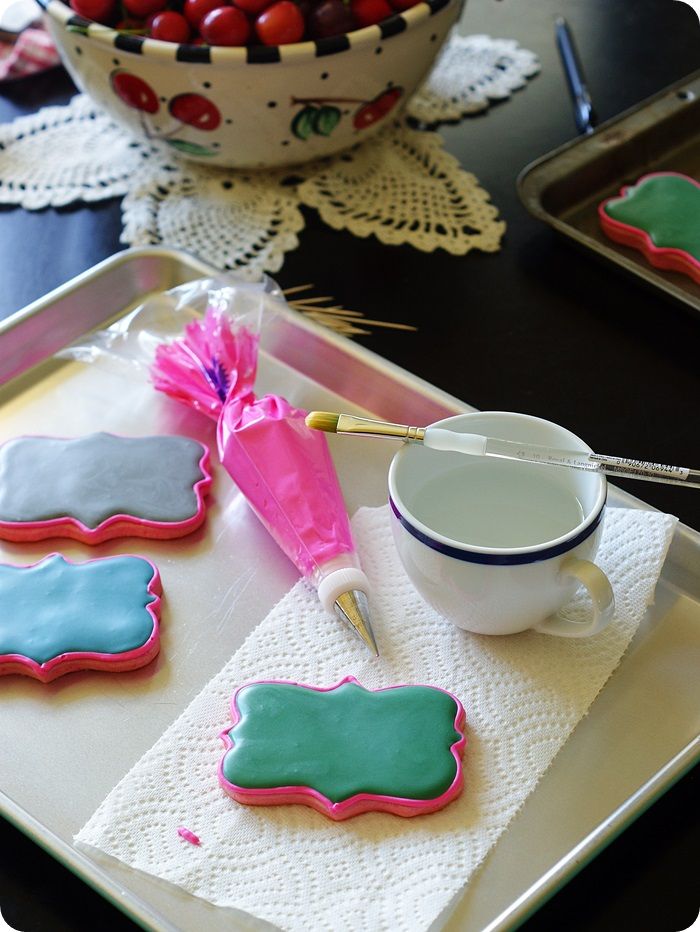
Let the cookies dry uncovered 6-8 hours, or overnight.
color challenge: bright pink cookies for fall :: bake at 350 blog

color challenge: bright pink cookies for fall :: bake at 350 blog
Once the icing is completely dry, use a #2 tip to pipe squiggly lines as an outer layer of petals in pink.

Dampen the brush with water, then blot very well on a paper towel.  Place the brush right into the icing and pull towards the center.

Make another layer,
bright pink cookies for fall, tutorial :: bake at 350 blog

and then another...
bright pink cookies for fall, tutorial ::: bake at 350 blog

In the center, pipe some dots for the flower center using a #1 tip.

Make some flowers in the center of the cookies, and some off the sides...I like both. 
color challenge: bright pink cookies for fall ::: bake at 350 blog
What do you think about bright pink for fall? 

Image Map
Now.  Go check out the other lovely ladies and their Bright Pink posts!  Seriously.  Go! ;)


reade more... Résuméabuiyad

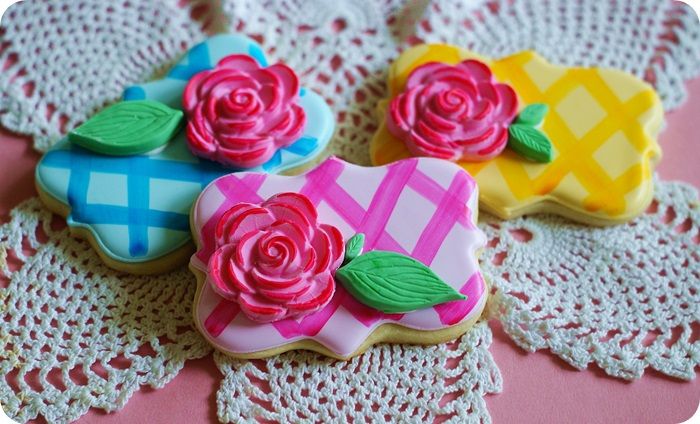
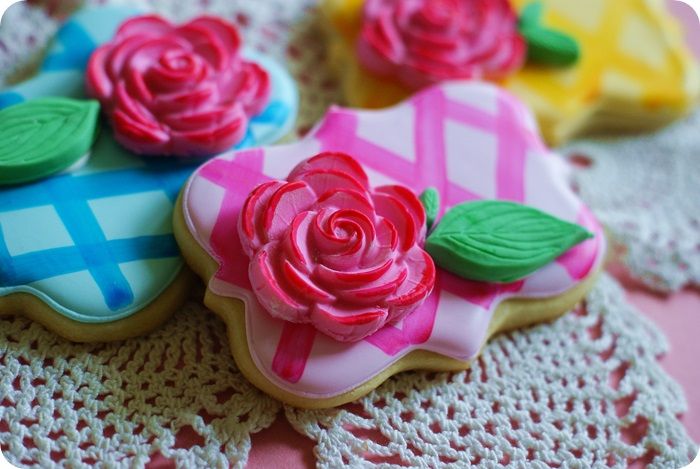
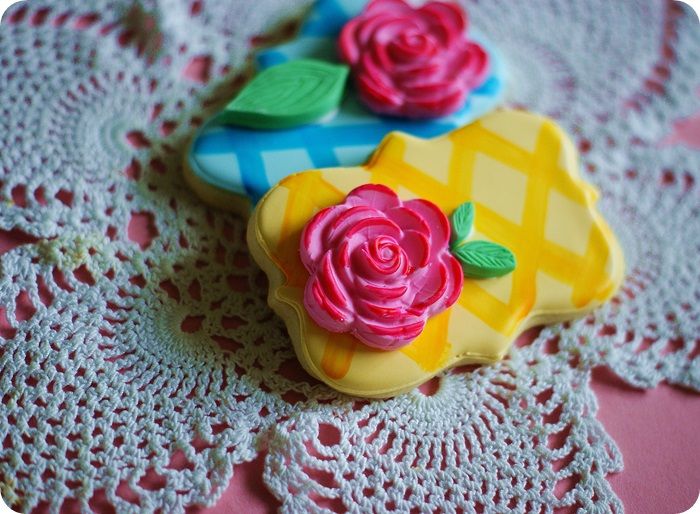
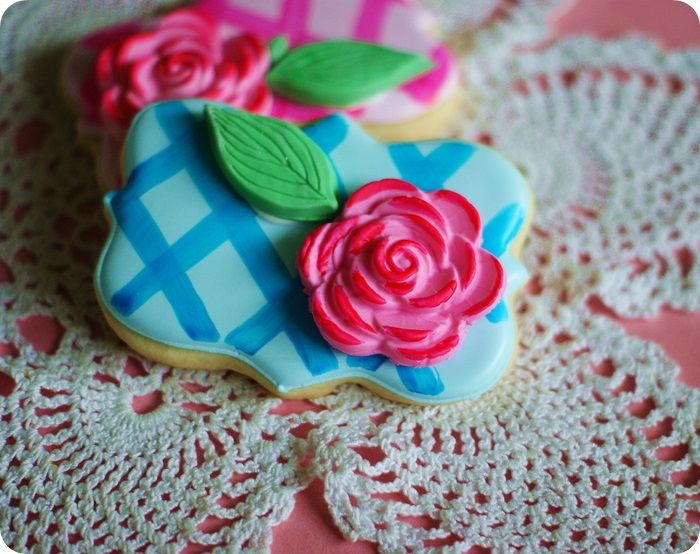
Everything's Coming Up Rosie

rosie cookies tutorial ::: bake at 350 blog
These cookies have been almost 5 months in the making.  OK...not in the *actual* making, but in the mental making.  You see, my sister had a little girl in April (this is her 4th baby...the first 3, boys).
Her name is Rosie. ♥ 

rosie cookies tutorial ::: bake at 350 blog
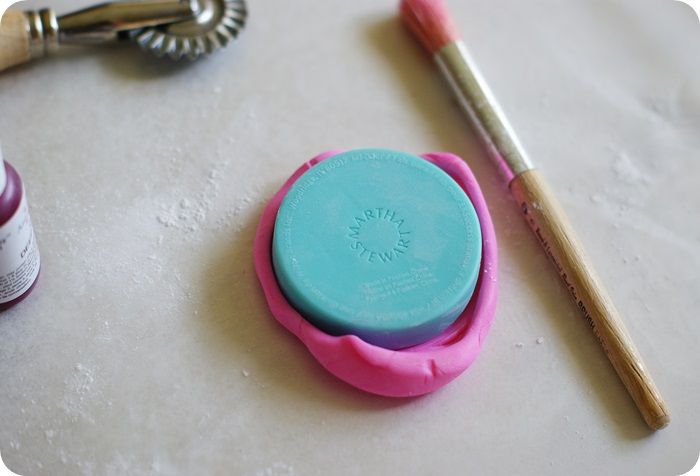
Thinking about cookies for Rosie, I knew I wanted to do roses (was that obvious?), so months ago, I bought some silicone rose molds by Martha Stewart.  Ah, Martha.

{Now, these are made for clay, but I used them with fondant.  Silicone is used for all kinds of cooking applications...and I can't find anything about specific "food-grade" silicone, but found this, "as a low-taint, non-toxic material, silicone can be used where contact with food is required."  And, the fondant is touching the silicone for about 2 seconds.  In other words, I think it's ok.}

Alright, disclaimer over.

rosie cookies tutorial ::: bake at 350 blog
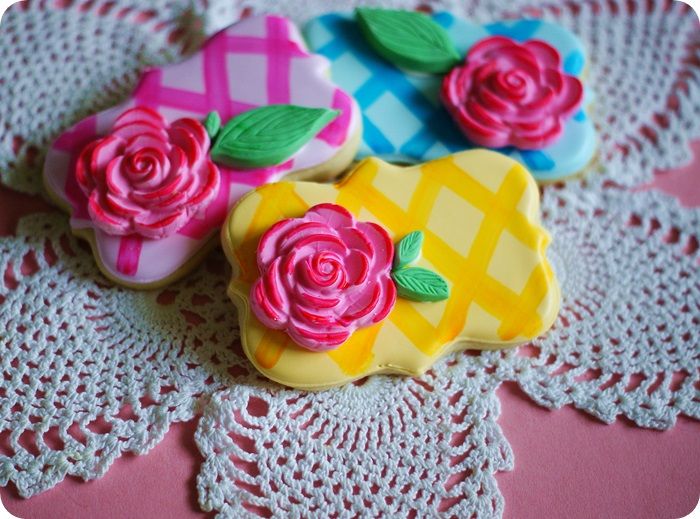
Ever since Rosie was born, my sister Molly and I have been debating the big issues.  Like, do we think pink roses are prettier on a blue or yellow background?  I still don't know.  

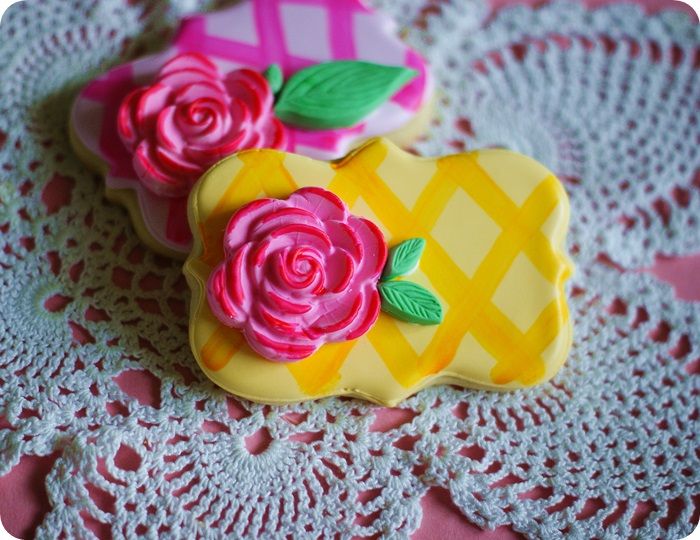
Originally, I thought the background for the cookies would be gingham, but (a.) painting diagonals is not one of my gifts, and (b.) they ended up looking more like lattice...which I liked.  They remind me of vintage lattice work.  I should just say I planned it that way. ;)
rosie cookies tutorial ::: bake at 350 blog

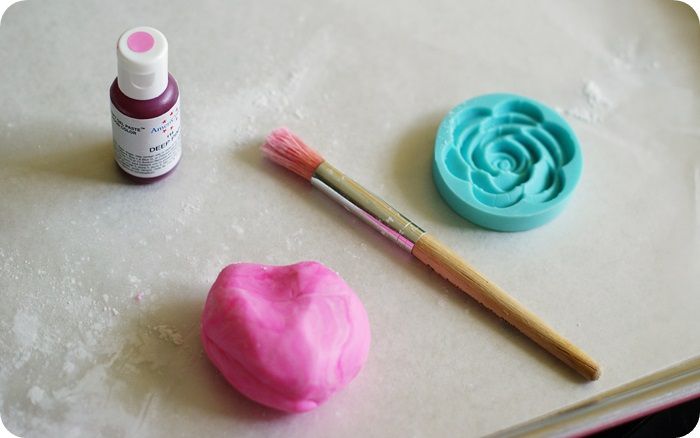
To make these Rosie cookies, you'll need:

rosie cookies tutorial ::: bake at 350 blog
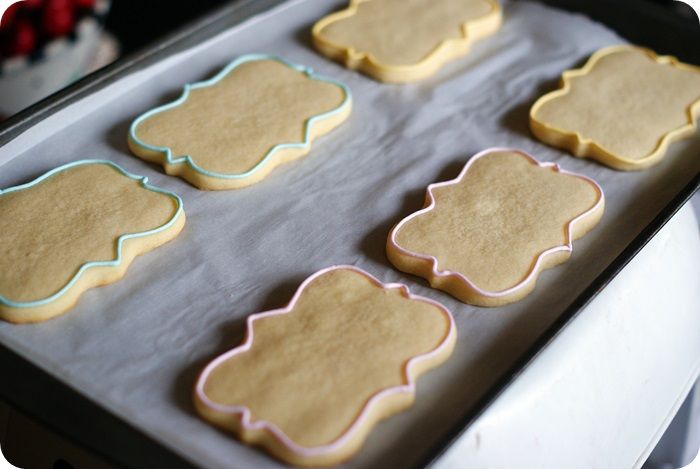
Use a #2 tip to outline the cookies in yellow, pink, and blue

Thin the icings with water, a bit at a time, stirring with a silicone spatula, until it is the consistency of a thick syrup.  (Reserve some of the white icing for piping details later.) You'll want to drop a "ribbon" of icing back into the bowl and have it disappear in a count of "one thousand one, one thousand two." Four is too thick, one is too thin.  Count of 2-3 is good.  Cover with a damp dishcloth and let sit for several minutes.

Stir gently with a silicone spatula to pop and large air bubbles that have formed.  Pour into squeeze bottles.

rosie cookies tutorial ::: bake at 350 blog
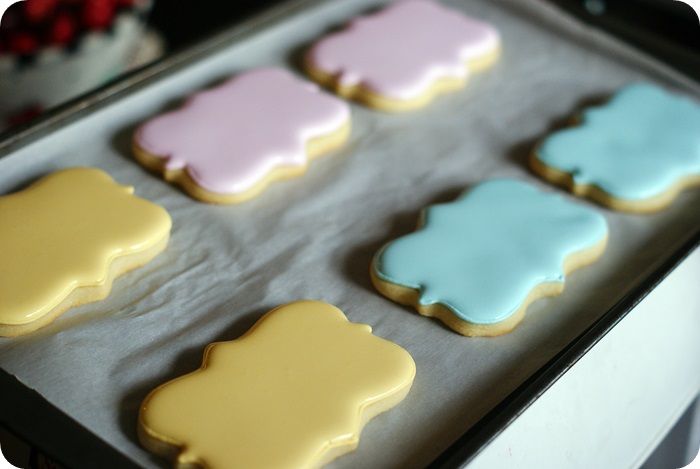
Fill in the outlines with the thinned icing, using a toothpick to guide to the edges and to pop large air bubbles.

Let the cookies dry, uncovered, 6-8 hours or overnight.

While the cookies are drying, make the roses. 

rosie cookies tutorial ::: bake at 350 blog
Dust the insides of the molds with cornstarch.

rosie cookies tutorial ::: bake at 350 blog
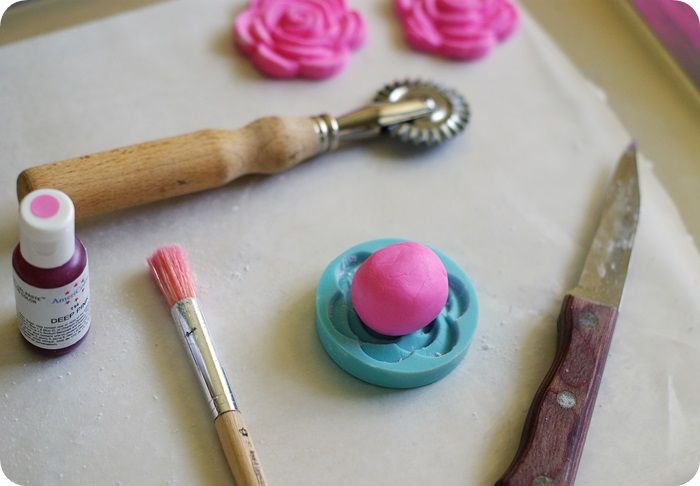
Press the tinted fondant into the mold (it helps to dust your hands with cornstarch, too).  Roll over the back of the mold with a small rolling pin.  I used the handle of a pastry cutter.

rosie cookies tutorial ::: bake at 350 blog
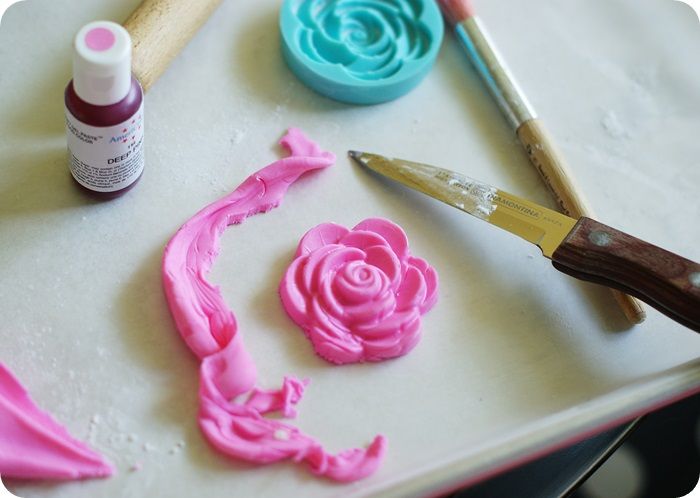
Flip the mold over and gently pry it off of the fondant.

rosie cookies tutorial ::: bake at 350 blog
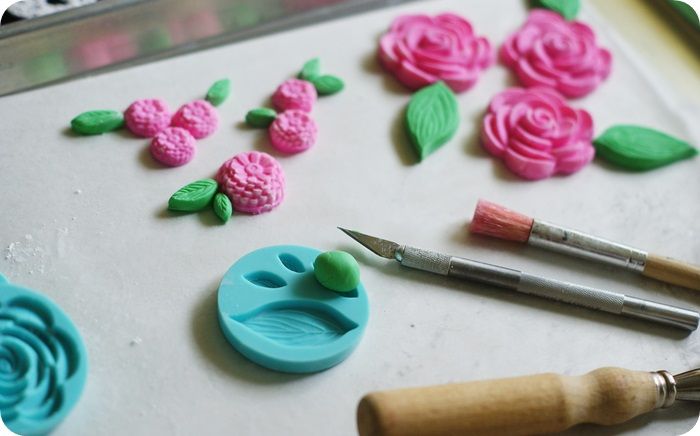
Use a paring knife (I eventually started using an X-acto knife) to cut away the excess.

rosie cookies tutorial ::: bake at 350 blog
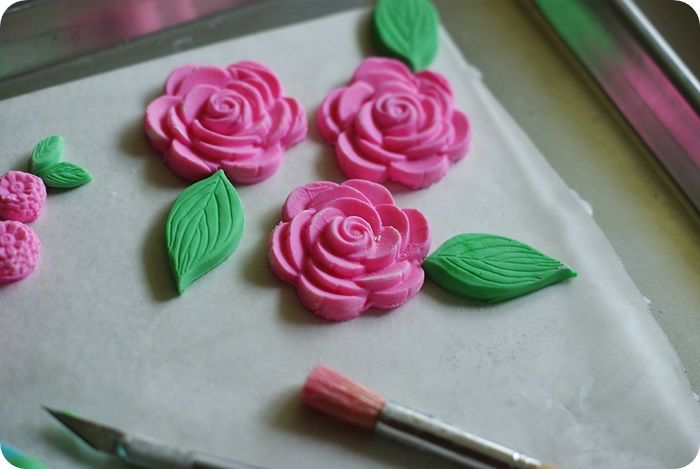
Make some leaves, too.

rosie cookies tutorial ::: bake at 350 blog
{I couldn't stop staring at them.}

The next day, add the lattice or gingham to the dried icing. (If you want to see REAL gingham on cookies, check out Glorious Treats.)

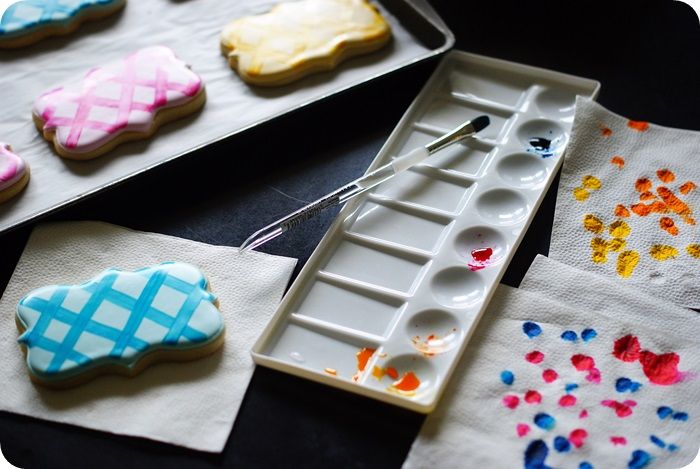
Mix equal parts food coloring and water.  Dip a flat paintbrush into the mixture, then blot off the excess.  I used a different yellow for the painting than I did for the icing.  The egg yellow as a paint was reading too "school bus."  I switched it up for Lemon Yellow.  (You can see the difference on those napkins in the picture.)
rosie cookies tutorial ::: bake at 350 blog
Paint on diagonal lines (hopefully better than I did).

Use a small paintbrush and paint along the edges of the fondant roses with the pink "paint" to add some dimension.

rosie cookies tutorial ::: bake at 350 blog
Use royal icing to attach the roses and leaves to the cookies.

I know, it seems like a lot of steps, but honestly, they're pretty easy.  As a matter of fact, I want to stick those roses onto every cookie I make from this point forward.

rosie cookies tutorial ::: bake at 350 blog
Rosie....we're so happy you are here!!!  
Thanks for bringing roses, hair bows, ruffles, tutus, and PINK into our lives! ♥


Online Cake Decorating Class
rosie cookies tutorial ::: bake at 350 blog
These cookies have been almost 5 months in the making.  OK...not in the *actual* making, but in the mental making.  You see, my sister had a little girl in April (this is her 4th baby...the first 3, boys).
Her name is Rosie. ♥ 

rosie cookies tutorial ::: bake at 350 blog
Thinking about cookies for Rosie, I knew I wanted to do roses (was that obvious?), so months ago, I bought some silicone rose molds by Martha Stewart.  Ah, Martha.

{Now, these are made for clay, but I used them with fondant.  Silicone is used for all kinds of cooking applications...and I can't find anything about specific "food-grade" silicone, but found this, "as a low-taint, non-toxic material, silicone can be used where contact with food is required."  And, the fondant is touching the silicone for about 2 seconds.  In other words, I think it's ok.}

Alright, disclaimer over.

rosie cookies tutorial ::: bake at 350 blog
Ever since Rosie was born, my sister Molly and I have been debating the big issues.  Like, do we think pink roses are prettier on a blue or yellow background?  I still don't know.  

Originally, I thought the background for the cookies would be gingham, but (a.) painting diagonals is not one of my gifts, and (b.) they ended up looking more like lattice...which I liked.  They remind me of vintage lattice work.  I should just say I planned it that way. ;)
rosie cookies tutorial ::: bake at 350 blog

To make these Rosie cookies, you'll need:

rosie cookies tutorial ::: bake at 350 blog
Use a #2 tip to outline the cookies in yellow, pink, and blue

Thin the icings with water, a bit at a time, stirring with a silicone spatula, until it is the consistency of a thick syrup.  (Reserve some of the white icing for piping details later.) You'll want to drop a "ribbon" of icing back into the bowl and have it disappear in a count of "one thousand one, one thousand two." Four is too thick, one is too thin.  Count of 2-3 is good.  Cover with a damp dishcloth and let sit for several minutes.
Stir gently with a silicone spatula to pop and large air bubbles that have formed.  Pour into squeeze bottles.

rosie cookies tutorial ::: bake at 350 blog
Fill in the outlines with the thinned icing, using a toothpick to guide to the edges and to pop large air bubbles.

Let the cookies dry, uncovered, 6-8 hours or overnight.

While the cookies are drying, make the roses. 

rosie cookies tutorial ::: bake at 350 blog
Dust the insides of the molds with cornstarch.

rosie cookies tutorial ::: bake at 350 blog
Press the tinted fondant into the mold (it helps to dust your hands with cornstarch, too).  Roll over the back of the mold with a small rolling pin.  I used the handle of a pastry cutter.

rosie cookies tutorial ::: bake at 350 blog
Flip the mold over and gently pry it off of the fondant.

rosie cookies tutorial ::: bake at 350 blog
Use a paring knife (I eventually started using an X-acto knife) to cut away the excess.

rosie cookies tutorial ::: bake at 350 blog
Make some leaves, too.

rosie cookies tutorial ::: bake at 350 blog
{I couldn't stop staring at them.}

The next day, add the lattice or gingham to the dried icing. (If you want to see REAL gingham on cookies, check out Glorious Treats.)

Mix equal parts food coloring and water.  Dip a flat paintbrush into the mixture, then blot off the excess.  I used a different yellow for the painting than I did for the icing.  The egg yellow as a paint was reading too "school bus."  I switched it up for Lemon Yellow.  (You can see the difference on those napkins in the picture.)
rosie cookies tutorial ::: bake at 350 blog
Paint on diagonal lines (hopefully better than I did).

Use a small paintbrush and paint along the edges of the fondant roses with the pink "paint" to add some dimension.

rosie cookies tutorial ::: bake at 350 blog
Use royal icing to attach the roses and leaves to the cookies.

I know, it seems like a lot of steps, but honestly, they're pretty easy.  As a matter of fact, I want to stick those roses onto every cookie I make from this point forward.

rosie cookies tutorial ::: bake at 350 blog
Rosie....we're so happy you are here!!!  
Thanks for bringing roses, hair bows, ruffles, tutus, and PINK into our lives! ♥


Online Cake Decorating Class
reade more... Résuméabuiyad

Brusha, brusha, brusha: Brush Embroidery Cookie Tutorial

First, for all of you who thought immediately of Jan in Grease when you read that post title, I love you.
Here's a clip.
brush embroidery cookie tutorial ::: bake at 350 blog
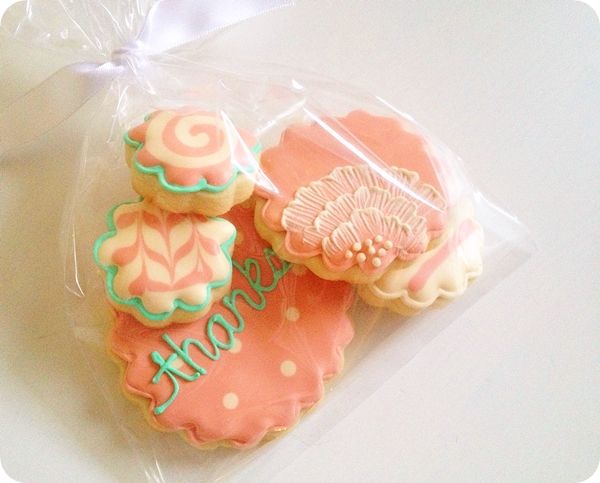
{Brush embroidery cookies look so romantic, almost like they belong in Victoria Magazine.}

Over the last couple of weeks, my dining room and kitchen tables have been covered in cookies.  Pint glasses filled with piping bags have collected on the kitchen counter.  We were eating a lot of take-out...and ice cream. (That has absolutely nothing to do with cookie decorating, but it happened.)

This is how things typically run at the end of a school year.  I even tried the ol', "I bet your teachers would like gift cards instead of cookies this year."  Kiddo was having none of it.
brush embroidery cookie tutorial ::: bake at 350 blog
So, in my mad rush to make and package cookies, I neglected to photograph any tutorials.  I popped a quick picture onto Instagram and, well, the masses spoke.  OK...3 people spoke, but I decided to take some quick how-to pics.

Here's what you need to know about brush embroidery: IT'S SUPER DUPER EASY!!!  I think the first time I ever saw it was a Ali Bee's beautiful blog.  I used a method almost exactly like hers except, I used a damp brush.

brush embroidery cookie tutorial ::: bake at 350 blog
To make brush embroidery cookies, you'll need:
  • sugar cookies that have been outlined and filled with royal icing, and have dried overnight (I used a mix of AmeriColor Dusty Rose + Lemon Yellow for the base color.)
  • royal icing for the embroidery, I used AmeriColor Ivory (piping consistency) 
  • disposable icing bag
  • coupler and tip (#2)
  • clean, flat paintbrush
  • cup of water
  • paper towels
{Please note that I had already decorated all of the cookies BEFORE taking pictures for this tutorial. I scraped all of the brush embroidery off of one cookie to show you. Hence, the weird finish on the base.}
brush embroidery cookie tutorial ::: bake at 350 blog
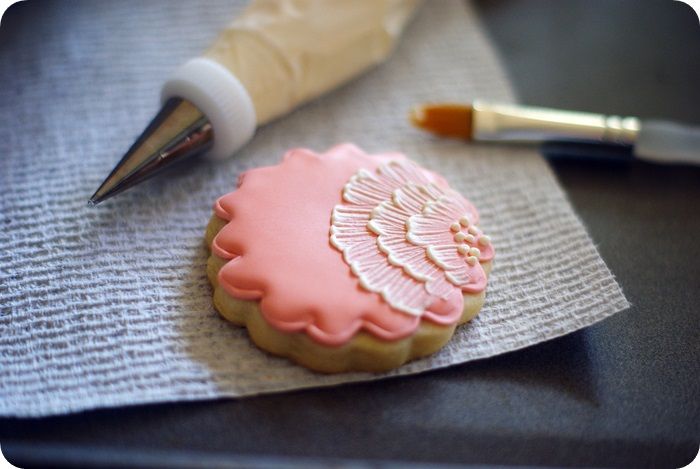
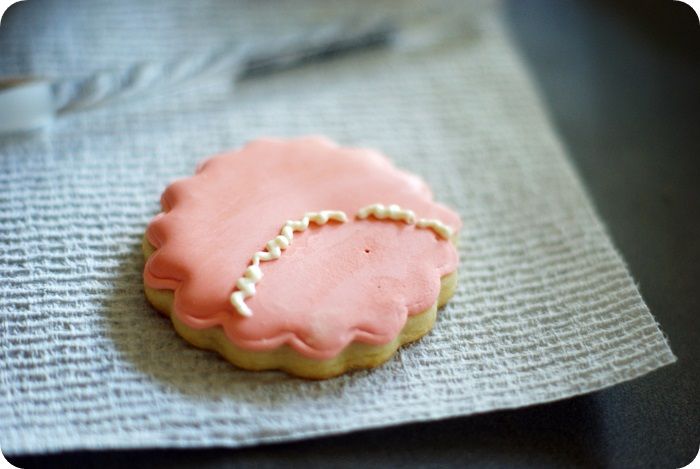
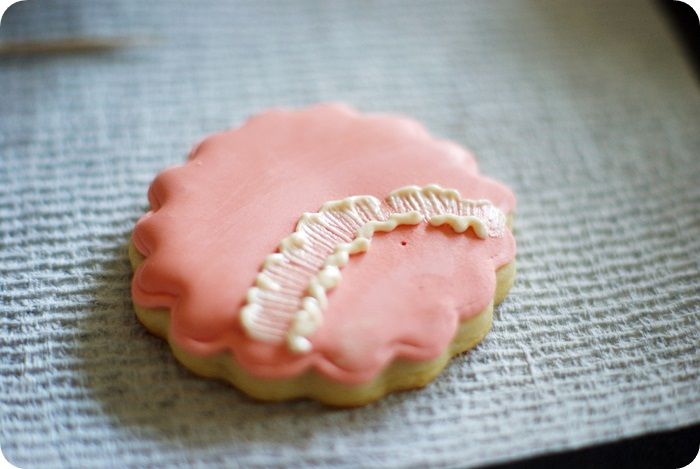
Use a #2 tip to pipe squiggly lines as an outer layer of petals.

brush embroidery cookie tutorial ::: bake at 350 blog
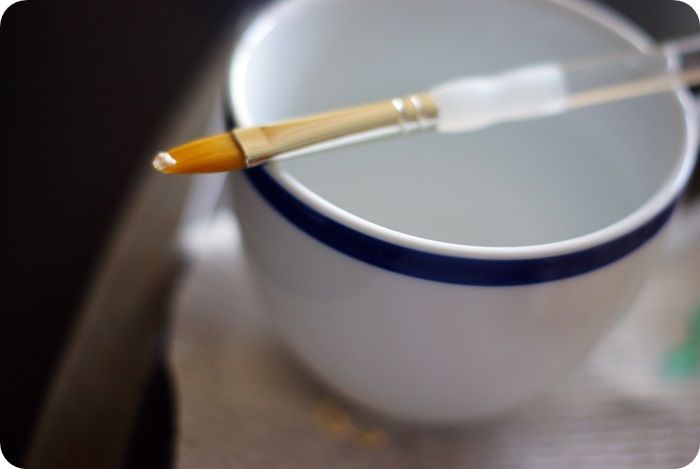
Dampen the brush with water, then blot very well on a paper towel.  Place the brush right into the icing and pull towards the center.

brush embroidery cookie tutorial ::: bake at 350 blog
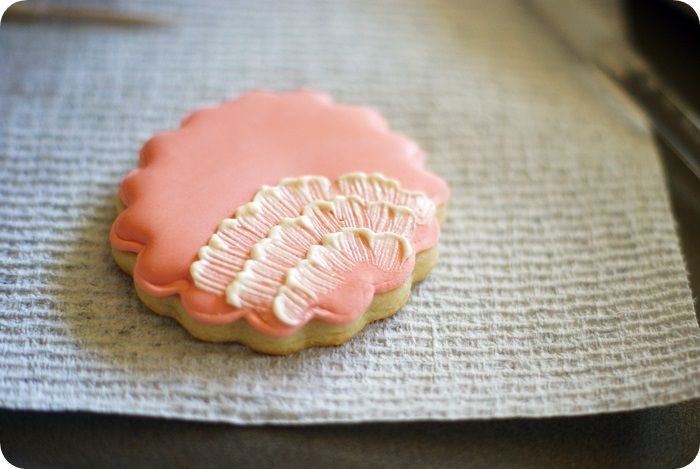
Make another layer,

brush embroidery cookie tutorial ::: bake at 350 blog
and then another.

brush embroidery cookie tutorial ::: bake at 350 blog
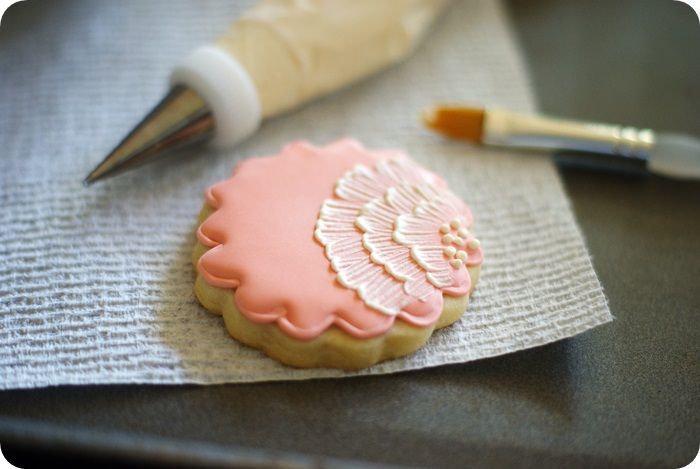
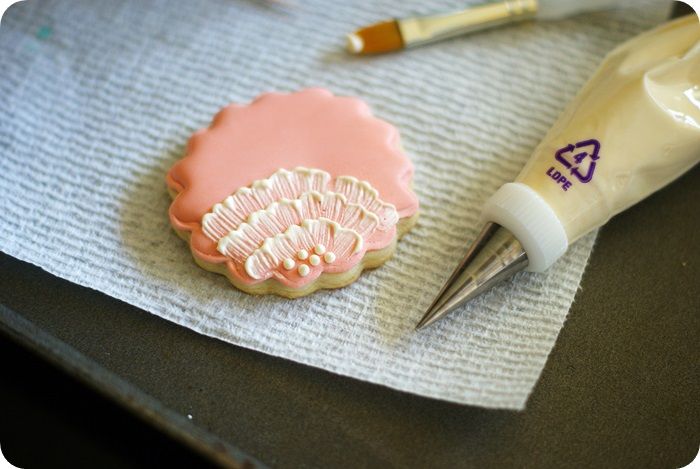
In the center, pipe some dots for the flower center.

Done.  See?  EASY!

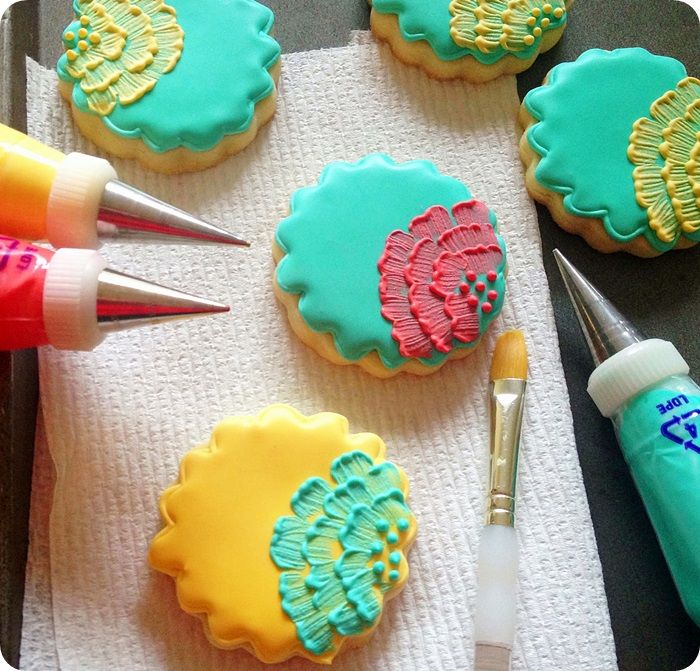
And, who says brush embroidery has to be soft and pastel?
brush embroidery cookie tutorial ::: bake at 350 blog

Who wants to try it?!?

{Some of the links above are Amazon Associates links.}


decorating cookies badge photo decoratingcookiesbadge-1.jpg
First, for all of you who thought immediately of Jan in Grease when you read that post title, I love you.
Here's a clip.
brush embroidery cookie tutorial ::: bake at 350 blog
{Brush embroidery cookies look so romantic, almost like they belong in Victoria Magazine.}

Over the last couple of weeks, my dining room and kitchen tables have been covered in cookies.  Pint glasses filled with piping bags have collected on the kitchen counter.  We were eating a lot of take-out...and ice cream. (That has absolutely nothing to do with cookie decorating, but it happened.)

This is how things typically run at the end of a school year.  I even tried the ol', "I bet your teachers would like gift cards instead of cookies this year."  Kiddo was having none of it.
brush embroidery cookie tutorial ::: bake at 350 blog
So, in my mad rush to make and package cookies, I neglected to photograph any tutorials.  I popped a quick picture onto Instagram and, well, the masses spoke.  OK...3 people spoke, but I decided to take some quick how-to pics.

Here's what you need to know about brush embroidery: IT'S SUPER DUPER EASY!!!  I think the first time I ever saw it was a Ali Bee's beautiful blog.  I used a method almost exactly like hers except, I used a damp brush.

brush embroidery cookie tutorial ::: bake at 350 blog
To make brush embroidery cookies, you'll need:
  • sugar cookies that have been outlined and filled with royal icing, and have dried overnight (I used a mix of AmeriColor Dusty Rose + Lemon Yellow for the base color.)
  • royal icing for the embroidery, I used AmeriColor Ivory (piping consistency) 
  • disposable icing bag
  • coupler and tip (#2)
  • clean, flat paintbrush
  • cup of water
  • paper towels
{Please note that I had already decorated all of the cookies BEFORE taking pictures for this tutorial. I scraped all of the brush embroidery off of one cookie to show you. Hence, the weird finish on the base.}
brush embroidery cookie tutorial ::: bake at 350 blog
Use a #2 tip to pipe squiggly lines as an outer layer of petals.

brush embroidery cookie tutorial ::: bake at 350 blog
Dampen the brush with water, then blot very well on a paper towel.  Place the brush right into the icing and pull towards the center.

brush embroidery cookie tutorial ::: bake at 350 blog
Make another layer,

brush embroidery cookie tutorial ::: bake at 350 blog
and then another.

brush embroidery cookie tutorial ::: bake at 350 blog
In the center, pipe some dots for the flower center.

Done.  See?  EASY!

And, who says brush embroidery has to be soft and pastel?
brush embroidery cookie tutorial ::: bake at 350 blog

Who wants to try it?!?

{Some of the links above are Amazon Associates links.}


decorating cookies badge photo decoratingcookiesbadge-1.jpg
reade more... Résuméabuiyad

Martha, Martha, Martha...

Martha 3 tiered cookie mag photo martha3tieredcookiemag.jpg
I am one of those people who can recall at least one dream per night.  Normally, they are very stressful: being chased and not being able to run, flying in planes that are dangerously close to the ground (usually in Russia), being pushed off the side of a mountain, getting married without makeup...it's no wonder I wake up so refreshed.  Not.

Martha 3 tiered cookie left photo martha3tieredcookieleft.jpg
Every so often, though, I have one of my recurring dreams that are actually pleasant.  I kid you not, I dream that I am friends with Martha Stewart.  We chat, we get ready for dinner parties, we take boat rides...and in my most recent Martha dream, we went to Macy's for an Ina book signing.
Apparently in my subconscious, Martha & me = BFF. ♥

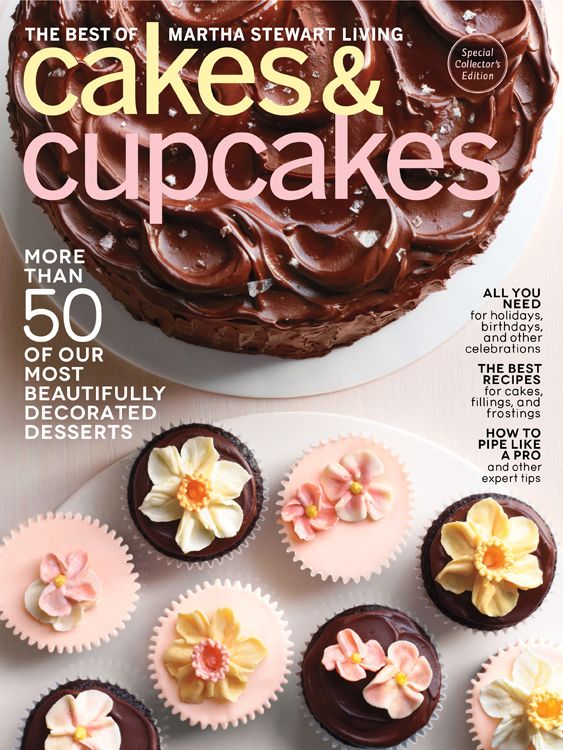
I'm pretty sure my next dream about Martha will involve this publication: The Best of Martha Stewart Living  Cakes & Cupcakes.
Martha cakes and cupcakes photo cakesandcupcakescovermartha.jpg

Maybe you've seen it on your newsstand.  It's a special edition available through May 13th.
YOU NEED IT.

It is just absolutely gorgeous.  Every idea, every recipe, every photo...even the paper it's printed on.  Beautiful.

Martha 3-tiered cupcake photo martha3tiered.jpg
{photo credit: Martha's Cakes & Cupcakes, used with permission}
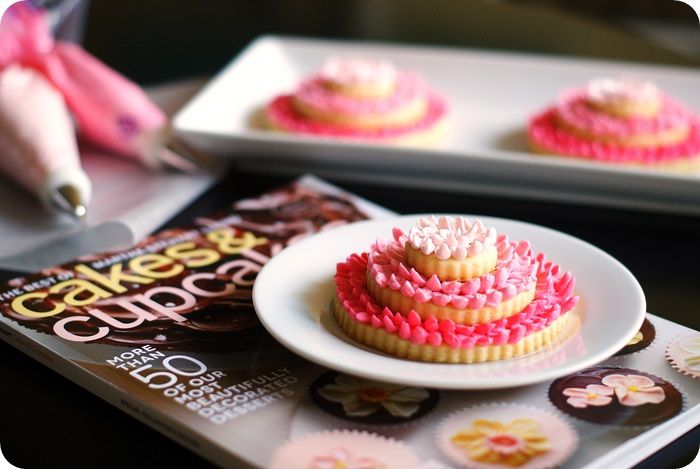
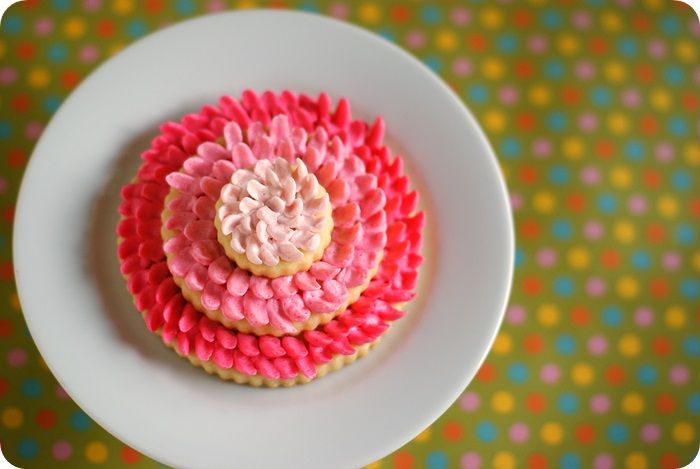
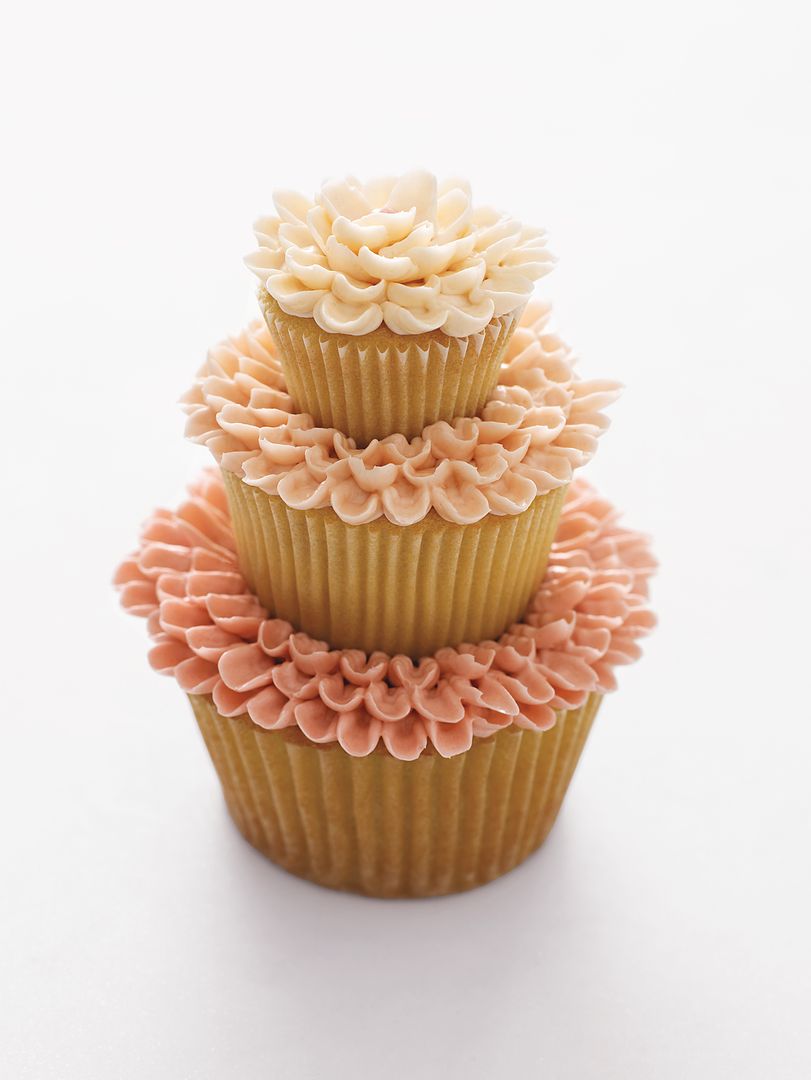
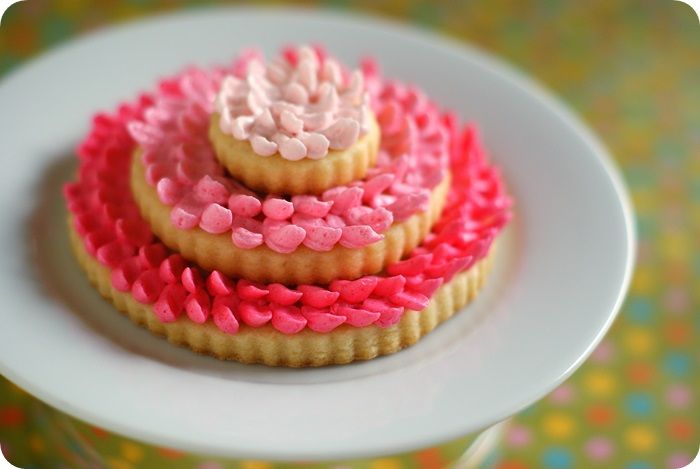
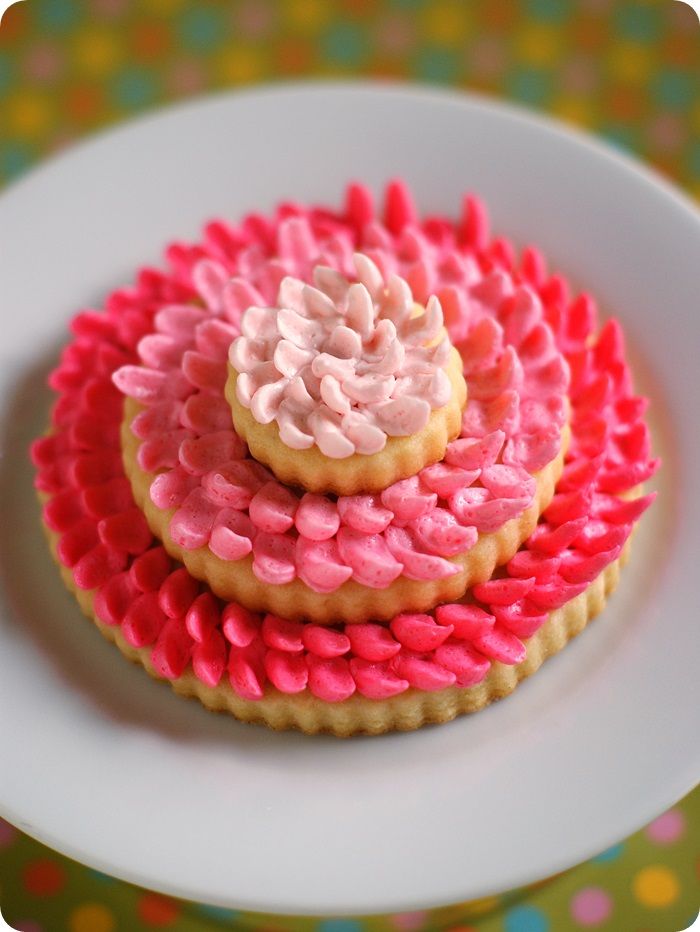
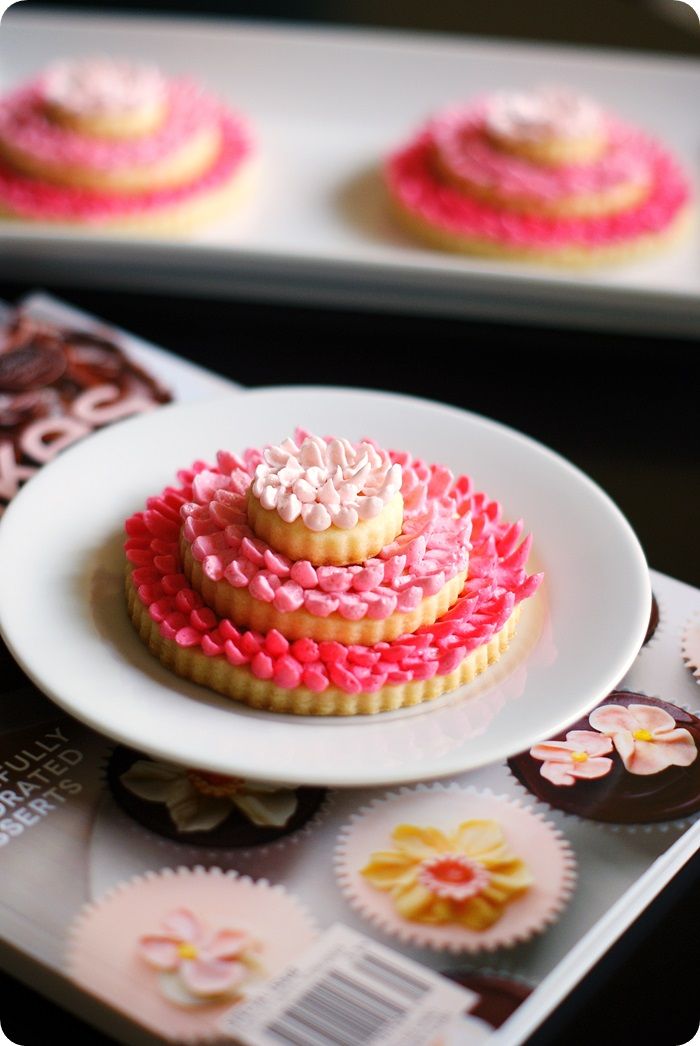
Martha's 3-tiered cupcakes are featured there...and they've always been a favorite of mine.  I decided to make a cookie version.

Martha 3 tiered cookie side photo martha3tieredcookieside.jpg
I used my go-to cookie recipe...and Martha's Swiss Meringue Buttercream.  I have to say, the buttercream on those cookies is glorious.  I keep intending to eat "one tier only" and end up eating the entire stack.  (It's for work, right?)

Bottom line?  Make these.  The cookies or Martha's original cupcakes.  They are just too cute.  Also, run out and pick up a copy of Martha's Cakes and Cupcakes.  Maybe *you'll* dream about Martha, too. ;)

Triple-Tier Flower Cakes 
(from The Best of Martha Stewart Living  Cakes & Cupcakes, used with permission) 
Makes 12 tiered cupcakes (12 of each cupcake size); or makes 15 large, 33 standard, or 108 mini

Ingredients:
3 1/4 cups all-purpose flour
2 1/2 cups sugar
1 1/2 teaspoons baking soda
1 teaspoon baking powder
1 1/2 teaspoons salt
2 large eggs plus 1 large yolk
1 1/4 cups warm water
1 1/4 cups buttermilk
1/2 cup plus 2 tablespoons vegetable oil
1 tablespoon pure vanilla extract

Directions:
Preheat oven to 350 degrees. Line muffin tins with paper liners. In a mixer bowl, sift flour, sugar, baking soda, baking powder, and salt. Add eggs, yolk, water, buttermilk, vegetable oil, and vanilla; beat together.

Divide batter among liners, filling about 2/3 full. Bake until deep golden brown, about 30 minutes for large, 25 minutes for standard, and 22 minutes for mini. Transfer tins to rack to cool for about 15 minutes. Remove from tins; let cool completely.

To assemble: Divide buttercream in thirds (3 cups for bottom tiers, 2 for middle, and 1 for top); color each in a different pink. Using a dab of buttercream between layers as "glue," stack the cupcakes. Using a U-shaped petal tip (such as Ateco No. 80), pipe petals around outside of each layer, and continue inward.

Swiss Meringue Buttercream
Makes 6 cups

Ingredients
1 1/4 cups sugar
5 large egg whites
1 pound (4 sticks) unsalted butter, cut into tablespoons, room temperature
1 teaspoon pure vanilla extract
Pink gel-paste food coloring
Directions
  1. Combine sugar and egg whites in mixer bowl, and set over a pan of simmering water. Whisk constantly until sugar is dissolved and mixture registers 140 degrees on an instant-read thermometer.
  2. Transfer bowl to mixer; whisk on medium-high speed until whites are fluffy and cooled, about 10 minutes. Continue to whisk until stiff, glossy peaks form.
  3. Reduce speed to medium-low; add butter by the tablespoon, whisking well after each addition. Whisk in vanilla. Buttercream can be refrigerated in an airtight container up to 3 days or frozen up to 1 month. Bring to room temperature before using; beat on lowest speed until smooth, about 3 minutes.
Martha 3 tiered cookie top photo martha3tieredcookietop.jpg
For the cookies, I used:
  • 3/4 tsp. vanilla & 1/4 tsp. almond extract and used half salted/half unsalted butter in the frosting,
  • this cookie recipe,
  • scalloped circle cookie cutters: 1 & 1/4", 2 & 1/2", 3 & 1/2"
  • AmeriColor Soft Pink
  • #59s icing tip (Martha calls for a #80 and I didn't have one)
Martha 3 tiered cookie mag length photo martha3tieredcookiemaglength.jpg
    Martha 3 tiered cookie mag photo martha3tieredcookiemag.jpg
    I am one of those people who can recall at least one dream per night.  Normally, they are very stressful: being chased and not being able to run, flying in planes that are dangerously close to the ground (usually in Russia), being pushed off the side of a mountain, getting married without makeup...it's no wonder I wake up so refreshed.  Not.

    Martha 3 tiered cookie left photo martha3tieredcookieleft.jpg
    Every so often, though, I have one of my recurring dreams that are actually pleasant.  I kid you not, I dream that I am friends with Martha Stewart.  We chat, we get ready for dinner parties, we take boat rides...and in my most recent Martha dream, we went to Macy's for an Ina book signing.
    Apparently in my subconscious, Martha & me = BFF. ♥

    I'm pretty sure my next dream about Martha will involve this publication: The Best of Martha Stewart Living  Cakes & Cupcakes.
    Martha cakes and cupcakes photo cakesandcupcakescovermartha.jpg

    Maybe you've seen it on your newsstand.  It's a special edition available through May 13th.
    YOU NEED IT.

    It is just absolutely gorgeous.  Every idea, every recipe, every photo...even the paper it's printed on.  Beautiful.

    Martha 3-tiered cupcake photo martha3tiered.jpg
    {photo credit: Martha's Cakes & Cupcakes, used with permission}
    Martha's 3-tiered cupcakes are featured there...and they've always been a favorite of mine.  I decided to make a cookie version.

    Martha 3 tiered cookie side photo martha3tieredcookieside.jpg
    I used my go-to cookie recipe...and Martha's Swiss Meringue Buttercream.  I have to say, the buttercream on those cookies is glorious.  I keep intending to eat "one tier only" and end up eating the entire stack.  (It's for work, right?)

    Bottom line?  Make these.  The cookies or Martha's original cupcakes.  They are just too cute.  Also, run out and pick up a copy of Martha's Cakes and Cupcakes.  Maybe *you'll* dream about Martha, too. ;)

    Triple-Tier Flower Cakes 
    (from The Best of Martha Stewart Living  Cakes & Cupcakes, used with permission) 
    Makes 12 tiered cupcakes (12 of each cupcake size); or makes 15 large, 33 standard, or 108 mini

    Ingredients:
    3 1/4 cups all-purpose flour
    2 1/2 cups sugar
    1 1/2 teaspoons baking soda
    1 teaspoon baking powder
    1 1/2 teaspoons salt
    2 large eggs plus 1 large yolk
    1 1/4 cups warm water
    1 1/4 cups buttermilk
    1/2 cup plus 2 tablespoons vegetable oil
    1 tablespoon pure vanilla extract

    Directions:
    Preheat oven to 350 degrees. Line muffin tins with paper liners. In a mixer bowl, sift flour, sugar, baking soda, baking powder, and salt. Add eggs, yolk, water, buttermilk, vegetable oil, and vanilla; beat together.

    Divide batter among liners, filling about 2/3 full. Bake until deep golden brown, about 30 minutes for large, 25 minutes for standard, and 22 minutes for mini. Transfer tins to rack to cool for about 15 minutes. Remove from tins; let cool completely.

    To assemble: Divide buttercream in thirds (3 cups for bottom tiers, 2 for middle, and 1 for top); color each in a different pink. Using a dab of buttercream between layers as "glue," stack the cupcakes. Using a U-shaped petal tip (such as Ateco No. 80), pipe petals around outside of each layer, and continue inward.

    Swiss Meringue Buttercream
    Makes 6 cups

    Ingredients
    1 1/4 cups sugar
    5 large egg whites
    1 pound (4 sticks) unsalted butter, cut into tablespoons, room temperature
    1 teaspoon pure vanilla extract
    Pink gel-paste food coloring
    Directions
    1. Combine sugar and egg whites in mixer bowl, and set over a pan of simmering water. Whisk constantly until sugar is dissolved and mixture registers 140 degrees on an instant-read thermometer.
    2. Transfer bowl to mixer; whisk on medium-high speed until whites are fluffy and cooled, about 10 minutes. Continue to whisk until stiff, glossy peaks form.
    3. Reduce speed to medium-low; add butter by the tablespoon, whisking well after each addition. Whisk in vanilla. Buttercream can be refrigerated in an airtight container up to 3 days or frozen up to 1 month. Bring to room temperature before using; beat on lowest speed until smooth, about 3 minutes.
    Martha 3 tiered cookie top photo martha3tieredcookietop.jpg
    For the cookies, I used:
    • 3/4 tsp. vanilla & 1/4 tsp. almond extract and used half salted/half unsalted butter in the frosting,
    • this cookie recipe,
    • scalloped circle cookie cutters: 1 & 1/4", 2 & 1/2", 3 & 1/2"
    • AmeriColor Soft Pink
    • #59s icing tip (Martha calls for a #80 and I didn't have one)
    Martha 3 tiered cookie mag length photo martha3tieredcookiemaglength.jpg
      reade more... Résuméabuiyad

      Frosted Pink Roses

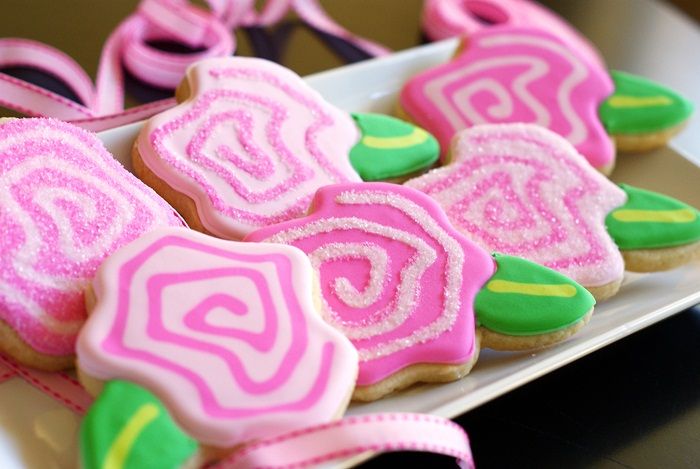
      Before we jump into red & green, can we have a shot of pink, please?
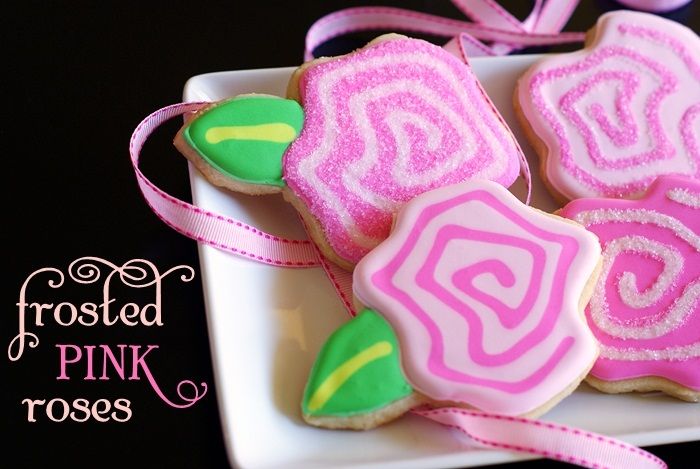
      I really wanted to call these Winter Roses, but I guess since it's still fall, I'll have to go with "frosted."  I love an open rose shape, but couldn't find a cutter to match, so years ago, I made a template.  Once you realize that making your own templates enables you to make ANY shape you'd like, the world is your oyster...cookie...whatever.

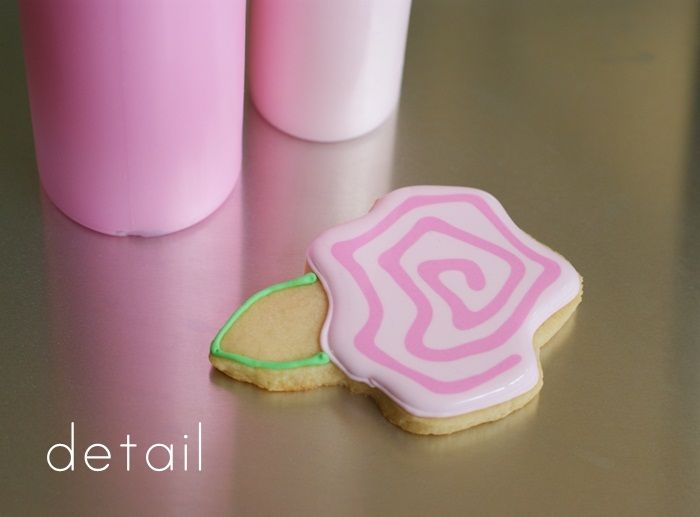
      If you've ever made a cookie with dots, or marbling, these are made using the same method...the swirl is adding on top of the wet flood icing.  But, if you'd prefer a raised outline instead for these flowers, here's an example.
      You might know that I'm usually torn as to whether to add sanding sugar or not....remember the "trees of indecision?"  These were no exception.

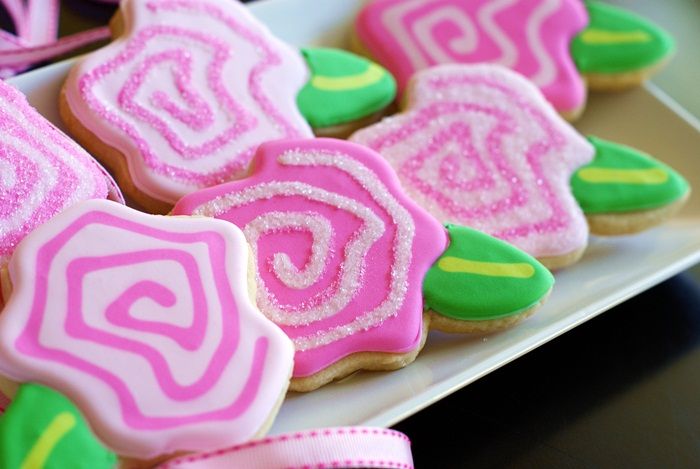
      In the end, I made some fully sanded, sanding on the swirl only, and not sanded at all.  And now you know why it takes me an hour and a half to pick out a lipstick...indecision.  I must work on this.


      OK...let's make Frosted Rose Cookies. You'll need:

      • sugar cookies made from a template
      • royal icing, divided and tinted with AmeriColor Deep Pink, Soft Pink, Leaf Green & Electric Green
      • disposable icing bags
      • couplers and tips: #2
      • squeeze bottles
      • small ramekin
      • small (clean) paintbrush
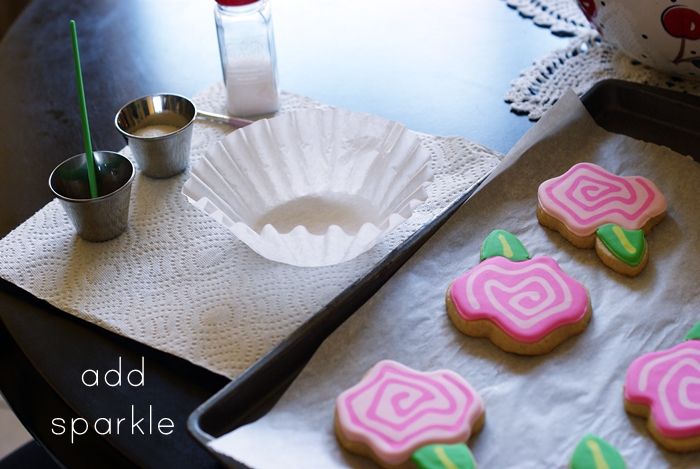
      • sanding sugar
      • meringue powder
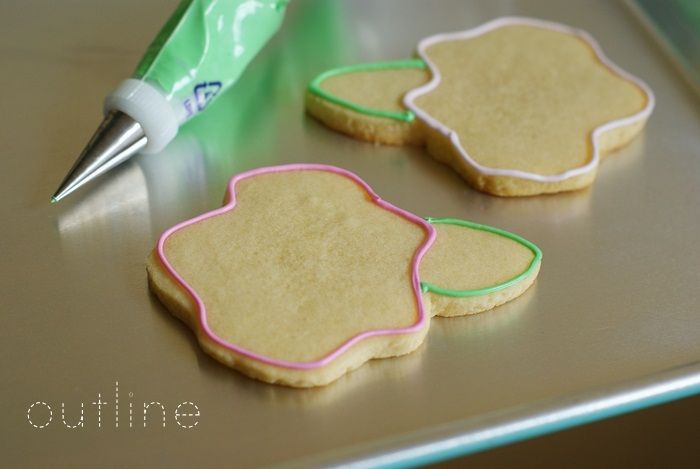
      Use a #2 tip to outline the cookie shape in pink icing.

      Use another #2 tip to outline the leaf in leaf green.

      Thin the pink icings with water, a bit at a time, stirring with a silicone spatula, until it is the consistency of a thick syrup.  You'll want to drop a "ribbon" of icing back into the bowl and have it disappear in a count of "one thousand one, one thousand two." Four is too thick, one is too thin.  Count of 2-3 is good.  Cover with a damp dishcloth and let sit for several minutes.

      Stir gently with a silicone spatula to pop and large air bubbles that have formed.  Pour into squeeze bottles.    

      Working 6-8 cookies at a time, fill in the outline with the thinned flood icing, using a toothpick to guide to the edges and to pop large air bubbles.

      Starting with the first cookie flooded, add the swirl in the contrasting color.

      Thin the green icings as described above.  Flood the leaf in the darker green, and add a lighter green stripe right down the center, just as adding the swirl.

      Let the cookies dry, uncovered, 6-8 hours, or overnight.

      The next day, apply the sanding sugar.  Mix 1/4 teaspoon meringue powder with 1/4 teaspoon water.  Brush onto the cookies wherever you'd like the sanding sugar to stick.  Over a basket-style coffee filter, shake the sanding sugar onto the cookie, and shake off the excess. (Use the filter like a funnel to pour back into the container.)

      Let dry 30 minutes before packaging.
      Alright...bring on the red & green. 
      Before we jump into red & green, can we have a shot of pink, please?
      I really wanted to call these Winter Roses, but I guess since it's still fall, I'll have to go with "frosted."  I love an open rose shape, but couldn't find a cutter to match, so years ago, I made a template.  Once you realize that making your own templates enables you to make ANY shape you'd like, the world is your oyster...cookie...whatever.

      If you've ever made a cookie with dots, or marbling, these are made using the same method...the swirl is adding on top of the wet flood icing.  But, if you'd prefer a raised outline instead for these flowers, here's an example.
      You might know that I'm usually torn as to whether to add sanding sugar or not....remember the "trees of indecision?"  These were no exception.

      In the end, I made some fully sanded, sanding on the swirl only, and not sanded at all.  And now you know why it takes me an hour and a half to pick out a lipstick...indecision.  I must work on this.


      OK...let's make Frosted Rose Cookies. You'll need:

      • sugar cookies made from a template
      • royal icing, divided and tinted with AmeriColor Deep Pink, Soft Pink, Leaf Green & Electric Green
      • disposable icing bags
      • couplers and tips: #2
      • squeeze bottles
      • small ramekin
      • small (clean) paintbrush
      • sanding sugar
      • meringue powder
      Use a #2 tip to outline the cookie shape in pink icing.

      Use another #2 tip to outline the leaf in leaf green.

      Thin the pink icings with water, a bit at a time, stirring with a silicone spatula, until it is the consistency of a thick syrup.  You'll want to drop a "ribbon" of icing back into the bowl and have it disappear in a count of "one thousand one, one thousand two." Four is too thick, one is too thin.  Count of 2-3 is good.  Cover with a damp dishcloth and let sit for several minutes.

      Stir gently with a silicone spatula to pop and large air bubbles that have formed.  Pour into squeeze bottles.    

      Working 6-8 cookies at a time, fill in the outline with the thinned flood icing, using a toothpick to guide to the edges and to pop large air bubbles.

      Starting with the first cookie flooded, add the swirl in the contrasting color.

      Thin the green icings as described above.  Flood the leaf in the darker green, and add a lighter green stripe right down the center, just as adding the swirl.

      Let the cookies dry, uncovered, 6-8 hours, or overnight.

      The next day, apply the sanding sugar.  Mix 1/4 teaspoon meringue powder with 1/4 teaspoon water.  Brush onto the cookies wherever you'd like the sanding sugar to stick.  Over a basket-style coffee filter, shake the sanding sugar onto the cookie, and shake off the excess. (Use the filter like a funnel to pour back into the container.)

      Let dry 30 minutes before packaging.
      Alright...bring on the red & green. 
      reade more... Résuméabuiyad