Pages

.

I have no idea what to call this, but I like it . . . Works For Me Wednesday

I'm thinking of just re-titling this..."Longest Blog Post Title in History."

Anyhoo...I wanted to show you guys this handy-dandy measuring cup that works for me.


{Photo Credit: pamperedchef.com}

Why? Fill one end and it's perfect for liquids. Flip it and the other side is perfect for measuring solid, semi-solid and sticky stuff.


You know that stuff that is hard to measure....shortening, peanut butter, honey. Just fill it to the amount you need and just push it right out. Voila!

See...


Mine is from Pampered Chef...no, I don't sell PC, but I have seen them other places. Sur La Table carries a mini version! I still really don't know what to call it. A flip-able, measuring cup pusher-outer thingy. There...that's it.


{On a side note, any recipe that has both butter AND Crisco is good in my book. I'll share this with you later.}


Go on and check out the other Works For Me Wednesday tips at We Are THAT Family.

You can find Bake at 350's WFMW archives here. Next week's edition is "greatest hits."
reade more... Résuméabuiyad

Tuesdays At The Table - Champagne Cupcakes

Hi Gang!  It's raining in the Northeast again.  Grr....I just got my basement dry from the last flood (and I do mean flood).  Are any of you experiencing nasty weather too?

I've noticed a few new people joining in and linking up these past few weeks.  HURRAY!!  Welcome!  I love seeing new people and reading new blogs.  :-)  I hope you all are taking the opportunity to visit that fabulous cooks that contribute recipes.  You all make such amazing things!!

Lovely Yellow Ribbons

Champagne Cupcakes

Batter:
2 3/4 cups flour
3 teaspoons baking powder
1 teasoon salt
2/3 cup butter
1 1/2 cups sugar
3/4 cup champagne (the sweeter the better!)
6 egg whites

Frosting:
3 1/4 cups powdered sugar
1 cup butter, at room temperature
1/2 teaspoon vanilla extract
3 tablespoons champagne, at room temperature

To make the cupcakes - In a large bowl, cream together butter and sugar until very light and fluffy. Sift flour, baking powder, and salt together, and then blend into creamed mixture alternately with champagne.

In another large clean bowl, beat egg whites until stiff peaks form. Fold 1/3 of the whites into batter to lighten it, then fold in remaining egg whites. Fill the cupcake liners about 2/3 full.

Bake at 350 degrees for 20 about minutes, or until a toothpick inserted into the cake comes out clean.

To make the frosting - With an electric mixer, beat together sugar and butter. Mix on low until well blended, and then on medium for another two minutes. Add vanilla and champagne, beating on medium for another minute. *Note: If you like to go heavy on the frosting, you might want to double the recipe.*

What's cooking in your kitchen?


reade more... Résuméabuiyad

Easter Cookie Ideas . . . hop to it!

I'm working tonight on some *new* Easter cookies, but here are some blasts from the past for a little Easter cookie decorating inspiration. {Click the links for the full posts.}


Good Eggs...personalized or not, these are always a hit!


Basket Case...I made these for the first time last year. My favorite part? The Easter grass peeking out! :)


"Fluffy" chicks...so simple and so sweet! I *heart* these! This would be a good one for decorating with the kids.


{They look really cute with the baskets.}


And, finally, which to *you* eat first? The Ears or the Tails? These are really easy to make...click here and I'll show you how.

{Re-name these"Twilight bunnies" and make the bite out of the neck! ;)}


Are you making Easter cookies this year?
reade more... Résuméabuiyad

Guest Post from Sweetopia : Marbling Cookies


I have *such* a treat for you guys today! This is the very first guest post on Bake at 350 and I am so, so happy to introduce you to Marian. Marian's blog is called Sweetopia and I'm not exaggerating when I say it is a cookie wonderland! I literally cried the first time I saw it. You'll love it, too! {Just WAIT until you see the little owl below!}

Thank you, Marian, for guest posting today! We are so lucky to have you here!


Hi! I'm Marian.


I'm really thrilled and honored to be here as a guest contributor for Bridget's website! Every time I visit I'm inspired by her eye-candy cookies and baked goods of all kinds! Hopefully you'll like the sweets I'm sharing today.


If you've tried cookies like these before you know how simple they are to make, and if you haven't, you're about to find out just how easy they are to create.

It's called marbling or swirling, which is basically when one or more colors of icing are applied to a base coat of icing, and then a toothpick, cake tester, pin or skewer is dragged through the icing to create a marbled or swirly effect.

Each combination of colors creates another look.


Just by changing the way you set up your lines and drag the toothpick, completely different designs emerge.

You can incorporate the swirled icing into your design, like these feathered cookie friends:


If you'd like to try the swirling effect, the most important thing for your success is the consistency of the icing. Bridget has some great points about that here, and my cookie decorating tutorial goes over some tips and the 10-second rule here.


Once you have your cookies baked and icing made, it's time to begin by piping your outline. I like to use a piping bag fitted with a coupler and #2 tip.

Fill or flood your cookie with royal icing right away. You could leave the outline to set to create a solid dam, but you'll be able to see the border when the icing dries.


Once you've filled the whole cookie in, shake it gently left to right on your work surface, to help smooth the icing out.


Add your second (or more), layers or colors of icing. Work as quickly as you can before the icing sets.


Take a toothpick, pin, skewer or dough tester (hey, whatever works!), and drag it through the icing. In this case I drew S-like shapes. The image below shows which direction I dragged the toothpick in.


Finish off the edges with dots or another design of your choice and you're done!


The hearts are made by piping dots and dragging the toothpick through the center of each dot.


Let your cookies dry, package and ribbon.


Simple, easy, fun and impressive!


If you have any questions or comments come visit me over at Sweetopia for more information or to contact me directly.


A big thanks to Bridget, cookie decorator extraordinaire, for having me as her guest blogger!


Happy marbling!

xo,

Marian

reade more... Résuméabuiyad

Nigella Lawson's Chocolate Fudge Cake


My darling chocolate fudge cake, it has been a while, hasn't it?

Nigella Lawson's chocolate fudge cake, from Nigella Bites, is my favourite chocolate cake of all time. Moist, rich cake, slathered with light-tasting, fudgy chocolate icing. Heaven. I made it (in triple quantities!) for my 21st birthday, and I've made it a zillion times for my buddies Allstar and Liam, who happened to do my 21st b'day speech. What legends!

Yesterday, I baked it for a rather massive house party we had to celebrate my bro's bday. I baked the cake in the morning, iced it in the arvo, and we all ate it in the wee hours of Sunday morning.

The recipe is here, so I'll just give you the gist of it.

So, in short: you mix melted butter, oil and cold water, then pour in the dry ingredients. (Flour, cocoa, sugar etc etc.) Finally you add a mixture of eggs, sour cream and vanilla extract, and beat gently until smooth and glossy.


Those of you who have been with me for a while will know that I usually bake this in 2 x 20cm round sandwich pans, making an epic double-decker cake of decadent deliciousness. However, in the interests of sharing it amongst many friends, this time I baked it in a 30cm square tin. It took 1 hour at 180C to cook through.


It smelled so good! Once it had cooled down a bit, I roughly hacked off the domed top to smooth it out. And we also got to eat the delicious crunchy offcuts, muahaha.

Of course, I say "once it had cooled down a bit", but when I removed the top there was still steam coming out of it. Hahaha, I guess we were really keen to get stuck in!

The icing is quite easy to make - beat butter until soft and smooth, add icing sugar, melted chocolate and vanilla essence. I always beat the butter and vanilla together; many years ago I had an incident with the chocolate seizing on contact with the vanilla. I passed it off as "choc chip icing", but it really wasn't the same.

I love buttercream icings so much more than ganaches, which tend to be too dark and throat-clogging for my liking.

I iced the cake very simply, just like one of those slab cakes you used to get at school afternoon teas. Another trick I use is to avoid putting it in the fridge, so the icing stays voluptuously soft and creamy. If you refrigerate it, it tends to get hard and a little grainy. (Of course, this advice only holds if you plan on eating the cake on the same day! If you're keeping it for longer, then of course keep it in the fridge.)

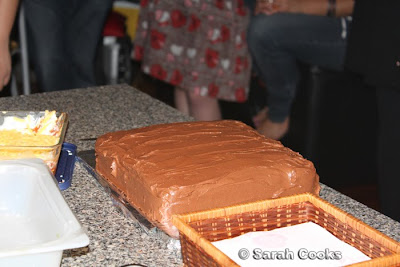
A simple decoration belies the utter fabulousness of this cake.

Here is my bro cutting the cake!


And some random shots of partygoers eating cake:
I noticed that everyone does the same "cake-eating" face: mouth open, chin pointed slightly.

It's also been a while since I've put quotes in my blog! So here we go!

Chrissie F: That chocolate cake was AMAZING!
Kristine P: mmmm that was some good cake.. i wanted to have some time alone with that cake and show it a good time!

Some of you who recall the How to Eat project, will recall my chocolate-cake-loving friend Liam, (aka King of Pork). Here's a shot for the fans:

The next morning, I gratefully awoke to a quiet and empty house, and saw this on the kitchen bench.


One small square of cake!!! SCORE!!!

Happy Birthday Daniel!!!!!!!!!!!!!!!!!!!!!!!!!!
reade more... Résuméabuiyad

Kiddo in the Kitchen : Chocolate Chip Cookie Dough Cheesecake Bars

KIK 1 mixer
We're trying a little something new here at the blog. Once a month or so, kiddo is going to pick a recipe and I'll help him make it...or he'll help me...or something. I'm thinking once a month...but we all know I'm a quitter, so we'll see how it goes! ;)

KIK 1 collage
{I'm pretty sure there is a pile of laundry in the background on my dining room table. Ignore that.}

Kiddo spends a lot of time in the kitchen. Not necessarily cooking, but he knows it's where to find me. If I'm not baking, I'm normally in the pantry grabbing a handful (or two) of chocolate chips straight from bag.


The kitchen is also where kiddo learned the concept of trust. When he was about 4, I called him in to taste some chocolate sauce I had just made. He wouldn't try it.

"It's really yummy...you'll love it," I said.

Shakes head. "No...I don't want any."

This went on for about 5 minutes...I could.not.let.it.go. He was going to eat the chocolate.

"Sweetheart...Mommy will never tell you something is really yummy to trick you into eating it. Look, I'll never tell you broccoli is really yummy. I'll tell you that it tastes pretty good with some butter and salt, but it's never going to taste as good as a chocolate chip cookie. THIS, this chocolate sauce tastes as good as a chocolate chip cookie...trust me."

He tried it.

He trusts now.

Now you'll have to trust us.

KIK 1 CCCD bar
So, onto the recipe. I knew as soon as he peeked over my shoulder as I read cookies and cups, that this was going to be our first recipe... Chocolate Chip Cookie Dough Cheesecake Bars.

{If you haven't been to cookies and cups...GO! It is filled with all kinds of deliciousness...and is really funny to boot (that's an expression, right?)}

Here's how to make them:
Chocolate Chip Cookie Dough Cheesecake Bars
{adapted from cookies and cups & The Essential Chocolate Chips Cookbook}

Crust:
1 & 1/2 c. graham cracker crumbs
5 TBSP butter, melted
2/3 c. mini semi-sweet chocolate chips

Cookie Dough:
5 TBPS butter, room temp.
1/3 c. packed light brown sugar
3 TBSP sugar
1/4 tsp coarse salt
1 tsp. vanilla extract
3/4 c. flour
1 c. chocolate chips

Cheesecake Filling:
10 oz. cream cheese, room temp.
1/4 c. sugar
1 egg
1 tsp vanilla extract

Topping:
1/3 c. chocolate chips
1 tsp shortening

Preheat oven to 325.

For the crust:
Grease a 8x8 pan with butter, line pan with parchment paper and butter the paper, leaving enough to extend over the sides.

Crush graham crackers into crumbs to make 1 & 1/2 cups. Add to butter and stir until crumbs are moistened. Stir in chocolate chips.

Press crust mixture into bottom of pan. Bake for 6 minutes. Set pan on wire rack to cool.

For cookie dough:
Using mixer and the paddle attachment, mix butter, brown sugar, sugar, salt, and vanilla extract at medium speed until smooth. Adjust mixer speed to low and add flour. Mix just until incorporated. Stir in chocolate chips. Set aside.
KIK 1 cookie dough

For cheesecake:
Using mixer, beat cream cheese and sugar until smooth. Add egg and vanilla extract, beating just until blended.
KIK 1 face
{It helps if you make a face!}

KIK 1 mixer watch
{Concentrate!}
KIK 1 drum collage
{And, have you ever noticed how your Kitchen Aid makes a little beat when mixing? Kiddo recommends drumming along. I may need to change the name of this segment to Kiddo & the Kitchen Aid!}

Pour batter into cooled, baked crust. Drop cookie dough by teaspoonfuls over the top of the filling.
KIK 1 prebake

Bake about 30 minutes, or until set. Transfer to wire rack to cool completely. Place in the refrigerator to chill several hours.
KIK 1 cooked

For the topping:
Combine the chocolate chips and shortening and melt in the microwave at 30 second intervals at 50% power. Stir after each interval; repeat until melted.

Drizzle over the bars before serving.
KIK 1 with water
They were rich and delicious; I highly recommend serving them with sparkling water to wash them down!

My only complaint, and I hate to complain about cookie dough and cheesecake, is that they are a little hard to cut into nice squares. These two in the pictures are the only pretty ones I got.

{My other complaint...I'm still seeing the effects of these on my thighs!}
KIK 1 text

The verdict: Kiddo gives these bars a thumbs-up!
KIK 1 thumbs up

What do you love baking with your kids?


I'm linking this post up to I'm Lovin' It at TidyMom's place because I *do* love baking with my boy! :)
reade more... Résuméabuiyad