Pages

Showing posts with label Vegetarian. Show all posts

How to Slice an Avocado

Sliced avocado

Hey everybody! Slightly random post for you today: a tutorial on slicing avocados! Those of you who follow me on Instagram will know that I love avocados, particularly sliced avocados. I usually have them for breakfast on toast or with smoked salmon, but also in salads or on top of cold silken tofu - delicious! Anyway, a few months ago I figured out this neat trick for slicing avocado, and now I can't stop. (If you scroll down to the bottom of this post you'll see a series of photo collages of my Instagrammed avocado slices... I found THIRTY SIX photos of separate sliced-avocado meals. Eep!) Despite the long series of step-by-step photos, it's very easy, and makes consistently pretty results. If I can do it at seven in the morning, before I've had my coffee, in under a minute, you can do it too.

Right now I'm eating these gigantic Reed avocados from Barham Avocados, an avocado farm on the Murray River who offer an avocado subscription service - yes really. A Twitter buddy of mine recommended them to me, and Sandra surprised me by buying me a subscription! Yay! They send you packages of different avocado varieties, depending on what's in season. We've only gotten one delivery so far, but I've been really impressed by the quality. They are a little pricier than the supermarket, but they are HUGE, deliciously creamy, and are consistently better quality - very few brown spots, if any. They're also delivered straight from the farm to your door! The only problem I've found is that they all ripen at the same time, and suddenly you've got six rapidly ripening avocados that need eating!

Avocado delivery

Ok, to sliced an avocado you need: one avocado, a sharp knife, and a big spoon.
Avocado

Pick up your avocado and your knife...
Avocado and knife

... and slice it all the way to the stone.
Avocado sliced to the stone

... rotate the avocado around until the cut goes all the way around. Be careful of your hands!
Rotating the avocado

Gently grasp both sides of the avocado and twist gently to bring the two hemispheres apart.
Twisting the avocados

Ta-dah!
Avocado half

Now, this particular avocado had a little brown spot at the top - which is because I left it a bit too long before eating it, not because it was a bad avocado! I considered leaving this avocado and using a perfect one for this post, but then I thought that you'd want to learn how to work around imperfections, and even though ideally every piece of fruit you eat will be at its perfect peak of ripeness, you know, life. (To reiterate what I wrote above, I've found that all the Barham avocados in this delivery were very good, with minimal brown spots or none).

Ok, so now you'll want to get rid of the seed. Gently whack the knife into the stone, and twist it to release the stone from the fruit.
Removing the stone

Removing the stone

I usually only eat half an avocado at a time - I keep the remaining half in its skin in a little zip-lock glad bag. I pop it in the fridge, and find it's good for a couple of days like that.

Next step is to scoop out any brown spots with a teaspoon and discard them.
Brown spots removed

Now, take your knife and make slices in the avocado all the way to the skin. (Again, be gentle and be careful of your fingers!)
Slicing the avocado

Slicing the avocado

Once it's sliced, you'll need your big spoon.
Avocado half and a spoon

Gently scoop out the avocado flesh with the big spoon, staying as close to the skin as possible.
Scooping out the flesh

Scooping out the flesh

Scooping out the flesh

And you're done!
Sliced avocado half

I use my hands to separate the avocado slices.
Separating the slices

From here you can arrange them either way up - skin side up or seed side up depending on what you think looks best - fan them out like a deck of cards, keep them in a straight line, whatever you like!

Sliced avocado montage #1

Sliced avocado montage #2

Sliced avocado montage #3

Sliced avocado montage #4

For breakfast, I always spritz the slices with lemon or lime juice, and add a generous amount of freshly ground black pepper and flakes of crunchy Murray River sea salt. I'll add chopped dill, chives or coriander if I happen to have any in the fridge. (Lime juice and coriander give you that guacamole-vibe - always fabulous). Sliced chillies are good too, but for some reason I only do this on the weekend. And I'll grate some lemon zest over if I'm feeling particularly energetic. If I'm putting the avocado slices on thick slices of light rye toast, I'll usually drizzle a little extra virgin olive oil on the toast before topping it with the avocado.

Surprisingly, I'm not sick of avocados yet, but seriously, any serving suggestions or recipes would be greatly appreciated! I've been Googling dessert recipes including avocado as an ingredient.... watch this space.
Sliced avocado

Hey everybody! Slightly random post for you today: a tutorial on slicing avocados! Those of you who follow me on Instagram will know that I love avocados, particularly sliced avocados. I usually have them for breakfast on toast or with smoked salmon, but also in salads or on top of cold silken tofu - delicious! Anyway, a few months ago I figured out this neat trick for slicing avocado, and now I can't stop. (If you scroll down to the bottom of this post you'll see a series of photo collages of my Instagrammed avocado slices... I found THIRTY SIX photos of separate sliced-avocado meals. Eep!) Despite the long series of step-by-step photos, it's very easy, and makes consistently pretty results. If I can do it at seven in the morning, before I've had my coffee, in under a minute, you can do it too.

Right now I'm eating these gigantic Reed avocados from Barham Avocados, an avocado farm on the Murray River who offer an avocado subscription service - yes really. A Twitter buddy of mine recommended them to me, and Sandra surprised me by buying me a subscription! Yay! They send you packages of different avocado varieties, depending on what's in season. We've only gotten one delivery so far, but I've been really impressed by the quality. They are a little pricier than the supermarket, but they are HUGE, deliciously creamy, and are consistently better quality - very few brown spots, if any. They're also delivered straight from the farm to your door! The only problem I've found is that they all ripen at the same time, and suddenly you've got six rapidly ripening avocados that need eating!

Avocado delivery

Ok, to sliced an avocado you need: one avocado, a sharp knife, and a big spoon.
Avocado

Pick up your avocado and your knife...
Avocado and knife

... and slice it all the way to the stone.
Avocado sliced to the stone

... rotate the avocado around until the cut goes all the way around. Be careful of your hands!
Rotating the avocado

Gently grasp both sides of the avocado and twist gently to bring the two hemispheres apart.
Twisting the avocados

Ta-dah!
Avocado half

Now, this particular avocado had a little brown spot at the top - which is because I left it a bit too long before eating it, not because it was a bad avocado! I considered leaving this avocado and using a perfect one for this post, but then I thought that you'd want to learn how to work around imperfections, and even though ideally every piece of fruit you eat will be at its perfect peak of ripeness, you know, life. (To reiterate what I wrote above, I've found that all the Barham avocados in this delivery were very good, with minimal brown spots or none).

Ok, so now you'll want to get rid of the seed. Gently whack the knife into the stone, and twist it to release the stone from the fruit.
Removing the stone

Removing the stone

I usually only eat half an avocado at a time - I keep the remaining half in its skin in a little zip-lock glad bag. I pop it in the fridge, and find it's good for a couple of days like that.

Next step is to scoop out any brown spots with a teaspoon and discard them.
Brown spots removed

Now, take your knife and make slices in the avocado all the way to the skin. (Again, be gentle and be careful of your fingers!)
Slicing the avocado

Slicing the avocado

Once it's sliced, you'll need your big spoon.
Avocado half and a spoon

Gently scoop out the avocado flesh with the big spoon, staying as close to the skin as possible.
Scooping out the flesh

Scooping out the flesh

Scooping out the flesh

And you're done!
Sliced avocado half

I use my hands to separate the avocado slices.
Separating the slices

From here you can arrange them either way up - skin side up or seed side up depending on what you think looks best - fan them out like a deck of cards, keep them in a straight line, whatever you like!

Sliced avocado montage #1

Sliced avocado montage #2

Sliced avocado montage #3

Sliced avocado montage #4

For breakfast, I always spritz the slices with lemon or lime juice, and add a generous amount of freshly ground black pepper and flakes of crunchy Murray River sea salt. I'll add chopped dill, chives or coriander if I happen to have any in the fridge. (Lime juice and coriander give you that guacamole-vibe - always fabulous). Sliced chillies are good too, but for some reason I only do this on the weekend. And I'll grate some lemon zest over if I'm feeling particularly energetic. If I'm putting the avocado slices on thick slices of light rye toast, I'll usually drizzle a little extra virgin olive oil on the toast before topping it with the avocado.

Surprisingly, I'm not sick of avocados yet, but seriously, any serving suggestions or recipes would be greatly appreciated! I've been Googling dessert recipes including avocado as an ingredient.... watch this space.
reade more... Résuméabuiyad

A Vegetarian Italian Feast for Four

Baci di Ricotta - Ricotta Kisses

Mmm... check out that bowl of deliciousness: Nigella's baci di ricotta (from Feast). An airy-light ricotta batter, deep fried til crisp and doused with icing sugar. Heaven!

I sometimes think I use dinner parties as an excuse to go crazy with the calories - and by way of example, look at my pork belly and pavlova; the richest chocolate cake I've ever eaten; salted butter caramel ice-cream with salted candied peanuts, peanut butter fudge sauce; a roast rack of pork followed by triple-chocolate custard tarts. Nothing wrong with that - if you're going to indulge with a decadent treat, better to share it around rather than have it all to yourself!

However, when this particular dinner party rolled around, I was really in the mood for something altogether lighter, and I wanted to include lots of delicious green vegetables. This wasn't out of any dietary concern or self-imposed restriction - y'all know I'm not a dieter! - but simply because I felt like a less-filling meal, one that wouldn't have us all popping our trouser buttons afterwards! I also really enjoy vegetables, and wanted them to be the star of the show. Dessert was deep-fried, but the baci di ricotta were in small quantities, and weren't hugely filling, like say, a cheesecake or a chocolate cake might be. Decadence without the food coma. (Besides, I feel that all the green vegetables negate all the deep-fried, amirite?)

A Vegetarian Italian Feast for Four

Broad Bean Bruschetta
Eggplant Involtini
My Favourite Green Salad

This recipes for this meal all came from Nigella's Feast, one of my favourite cookbooks. It's essentially the "Italian-Inspired Supper for Six" from the Meatless Feasts chapter, in reduced quantities, with Nigella's broad bean bruschetta instead of the Italianified guacamole, and a pimped up green salad on the side. (Recipe below!) The menu was a little time-consuming to put together, but these are some of my favourite recipes, so I was happy to devote the afternoon to cooking them.

Double-podded broad beans

Broad beans! I love, love, love broad beans! And although Nigella says you have to use fresh ones for this recipe, I've always used frozen ones and it turns out fabulously.

Sliced zucchini

I added grilled zucchini to Nigella's suggested side salad of baby spinach, pumpkin seeds and avocado. I used a mandolin to slice them, and was so surprised when they fell in such a pretty pattern!

Filling for the involtini

Now, as I've mentioned before, Nigella is super keen on involtini (grilled eggplant, wrapped around a filling, covered with tomato sauce, topped with cheese and baked), and has variations on this recipe in about half of her books. The involtini I made on this occasion weren't technically the ones in Feast, but rather a mash-up of all the different versions. For the filling, I used feta, parmesan, pine nuts, currants, egg, parsley and lemon zest, with bulghur wheat for added bulk.

Eggplant involtini

Rather than smothering the pretty little eggplant rolls in a jar of tomato passata, I made a proper tomato sauce by sautéing chopped onion and garlic in olive oil, adding some tinned crushed tomatoes and slowly cooking them until thickened. Time consuming, yes, but I love tomato sauce, and it can all be done in advance, and just baked when you want to eat.

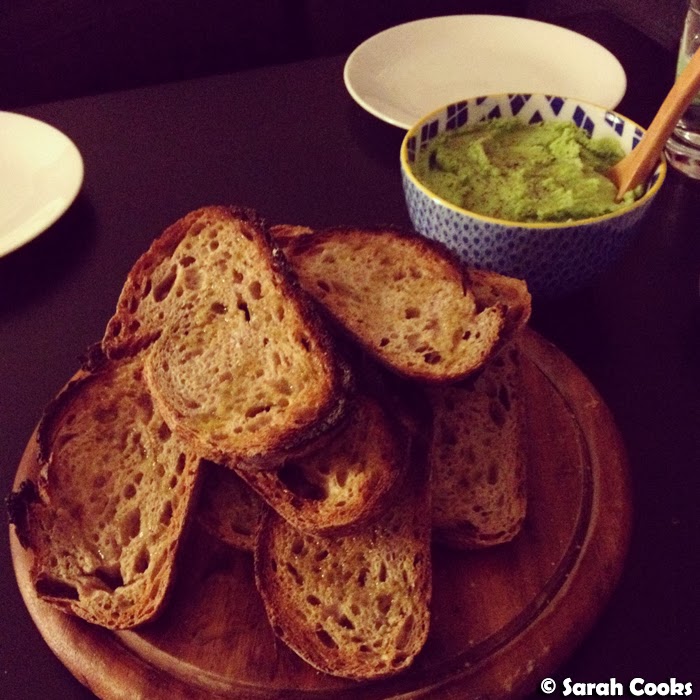
Let's have a look at the meal! Look how green the broad bean bruschetta is. I love it!

Broad bean bruschetta

I served it with toasted light rye bread. (I wish I could say I chargrilled these slices, but I literally just toasted them in the toaster). Looking back at the pictures now, I see it was a pretty big pile of bread for four people as a starter - I must have been worried that we'd still be hungry, haha. (We only had about a slice each).

Broad bean bruschetta

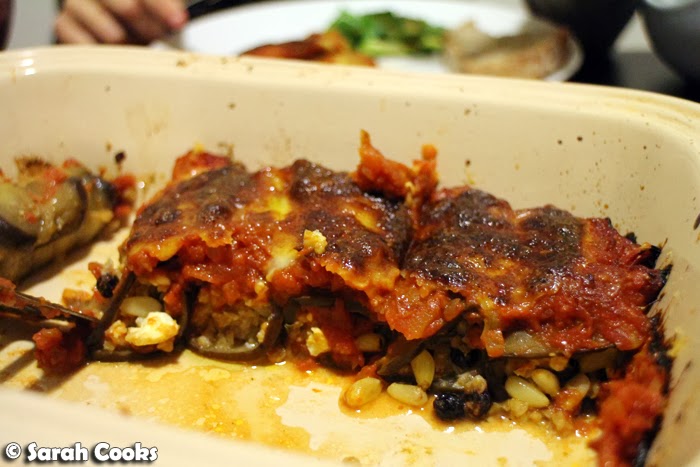
Eggplant involtini

These involtini are soooo delicious - I love the pop of sweetness from the currants, the mushy eggplants and the toasty melted mozzarella.

My favourite green salad

Sometimes I make salads and they remain untouched, a virtuous but unnecessary adjunct to a complete meal, but this one went down really well - I think the additions of the grilled zucchini, toasted pumpkin seeds, avocado really made it very moreish. (And I'm sure the seeds and avocado added all sorts of heart-healthy fats - bonus!)

Dinner

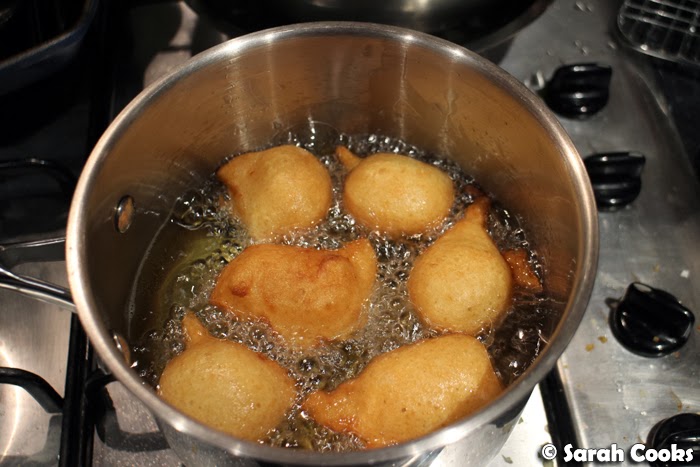
And once all those lovely vegetables were eaten, it was time to deep-fry! It is a bit of work to have to cook dessert in the middle of a dinner party, but I thought it was actually a nice way to break up the evening - we all just headed into the kitchen to keep chatting while I prepared the baci. The batter takes just a minute to stir together, and the deep-frying process wasn't too difficult or scary, as I used a small saucepan keep the process manageable, and an oil themometer to take any guesswork out of the process. I love how they puff up into irregular little alien shapes!

Deep frying the baci

Baci di Ricotta

And if it was easy to make them, it was even easier to eat them! A thick dusting of icing sugar on top, a pot of tea on the side and... inhale!

My Favourite Green Salad
Adapted from an idea in Nigella Lawson's Feast

Ingredients
2 zucchini
2 tablespoons pumpkin seeds
120 grams baby spinach leaves
1 ripe avocado
Salt, pepper, lemon juice and extra virgin olive oil

Method
Heat a griddle pan over a medium heat. Trim the ends of the zucchini and thinly slice lengthwise. (A mandolin is ideal). Brush each slice with olive oil on both sides and grill for a minute on each side, until cooked through and marked with and char marks. Remove to a plate. Sprinkle generously with salt and squeeze a little lemon juice over. Let cool completely before assembling the salad.
Toast the pumpkin seeds in a dry frying pan for a few minutes, until lovely and fragrant. (They don't really change colour, so use your nose to tell you when they're ready). Tip them out onto a plate to cool down.
When you are ready to eat, place the spinach leaves in a large bowl. Add the zucchini slices and half the pumpkin seeds.
Cut the avocado in half, and scoop out little pieces with a teaspoon. Add to the spinach and zucchini in the bowl. Squeeze more lemon juice over, to prevent the avocado pieces from browning. Drizzle generously with olive oil. Toss to combine, and add salt and pepper to taste. Sprinkle with the remaining pumpkin seeds to serve.
Serves 4-6 as a side
Baci di Ricotta - Ricotta Kisses

Mmm... check out that bowl of deliciousness: Nigella's baci di ricotta (from Feast). An airy-light ricotta batter, deep fried til crisp and doused with icing sugar. Heaven!

I sometimes think I use dinner parties as an excuse to go crazy with the calories - and by way of example, look at my pork belly and pavlova; the richest chocolate cake I've ever eaten; salted butter caramel ice-cream with salted candied peanuts, peanut butter fudge sauce; a roast rack of pork followed by triple-chocolate custard tarts. Nothing wrong with that - if you're going to indulge with a decadent treat, better to share it around rather than have it all to yourself!

However, when this particular dinner party rolled around, I was really in the mood for something altogether lighter, and I wanted to include lots of delicious green vegetables. This wasn't out of any dietary concern or self-imposed restriction - y'all know I'm not a dieter! - but simply because I felt like a less-filling meal, one that wouldn't have us all popping our trouser buttons afterwards! I also really enjoy vegetables, and wanted them to be the star of the show. Dessert was deep-fried, but the baci di ricotta were in small quantities, and weren't hugely filling, like say, a cheesecake or a chocolate cake might be. Decadence without the food coma. (Besides, I feel that all the green vegetables negate all the deep-fried, amirite?)

A Vegetarian Italian Feast for Four

Broad Bean Bruschetta
Eggplant Involtini
My Favourite Green Salad

This recipes for this meal all came from Nigella's Feast, one of my favourite cookbooks. It's essentially the "Italian-Inspired Supper for Six" from the Meatless Feasts chapter, in reduced quantities, with Nigella's broad bean bruschetta instead of the Italianified guacamole, and a pimped up green salad on the side. (Recipe below!) The menu was a little time-consuming to put together, but these are some of my favourite recipes, so I was happy to devote the afternoon to cooking them.

Double-podded broad beans

Broad beans! I love, love, love broad beans! And although Nigella says you have to use fresh ones for this recipe, I've always used frozen ones and it turns out fabulously.

Sliced zucchini

I added grilled zucchini to Nigella's suggested side salad of baby spinach, pumpkin seeds and avocado. I used a mandolin to slice them, and was so surprised when they fell in such a pretty pattern!

Filling for the involtini

Now, as I've mentioned before, Nigella is super keen on involtini (grilled eggplant, wrapped around a filling, covered with tomato sauce, topped with cheese and baked), and has variations on this recipe in about half of her books. The involtini I made on this occasion weren't technically the ones in Feast, but rather a mash-up of all the different versions. For the filling, I used feta, parmesan, pine nuts, currants, egg, parsley and lemon zest, with bulghur wheat for added bulk.

Eggplant involtini

Rather than smothering the pretty little eggplant rolls in a jar of tomato passata, I made a proper tomato sauce by sautéing chopped onion and garlic in olive oil, adding some tinned crushed tomatoes and slowly cooking them until thickened. Time consuming, yes, but I love tomato sauce, and it can all be done in advance, and just baked when you want to eat.

Let's have a look at the meal! Look how green the broad bean bruschetta is. I love it!

Broad bean bruschetta

I served it with toasted light rye bread. (I wish I could say I chargrilled these slices, but I literally just toasted them in the toaster). Looking back at the pictures now, I see it was a pretty big pile of bread for four people as a starter - I must have been worried that we'd still be hungry, haha. (We only had about a slice each).

Broad bean bruschetta

Eggplant involtini

These involtini are soooo delicious - I love the pop of sweetness from the currants, the mushy eggplants and the toasty melted mozzarella.

My favourite green salad

Sometimes I make salads and they remain untouched, a virtuous but unnecessary adjunct to a complete meal, but this one went down really well - I think the additions of the grilled zucchini, toasted pumpkin seeds, avocado really made it very moreish. (And I'm sure the seeds and avocado added all sorts of heart-healthy fats - bonus!)

Dinner

And once all those lovely vegetables were eaten, it was time to deep-fry! It is a bit of work to have to cook dessert in the middle of a dinner party, but I thought it was actually a nice way to break up the evening - we all just headed into the kitchen to keep chatting while I prepared the baci. The batter takes just a minute to stir together, and the deep-frying process wasn't too difficult or scary, as I used a small saucepan keep the process manageable, and an oil themometer to take any guesswork out of the process. I love how they puff up into irregular little alien shapes!

Deep frying the baci

Baci di Ricotta

And if it was easy to make them, it was even easier to eat them! A thick dusting of icing sugar on top, a pot of tea on the side and... inhale!

My Favourite Green Salad
Adapted from an idea in Nigella Lawson's Feast

Ingredients
2 zucchini
2 tablespoons pumpkin seeds
120 grams baby spinach leaves
1 ripe avocado
Salt, pepper, lemon juice and extra virgin olive oil

Method
Heat a griddle pan over a medium heat. Trim the ends of the zucchini and thinly slice lengthwise. (A mandolin is ideal). Brush each slice with olive oil on both sides and grill for a minute on each side, until cooked through and marked with and char marks. Remove to a plate. Sprinkle generously with salt and squeeze a little lemon juice over. Let cool completely before assembling the salad.
Toast the pumpkin seeds in a dry frying pan for a few minutes, until lovely and fragrant. (They don't really change colour, so use your nose to tell you when they're ready). Tip them out onto a plate to cool down.
When you are ready to eat, place the spinach leaves in a large bowl. Add the zucchini slices and half the pumpkin seeds.
Cut the avocado in half, and scoop out little pieces with a teaspoon. Add to the spinach and zucchini in the bowl. Squeeze more lemon juice over, to prevent the avocado pieces from browning. Drizzle generously with olive oil. Toss to combine, and add salt and pepper to taste. Sprinkle with the remaining pumpkin seeds to serve.
Serves 4-6 as a side
reade more... Résuméabuiyad

Corn Fritters

Corn fritters, (messily) poached eggs, smoked salmon, chive labneh, diced avocado
As you know, I love making quick-yet-nourishing weekday breakfasts, styling them prettily and instagramming them. On weekends, I've gotten into the habit of making slightly more involved cafe-style brunches - it takes a bit of time, but the results are delicious, and I do love pottering about the kitchen!

The breakfast, above, was my take on that ubiquitous cafe staple of corn fritters. I googled a few recipes to get a general idea of how to make them, and then ended up doing it my own way. Basically I wanted maximum corniness: loads of corn kernels just bound by a little batter.

To increase the corn-factor even more, I used a small tin of creamed corn as a binding agent, instead of just egg. Creamed corn is all kinds of awesome! For extra flavour I added a finely chopped red onion and cayenne pepper. (I later learned, through a hospo-working friend of mine, that one of the most popular restaurants in Melbourne uses corn purée in their fritters for this exact reason. Win!)
Corn fritter batter, pre-mixing

I used the kernels of a fresh ear of corn, and boosted quantities with a small tin of corn kernels, because this is what I happened to have in my fridge and pantry - for ease, in the recipe below I've specified either two ears of corn or a normal-sized (400 gram) tin of corn kernels.
Corn kernels
I loved the golden, corn-studded batter!
Batter
Shallow frying! One tip: this batter is quite delicate, with the corn kernels barely held together by the batter, so don't be tempted to flip the fritters until they are well and truly sealed on the bottom, and cooked at least half way through, otherwise you'll be in for a big mess! (As I write this, it occurs to me that you could deep-fry tablespoons of the mixture for a super-crispy result, but I feel that would be more canapé than brunch).
Frying

Cooked fritters
Now, the fun stuff: sides! I went all out and did poached eggs (mine were really messy, as you can see above - must practise!), smoked salmon, diced avocado spritzed with lime juice and sprinkled with salt and pepper, and chive labneh. And when I say labneh, I really mean that I just lined a sieve with a paper coffee filter, spooned some 0% Greek yogurt in there and let it drip while I got on with everything else. To serve the labneh, I poured over a little extra virgin olive oil, and sprinkled with salt, pepper and chopped chives. (Chopped chives make everything taste better!)
Diced avocado, chive labneh
Other ideas I had for sides: bacon, fried eggs, halloumi (like St. Ali's corn fritters), tomato relish (or any expensive relish/chutney/salsa that you have languishing in your pantry), guacamole, pico de gallo... anything you like, really! They're turn out quite sweet (corn, duh), so salty accompaniments work well. For the maximum corn-experience, why not wrap them up in a corn tortilla?

But you know what? Even if you eat these plain, they're pretty damn good. They're super-corny, nice and pancakey on the inside, and with fab crisp edges. Despite being fried, they feel light and bright and delicious. It's totally worth setting aside your Sunday morning to make these!

Corn Fritters
An original recipe from Sarah Cooks, inspired by the multitudes of corn fritters at Melbourne's cafes!

Ingredients
1 x 125 gram tin of creamed corn
1/4 cup flour
1 teaspoon bicarb
1 egg
1/4 teaspoon cayenne pepper
1/4 red onion, finely chopped
Small handful flat-leaf parsley, finely chopped
The kernels from 2 ears of corn, or 1 x 400g tin of corn kernels

Method
Place all the ingredients except for the corn kernels in a mixing bowl, and whisk to combine. Season with salt and pepper to taste.
Slice the kernels off the corn (or open the tin of corn!) and add to the bowl.
Heat a layer of vegetable oil in a non-stick frying pan. Cook spoonfuls of the corn mixture in the hot oil for about three minutes a side, only flipping when the fritters are sealed on the bottom.
Place the corn fritters in a 75C oven as you cook the rest of the batter.

Makes 6 fritters, serves 2-4 depending on how hungry you are and what you serve them with.
Corn fritters, (messily) poached eggs, smoked salmon, chive labneh, diced avocado
As you know, I love making quick-yet-nourishing weekday breakfasts, styling them prettily and instagramming them. On weekends, I've gotten into the habit of making slightly more involved cafe-style brunches - it takes a bit of time, but the results are delicious, and I do love pottering about the kitchen!

The breakfast, above, was my take on that ubiquitous cafe staple of corn fritters. I googled a few recipes to get a general idea of how to make them, and then ended up doing it my own way. Basically I wanted maximum corniness: loads of corn kernels just bound by a little batter.

To increase the corn-factor even more, I used a small tin of creamed corn as a binding agent, instead of just egg. Creamed corn is all kinds of awesome! For extra flavour I added a finely chopped red onion and cayenne pepper. (I later learned, through a hospo-working friend of mine, that one of the most popular restaurants in Melbourne uses corn purée in their fritters for this exact reason. Win!)
Corn fritter batter, pre-mixing

I used the kernels of a fresh ear of corn, and boosted quantities with a small tin of corn kernels, because this is what I happened to have in my fridge and pantry - for ease, in the recipe below I've specified either two ears of corn or a normal-sized (400 gram) tin of corn kernels.
Corn kernels
I loved the golden, corn-studded batter!
Batter
Shallow frying! One tip: this batter is quite delicate, with the corn kernels barely held together by the batter, so don't be tempted to flip the fritters until they are well and truly sealed on the bottom, and cooked at least half way through, otherwise you'll be in for a big mess! (As I write this, it occurs to me that you could deep-fry tablespoons of the mixture for a super-crispy result, but I feel that would be more canapé than brunch).
Frying

Cooked fritters
Now, the fun stuff: sides! I went all out and did poached eggs (mine were really messy, as you can see above - must practise!), smoked salmon, diced avocado spritzed with lime juice and sprinkled with salt and pepper, and chive labneh. And when I say labneh, I really mean that I just lined a sieve with a paper coffee filter, spooned some 0% Greek yogurt in there and let it drip while I got on with everything else. To serve the labneh, I poured over a little extra virgin olive oil, and sprinkled with salt, pepper and chopped chives. (Chopped chives make everything taste better!)
Diced avocado, chive labneh
Other ideas I had for sides: bacon, fried eggs, halloumi (like St. Ali's corn fritters), tomato relish (or any expensive relish/chutney/salsa that you have languishing in your pantry), guacamole, pico de gallo... anything you like, really! They're turn out quite sweet (corn, duh), so salty accompaniments work well. For the maximum corn-experience, why not wrap them up in a corn tortilla?

But you know what? Even if you eat these plain, they're pretty damn good. They're super-corny, nice and pancakey on the inside, and with fab crisp edges. Despite being fried, they feel light and bright and delicious. It's totally worth setting aside your Sunday morning to make these!

Corn Fritters
An original recipe from Sarah Cooks, inspired by the multitudes of corn fritters at Melbourne's cafes!

Ingredients
1 x 125 gram tin of creamed corn
1/4 cup flour
1 teaspoon bicarb
1 egg
1/4 teaspoon cayenne pepper
1/4 red onion, finely chopped
Small handful flat-leaf parsley, finely chopped
The kernels from 2 ears of corn, or 1 x 400g tin of corn kernels

Method
Place all the ingredients except for the corn kernels in a mixing bowl, and whisk to combine. Season with salt and pepper to taste.
Slice the kernels off the corn (or open the tin of corn!) and add to the bowl.
Heat a layer of vegetable oil in a non-stick frying pan. Cook spoonfuls of the corn mixture in the hot oil for about three minutes a side, only flipping when the fritters are sealed on the bottom.
Place the corn fritters in a 75C oven as you cook the rest of the batter.

Makes 6 fritters, serves 2-4 depending on how hungry you are and what you serve them with.
reade more... Résuméabuiyad

Eggplant and Zucchini Parmigiana

Eggplant and Zucchini Parmigiana, buttered cassarece
Brrrrr... it's really started to get cold, hasn't it? After our long, hot summer and mild March and April, I'm really feeling the cold! (I realise this our weather is nothing compared to the most recent European winter, but what can I say? I'm a wimp!) It's totally the weather for warm and comforting stews and bakes. Preferably with cheese.

Mmm... cheese

This eggplant and zucchini parmigiana is something I made to use up the eggplant and zucchinis we'd gotten delivered in the organic veggie box. It's just grilled eggplant and zucchini, layered with a tomato sauce and topped with buffalo mozzarella and breadcrumbs. You don't necessarily need to use expensive buffalo mozzarella, but I do love it so very much, and my local supermarket often sells DOC buffalo mozzarella at reduced prices when they get close to the use by date. Score!

It's warm and comforting, but not in the least bit stodgy. There's no meat, and it's easily adaptable to become gluten free and/or low carb (just omit the breadcrumbs and choose an appropriate side). I just made it up as I went along (see recipe below), but the idea itself is a classic one, and there are versions of it all over.

The dish isn't difficult, but it is time consuming, as you've got to grill the eggplants and zucchini, make a tomato sauce and bake it all. But I think it's something nice to do on a cold and windy day.

Eggplant layer

Tomato sauce!
I used onions, celery and carrots as the base for my tomato sauce - normally I'd just use onions, but again, I wanted to use up some carrots and celery from the veggie box. They also taste good, and have the benefit of increasing the vegetable quotient. (If you've read any of my Unblogged Files posts, you'll know that I need to include vegetables in my diet wherever I can!)

Zucchini layer
And here's the beautiful ball of buffalo mozzarella. Love it!
Buffalo Mozzarella

Cheese!
I find it tricky to slice the mozzarella neatly, but once it's blanketed with breadcrumbs and grated parmesan cheese, and baked, you can't tell.
Parmesan and crumbs
I served it with hot buttered noodles (with a few chives snipped through for extra deliciousness), but I think crusty bread, mashed potato or rice would be equally good.
Yum
Eggplant and Zucchini Parmigiana
A recipe by Sarah Cooks

Ingredients
1 large eggplant
2 medium zucchini
Olive oil, for grilling
1 onion
1 stick of celery
1 small carrot
1 clove of garlic, minced
700 mls tomato passata
1 x 100 grams ball buffalo mozzarella
Parmesan cheese
Breadcrumbs

Method
Heat a griddle pan to medium-high heat. Slice the eggplant crosswise into slices just under a centimetre thick, and slice the zucchini lengthwise into slices of the same thickness. Brush the slices with olive oil and grill for a few minutes on each side until cooked through and soft. Set aside.
Heat some olive oil in a saucepan. Finely chop the onion and celery, and finely grate the carrot (or just whizz it up in a food processor). Add to the saucepan with a generous pinch of salt and cook for five to ten minutes, or until softened. Add the minced garlic and cook for a further minute. Add the tomato passata and stir well. Bring to the boil, then turn the heat to low and simmer for twenty minutes.
Preheat the oven to 200C.
Brush a 20cm round ceramic dish with olive oil. Arrange a layer of eggplant slices on the bottom, followed by a third of the tomato sauce. Then arrange the zucchini slices on top, followed by another third of the tomato sauce. Finish with the remaining eggplant and tomato sauce. Rip or slice up the buffalo mozzarella and arrange on top. Grate some parmesan cheese over and sprinkle with breadcrumbs.
Bake for 20-30 minutes, or until piping hot all the way through and golden brown on top.
Allow to rest for 10 minutes before slicing.
Serve with crusty bread, hot buttered (and chive'd) pasta or any carb of your choice.
Serves 6
Eggplant and Zucchini Parmigiana, buttered cassarece
Brrrrr... it's really started to get cold, hasn't it? After our long, hot summer and mild March and April, I'm really feeling the cold! (I realise this our weather is nothing compared to the most recent European winter, but what can I say? I'm a wimp!) It's totally the weather for warm and comforting stews and bakes. Preferably with cheese.

Mmm... cheese

This eggplant and zucchini parmigiana is something I made to use up the eggplant and zucchinis we'd gotten delivered in the organic veggie box. It's just grilled eggplant and zucchini, layered with a tomato sauce and topped with buffalo mozzarella and breadcrumbs. You don't necessarily need to use expensive buffalo mozzarella, but I do love it so very much, and my local supermarket often sells DOC buffalo mozzarella at reduced prices when they get close to the use by date. Score!

It's warm and comforting, but not in the least bit stodgy. There's no meat, and it's easily adaptable to become gluten free and/or low carb (just omit the breadcrumbs and choose an appropriate side). I just made it up as I went along (see recipe below), but the idea itself is a classic one, and there are versions of it all over.

The dish isn't difficult, but it is time consuming, as you've got to grill the eggplants and zucchini, make a tomato sauce and bake it all. But I think it's something nice to do on a cold and windy day.

Eggplant layer

Tomato sauce!
I used onions, celery and carrots as the base for my tomato sauce - normally I'd just use onions, but again, I wanted to use up some carrots and celery from the veggie box. They also taste good, and have the benefit of increasing the vegetable quotient. (If you've read any of my Unblogged Files posts, you'll know that I need to include vegetables in my diet wherever I can!)

Zucchini layer
And here's the beautiful ball of buffalo mozzarella. Love it!
Buffalo Mozzarella

Cheese!
I find it tricky to slice the mozzarella neatly, but once it's blanketed with breadcrumbs and grated parmesan cheese, and baked, you can't tell.
Parmesan and crumbs
I served it with hot buttered noodles (with a few chives snipped through for extra deliciousness), but I think crusty bread, mashed potato or rice would be equally good.
Yum
Eggplant and Zucchini Parmigiana
A recipe by Sarah Cooks

Ingredients
1 large eggplant
2 medium zucchini
Olive oil, for grilling
1 onion
1 stick of celery
1 small carrot
1 clove of garlic, minced
700 mls tomato passata
1 x 100 grams ball buffalo mozzarella
Parmesan cheese
Breadcrumbs

Method
Heat a griddle pan to medium-high heat. Slice the eggplant crosswise into slices just under a centimetre thick, and slice the zucchini lengthwise into slices of the same thickness. Brush the slices with olive oil and grill for a few minutes on each side until cooked through and soft. Set aside.
Heat some olive oil in a saucepan. Finely chop the onion and celery, and finely grate the carrot (or just whizz it up in a food processor). Add to the saucepan with a generous pinch of salt and cook for five to ten minutes, or until softened. Add the minced garlic and cook for a further minute. Add the tomato passata and stir well. Bring to the boil, then turn the heat to low and simmer for twenty minutes.
Preheat the oven to 200C.
Brush a 20cm round ceramic dish with olive oil. Arrange a layer of eggplant slices on the bottom, followed by a third of the tomato sauce. Then arrange the zucchini slices on top, followed by another third of the tomato sauce. Finish with the remaining eggplant and tomato sauce. Rip or slice up the buffalo mozzarella and arrange on top. Grate some parmesan cheese over and sprinkle with breadcrumbs.
Bake for 20-30 minutes, or until piping hot all the way through and golden brown on top.
Allow to rest for 10 minutes before slicing.
Serve with crusty bread, hot buttered (and chive'd) pasta or any carb of your choice.
Serves 6
reade more... Résuméabuiyad