Pages

Showing posts with label dessert cakes. Show all posts

Raspberry Velvet Cake - No artificial color or flavoring

Raspberry Velvet Cake - No artificial color or flavoring
The velvet cake collection grows today with a new flavor, raspberry...and without any artificial color or flavoring. We try very hard to limit the amount of fake food at our house, preferring to cook and bake from scratch with real ingredients and avoiding preservatives and chemical based food colorings and artificial flavorings as much as possible. My son and I love anything raspberry so I set out to try incorporating some raspberry puree into the batter which with it's intense natural flavor and color seemed like a good choice. 

In terms of flavor, there was not much difference but the frozen berries produced a darker pink color if that matters to you. The cake is as moist and light as the others in our Velvet Cake Collection with good raspberry flavor coming through. Some additional puree added to a raspberry buttercream frosting would add even more great raspberry flavor but we liked it with this fluffy marshmallow frosting. Get that frosting recipe by visiting our recipe for Black and White Cake.
 
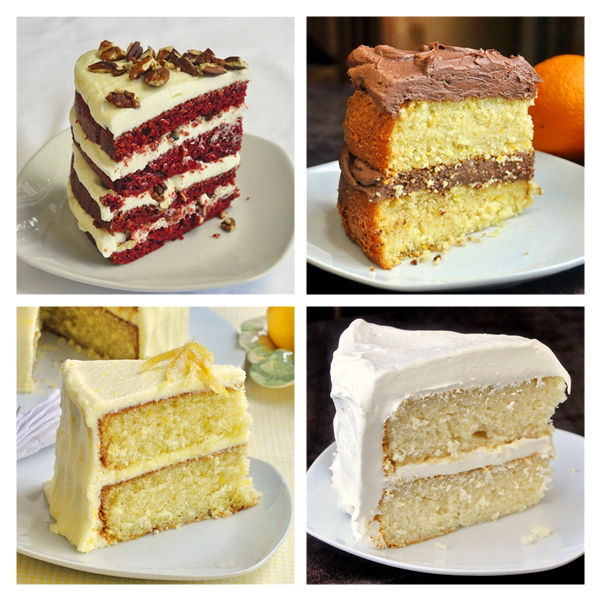
Click the photo at the bottom of the post for our other velvet cake recipes, Red Velvet, White Velvet,  Orange Velvet and Lemon Velvet.

Raspberry Velvet Cake

Recipe by Barry C. Parsons
Raspberry Velvet Cake - developed from an outstanding Red Velvet Cake recipe, this beautiful cake is a perfectly moist and tender crumbed cake that would make an ideal birthday cake.
Prep time: Approximately 20 minutes
Cook time: 35 minutes
Total time: Approximately 1 hour.
Ingredients
  • 1 1/4 cups sifted all purpose flour
  • 1 1/2 cups sifted cake flour
  • 1/2 teaspoon baking soda
  • 1 1/2 tsp baking powder
  • 1 teaspoon salt
  • 1 1/2 cups sugar
  • 2/3 cup vegetable oil
  • 1/3 cup vegetable shortening at room temperature
  • 1 tsp good quality pure vanilla extract
  • 3 large eggs
  • 3/4 cup undiluted evaporated milk
  • 3/4 cup raspberry puree
Directions
  1. Make the raspberry puree by mashing fresh or frozen raspberries and pressing them through a fine sieve to remove the seeds. You will need at least 2 cups of raspberries or more to make sufficient puree
  2. Grease and flour 2 nine inch round cake pans and line the bottom with 2 circles of parchment paper. 
  3. Sift together both flours, baking soda. baking powder, salt and sugar, Set aside.
  4. In the bowl of an electric mixer beat together the vegetable oil, shortening and vanilla. Beat well at high speed with whisk attachment until light and fluffy
  5. Beat the eggs in one at a time.
  6. Stir together the undiluted evaporated milk and raspberry puree.
  7. Fold in the dry ingredients alternately with the raspberry and milk mixture.
  8. I always add dry ingredients in three divisions and liquid ingredients in 2 divisions. It is very important to begin and end the additions with the dry ingredients. Do not over mix the batter. As soon as it has no lumps in the batter, pour into the two prepared 9 inch cake pans.
  9. Bake at 325 degrees F for 30-35 minutes or until a wooden toothpick inserted in the center comes out clean. Allow the cake to cool in the pans for 10 minutes before turning out onto wire racks to cool completely.
  10. I've frosted this cake with Marshmallow Frosting but any good vanilla frosting is great on this cake. Find the frosting recipe with our Black and White Cake
Click the photo below to see the other outstanding recipes in our 

    Raspberry Velvet Cake - No artificial color or flavoring
    Raspberry Velvet Cake - No artificial color or flavoring
    The velvet cake collection grows today with a new flavor, raspberry...and without any artificial color or flavoring. We try very hard to limit the amount of fake food at our house, preferring to cook and bake from scratch with real ingredients and avoiding preservatives and chemical based food colorings and artificial flavorings as much as possible. My son and I love anything raspberry so I set out to try incorporating some raspberry puree into the batter which with it's intense natural flavor and color seemed like a good choice. 

    In terms of flavor, there was not much difference but the frozen berries produced a darker pink color if that matters to you. The cake is as moist and light as the others in our Velvet Cake Collection with good raspberry flavor coming through. Some additional puree added to a raspberry buttercream frosting would add even more great raspberry flavor but we liked it with this fluffy marshmallow frosting. Get that frosting recipe by visiting our recipe for Black and White Cake.
     
    Click the photo at the bottom of the post for our other velvet cake recipes, Red Velvet, White Velvet,  Orange Velvet and Lemon Velvet.

    Raspberry Velvet Cake

    Recipe by Barry C. Parsons
    Raspberry Velvet Cake - developed from an outstanding Red Velvet Cake recipe, this beautiful cake is a perfectly moist and tender crumbed cake that would make an ideal birthday cake.
    Prep time: Approximately 20 minutes
    Cook time: 35 minutes
    Total time: Approximately 1 hour.
    Ingredients
    • 1 1/4 cups sifted all purpose flour
    • 1 1/2 cups sifted cake flour
    • 1/2 teaspoon baking soda
    • 1 1/2 tsp baking powder
    • 1 teaspoon salt
    • 1 1/2 cups sugar
    • 2/3 cup vegetable oil
    • 1/3 cup vegetable shortening at room temperature
    • 1 tsp good quality pure vanilla extract
    • 3 large eggs
    • 3/4 cup undiluted evaporated milk
    • 3/4 cup raspberry puree
    Directions
    1. Make the raspberry puree by mashing fresh or frozen raspberries and pressing them through a fine sieve to remove the seeds. You will need at least 2 cups of raspberries or more to make sufficient puree
    2. Grease and flour 2 nine inch round cake pans and line the bottom with 2 circles of parchment paper. 
    3. Sift together both flours, baking soda. baking powder, salt and sugar, Set aside.
    4. In the bowl of an electric mixer beat together the vegetable oil, shortening and vanilla. Beat well at high speed with whisk attachment until light and fluffy
    5. Beat the eggs in one at a time.
    6. Stir together the undiluted evaporated milk and raspberry puree.
    7. Fold in the dry ingredients alternately with the raspberry and milk mixture.
    8. I always add dry ingredients in three divisions and liquid ingredients in 2 divisions. It is very important to begin and end the additions with the dry ingredients. Do not over mix the batter. As soon as it has no lumps in the batter, pour into the two prepared 9 inch cake pans.
    9. Bake at 325 degrees F for 30-35 minutes or until a wooden toothpick inserted in the center comes out clean. Allow the cake to cool in the pans for 10 minutes before turning out onto wire racks to cool completely.
    10. I've frosted this cake with Marshmallow Frosting but any good vanilla frosting is great on this cake. Find the frosting recipe with our Black and White Cake
    Click the photo below to see the other outstanding recipes in our 

      reade more... Résuméabuiyad

      Lemon Velvet Cake

      Lemon Velvet Cake
      Lemon Velvet Cake
      It all started with me trying to develop the best Red Velvet Cake recipe I could.  It was such a sucess and I loved the moist, tender texture of that cake so much that I just had to try a White Velvet Cake and then an Orange Velvet Cake. Those turned out to be a couple of the most popular cake recipes ever on Rock Recipes so I couldn't stop there. Keeping the lemon lovers like me in mind, a luscious lemon version was inevitable. The creamy, tangy lemon buttercream frosting goes particularly well with this beautiful lemon cake too.

      Am I done with Velvet Cake recipes yet? Maybe not, I have an idea that might work out for yet another version. Here's a clue...think pink. :) 

      Lemon Velvet Cake
      Lemon Velvet Cake
      Lemon Velvet Cake

      Recipe by Barry C. Parsons
      Developed from an outstanding Red Velvet Cake recipe, this lemon cake is a perfectly moist and tender crumbed cake with a lemony buttercream frosting. An ideal birthday cake for the lemon lover in your life.
      Prep time: Approximately 20 minutes
      Cook time: 35 minutes
      Total time: Approximately 1 hour.
      Yield: 12 -16 servings
      Ingredients
      • 1 1/4 cups sifted all purpose flour
      • 1 1/2 cups sifted cake flour
      • 1/2 teaspoon baking soda
      • 1 1/2 tsp baking powder
      • 1 teaspoon salt
      • 1 1/2 cups sugar
      • 2/3 cup vegetable oil
      • 1/3 cup vegetable shortening at room temperature
      • 1 tsp good quality vanilla extract
      • 2 tsp pure lemon extract
      • 3 large eggs
      • 1 1/2 cups buttermilk
      • zest of two small or one large lemons, grated and finely chopped
      • FOR THE FROSTING
      • 8 cups icing sugar (powdered sugar)
      • 2 cups unsalted butter
      • 1 tsp pure lemon extract
      • 1 tsp minced lemon zest (optional) 
      • aprox 4 tbsp milk
      Directions
      1. Grease and flour 2 nine inch round cake pans and line the bottom with 2 circles of parchment paper. Sift together both flours, baking soda. baking powder, salt and sugar, Set aside.
      2. In the bowl of an electric mixer beat together the vegetable oil, shortening, vanilla and lemon extract. Beat well at high speed with whisk attachment until light and fluffy
      3. Beat the eggs in one at a time.
      4. Fold in the lemon zest.
      5. Fold in the dry ingredients alternately with the buttermilk.
      6. I always add dry ingredients in three divisions and liquid ingredients in 2 divisions. It is very important to begin and end the additions with the dry ingredients. Do not over mix the batter. As soon as it has no lumps in the batter, pour into the two prepared 9 inch cake pans.
      7. Bake at 325 degrees F for 30-35 minutes or until a wooden toothpick inserted in the center comes out clean. Allow the cake to cool in the pans for 10 minutes before turning out onto wire racks to cool completely.
      8. FOR THE FROSTING: mix together the icing sugar, lemon zest and butter until it becomes sort of crumbly.
      9. Add the lemon extract and a little of the milk.
      10. Beat until smooth and fluffy, adding only enough milk to bring the frosting to a creamy spreadable consistency.
      11. Fill and frost the cake. Garnish with candied lemon zest if desired.
      12. To make candied lemon zest, remove the zest with a sharp vegetable peeler in long strips, avoiding as much of the white pith as possible.
      13. Bring one cup of water and one cup of sugar to a slow boil.
      14. Add the pieces of lemon zest and boil for about 15 minutes. Drain the lemon zest on a wire rack.
      15. When cool, cut them in strips and roll in fine sugar. 
      For the other recipes in our Velvet Cakes Collection click the photo below.
      The Velvet Cake Collection

        Lemon Velvet Cake
        Lemon Velvet Cake
        It all started with me trying to develop the best Red Velvet Cake recipe I could.  It was such a sucess and I loved the moist, tender texture of that cake so much that I just had to try a White Velvet Cake and then an Orange Velvet Cake. Those turned out to be a couple of the most popular cake recipes ever on Rock Recipes so I couldn't stop there. Keeping the lemon lovers like me in mind, a luscious lemon version was inevitable. The creamy, tangy lemon buttercream frosting goes particularly well with this beautiful lemon cake too.

        Am I done with Velvet Cake recipes yet? Maybe not, I have an idea that might work out for yet another version. Here's a clue...think pink. :) 

        Lemon Velvet Cake
        Lemon Velvet Cake
        Lemon Velvet Cake

        Recipe by Barry C. Parsons
        Developed from an outstanding Red Velvet Cake recipe, this lemon cake is a perfectly moist and tender crumbed cake with a lemony buttercream frosting. An ideal birthday cake for the lemon lover in your life.
        Prep time: Approximately 20 minutes
        Cook time: 35 minutes
        Total time: Approximately 1 hour.
        Yield: 12 -16 servings
        Ingredients
        • 1 1/4 cups sifted all purpose flour
        • 1 1/2 cups sifted cake flour
        • 1/2 teaspoon baking soda
        • 1 1/2 tsp baking powder
        • 1 teaspoon salt
        • 1 1/2 cups sugar
        • 2/3 cup vegetable oil
        • 1/3 cup vegetable shortening at room temperature
        • 1 tsp good quality vanilla extract
        • 2 tsp pure lemon extract
        • 3 large eggs
        • 1 1/2 cups buttermilk
        • zest of two small or one large lemons, grated and finely chopped
        • FOR THE FROSTING
        • 8 cups icing sugar (powdered sugar)
        • 2 cups unsalted butter
        • 1 tsp pure lemon extract
        • 1 tsp minced lemon zest (optional) 
        • aprox 4 tbsp milk
        Directions
        1. Grease and flour 2 nine inch round cake pans and line the bottom with 2 circles of parchment paper. Sift together both flours, baking soda. baking powder, salt and sugar, Set aside.
        2. In the bowl of an electric mixer beat together the vegetable oil, shortening, vanilla and lemon extract. Beat well at high speed with whisk attachment until light and fluffy
        3. Beat the eggs in one at a time.
        4. Fold in the lemon zest.
        5. Fold in the dry ingredients alternately with the buttermilk.
        6. I always add dry ingredients in three divisions and liquid ingredients in 2 divisions. It is very important to begin and end the additions with the dry ingredients. Do not over mix the batter. As soon as it has no lumps in the batter, pour into the two prepared 9 inch cake pans.
        7. Bake at 325 degrees F for 30-35 minutes or until a wooden toothpick inserted in the center comes out clean. Allow the cake to cool in the pans for 10 minutes before turning out onto wire racks to cool completely.
        8. FOR THE FROSTING: mix together the icing sugar, lemon zest and butter until it becomes sort of crumbly.
        9. Add the lemon extract and a little of the milk.
        10. Beat until smooth and fluffy, adding only enough milk to bring the frosting to a creamy spreadable consistency.
        11. Fill and frost the cake. Garnish with candied lemon zest if desired.
        12. To make candied lemon zest, remove the zest with a sharp vegetable peeler in long strips, avoiding as much of the white pith as possible.
        13. Bring one cup of water and one cup of sugar to a slow boil.
        14. Add the pieces of lemon zest and boil for about 15 minutes. Drain the lemon zest on a wire rack.
        15. When cool, cut them in strips and roll in fine sugar. 
        For the other recipes in our Velvet Cakes Collection click the photo below.
        The Velvet Cake Collection

          reade more... Résuméabuiyad

          Billot Log Cake a.k.a. Raspberry Buttercream Log

          Billot Log Cake a.k.a. Raspberry Buttercream Log
          Billot Log Cake a.k.a. Raspberry Buttercream Log
          With the Canada Day weekend just a few days away I decided to create a dessert for our nation's 146th birthday based yet again on another popular snack cake from my childhood, Vachon's Billot Log cake, a mini sponge roll cake filled with raspberry jelly and sweet frosting and rolled in coconut. We've previously featured another Vachon inspired cake in our Jos Louis Cake.

          The red and white coloring of the little treats is reflective of the Canadian flag, so with some sweet fresh raspberries in the fridge I decided to take inspiration from it and create a homage to the Billot Log cake, in particular for my son Noah who absolutely loves raspberries and specifically asked  for a cake with lots of frosting. He thought this cake was the best thing ever. I know he'll be asking for it again and I wouldn't be surprised if it makes another appearance as his birthday cake later this summer.

          Billot Log Cake a.k.a. Raspberry Buttercream Log
          Billot Log Cake a.k.a. Raspberry Buttercream Log

          For those of you unfamiliar with the Billot Log, I thought this YouTube "un-boxing" of the snack cake was quite amusing.  Happy Canada Day!


          Sponge Cake

          Line the bottom of a 12 x 18 inch jelly roll pan or ridged cookie sheet with parchment paper cut to it's exact size. Do not grease the pan. Preheat oven to 300 degrees F.


          Sift together and set aside:
          • 1 cup flour
          • 1 tsp baking powder
          For the meringue base of the batter you will need:
          • 6 eggs separated, room temperature
          • 1/4 tsp cream of tarter
          • 1  cup sugar, separated in 2 portions of  1/2 cup
          • 1 1/2tsp vanilla extract
          Beat egg whites and cream of tarter until foamy. Add 1/2 cup sugar gradually until egg whites are stiff.
           
          Beat egg yolks and 1/2 cup sugar until foamy and thickened.

           
          Fold beaten egg yolks into the beaten egg whites along with the vanilla for only a few turns before slowly and gradually folding in the flour and baking powder mixture very gently BY HAND using a rubber spatula until just incorporated into the meringue mixture. I mix in the dry ingredients in 3 equal portions. Do not over mix, you just want the flour to be incorporated; over mixing will deflate the egg whites and result in a tough textured final product.


          Spread the batter evenly into the prepared pan and bake for 25 minutes until the center springs back when touched. 

          Cool in the pan for about 15 minutes. Run a sharp knife around the edge of the pan to release the cake. Cover the top of the cake wit h another sheet of parchment paper and invert onto the counter top. Beginning at the shortest side, loosely roll the cake up, letting it rest with the edge seam on the bottom. Let it cool completely. This technique will allow the cake to be more easily rolled later without cracking when the filling is added.

          Vanilla Buttercream Frosting

          In the bowl of an electric mixer blend together until the butter is well incorporated:
          • 6 cups icing sugar (powdered sugar)
          • 1 1/2 cups butter
          Add:
          • Approximately 3-4 tbsp milk
          • 2 tsp vanilla extract
          Add the milk a little at a time until the frosting is light, fluffy and smooth. I like to beat the frosting for an additional 5 minutes once I get the consistency correct in order to beat in more air and make it lighter and creamier.

          To construct the cake:

          Unroll the sponge cake and remove the top parchment paper. Spread the frosting evenly over the cake. Sprinkle the surface of the frosting evenly with:
          • 1 1/2 cups fresh raspberries
          Starting at a short side of the cake, begin to roll the cake up, removing the bottom parchment paper as you go. The parchment paper is a great help in rolling the cake.

          Let the cake rest on a serving plate with the seam side down. Mix together:

          • 3/4 cup raspberry jam or jelly
          • 2 tbsp water
          Heat the jelly and water in the microwave or in a small pot on the stove until it is smooth and evenly blended. Brush the heated jelly all over the surface of the cake roll. Finally sprinkle the entire surface of the cake roll with
          • 3/4 cup sweetened dried coconut
          Chill the cake in the refrigerator for a couple of hours before serving. I like to make this cake the day before to give time for the raspberries to meld with the sugar in the frosting making it even better.


          Billot Log Cake a.k.a. Raspberry Buttercream Log
          Billot Log Cake a.k.a. Raspberry Buttercream Log
          With the Canada Day weekend just a few days away I decided to create a dessert for our nation's 146th birthday based yet again on another popular snack cake from my childhood, Vachon's Billot Log cake, a mini sponge roll cake filled with raspberry jelly and sweet frosting and rolled in coconut. We've previously featured another Vachon inspired cake in our Jos Louis Cake.

          The red and white coloring of the little treats is reflective of the Canadian flag, so with some sweet fresh raspberries in the fridge I decided to take inspiration from it and create a homage to the Billot Log cake, in particular for my son Noah who absolutely loves raspberries and specifically asked  for a cake with lots of frosting. He thought this cake was the best thing ever. I know he'll be asking for it again and I wouldn't be surprised if it makes another appearance as his birthday cake later this summer.

          Billot Log Cake a.k.a. Raspberry Buttercream Log
          Billot Log Cake a.k.a. Raspberry Buttercream Log

          For those of you unfamiliar with the Billot Log, I thought this YouTube "un-boxing" of the snack cake was quite amusing.  Happy Canada Day!


          Sponge Cake

          Line the bottom of a 12 x 18 inch jelly roll pan or ridged cookie sheet with parchment paper cut to it's exact size. Do not grease the pan. Preheat oven to 300 degrees F.


          Sift together and set aside:
          • 1 cup flour
          • 1 tsp baking powder
          For the meringue base of the batter you will need:
          • 6 eggs separated, room temperature
          • 1/4 tsp cream of tarter
          • 1  cup sugar, separated in 2 portions of  1/2 cup
          • 1 1/2tsp vanilla extract
          Beat egg whites and cream of tarter until foamy. Add 1/2 cup sugar gradually until egg whites are stiff.
           
          Beat egg yolks and 1/2 cup sugar until foamy and thickened.

           
          Fold beaten egg yolks into the beaten egg whites along with the vanilla for only a few turns before slowly and gradually folding in the flour and baking powder mixture very gently BY HAND using a rubber spatula until just incorporated into the meringue mixture. I mix in the dry ingredients in 3 equal portions. Do not over mix, you just want the flour to be incorporated; over mixing will deflate the egg whites and result in a tough textured final product.


          Spread the batter evenly into the prepared pan and bake for 25 minutes until the center springs back when touched. 

          Cool in the pan for about 15 minutes. Run a sharp knife around the edge of the pan to release the cake. Cover the top of the cake wit h another sheet of parchment paper and invert onto the counter top. Beginning at the shortest side, loosely roll the cake up, letting it rest with the edge seam on the bottom. Let it cool completely. This technique will allow the cake to be more easily rolled later without cracking when the filling is added.

          Vanilla Buttercream Frosting

          In the bowl of an electric mixer blend together until the butter is well incorporated:
          • 6 cups icing sugar (powdered sugar)
          • 1 1/2 cups butter
          Add:
          • Approximately 3-4 tbsp milk
          • 2 tsp vanilla extract
          Add the milk a little at a time until the frosting is light, fluffy and smooth. I like to beat the frosting for an additional 5 minutes once I get the consistency correct in order to beat in more air and make it lighter and creamier.

          To construct the cake:

          Unroll the sponge cake and remove the top parchment paper. Spread the frosting evenly over the cake. Sprinkle the surface of the frosting evenly with:
          • 1 1/2 cups fresh raspberries
          Starting at a short side of the cake, begin to roll the cake up, removing the bottom parchment paper as you go. The parchment paper is a great help in rolling the cake.

          Let the cake rest on a serving plate with the seam side down. Mix together:

          • 3/4 cup raspberry jam or jelly
          • 2 tbsp water
          Heat the jelly and water in the microwave or in a small pot on the stove until it is smooth and evenly blended. Brush the heated jelly all over the surface of the cake roll. Finally sprinkle the entire surface of the cake roll with
          • 3/4 cup sweetened dried coconut
          Chill the cake in the refrigerator for a couple of hours before serving. I like to make this cake the day before to give time for the raspberries to meld with the sugar in the frosting making it even better.


          reade more... Résuméabuiyad

          Roasted Peaches and Cream Cake

          Roasted Peaches and Cream Cake
          Roasted Peaches and Cream Cake
          Summer peaches are among my absolute favorite fruits. I remember picking them up at roadside stands on the Niagara peninsula in Ontario during a family road trip as a kid when they were at their peak of sweetness and juiciness. I've been in love with them ever since and they are among my most preferred fruits for summer desserts too. My annual anticipation of baking my Perfect Peach Pie is one of the highlights of my culinary year. That one will have to wait a few weeks for Canadian peaches but with some quite good US peaches available in my local supermarket this week, I decided to try out this idea for a roasted peach compote used on a simple butter cake with vanilla whipped cream as a frosting.

          The result was utterly delicious as some of my neighbors who were the lucky recipients of much of this cake can attest. The roasting of the peaches released their sweet juice and intensified the flavor. This would make a great summer celebration cake for occasions like Father's Day, Canada Day, the Fourth of July or any summer birthday.

          Roasted Peaches and Cream Cake
          Roasted Peaches and Cream Cake

          Butter Cake

          Grease two 8 or 9 inch cake pans and line the bottoms with parchment paper. Preheat oven to 325 degrees F.
          |
          Sift together and set aside:

          • 1 1/4 cups sifted all purpose flour
          • 1 1/2 cups sifted cake flour                                                                           
          • 1/2  teaspoon baking soda
          • 1 1/2 tsp baking powder
          • 1 teaspoon salt
          In the bowl of an electric mixer beat together well at high speed with whisk attachment until light and fluffy :
          • 2/3 cup butter
          • 1/3 cup vegetable oil
          • 3 tablespoons good quality vanilla extract
          • 1 1/2 cups sugar 
          Beat in, one at a time,
          • 3 large eggs
          Fold in the dry ingredients alternately with:
          • 1 1/2 cups buttermilk
          I always add dry ingredients in three divisions and liquid ingredients in 2 divisions. It is very important to begin and end the additions with the dry ingredients. Do not over mix the batter. As soon as it has no lumps in the batter, pour into the two prepared 9 inch cake pans.

          Bake at 325 degrees F for 30-35 minutes or until a wooden toothpick inserted in the center comes out clean. Allow the cake to cool in the pans for 10 minutes before turning out onto wire racks to cool completely.

          Roasted Peach Compote

          • 2 1/2 pounds fresh peaches, peeled and diced large
          • 1/2 cup brown sugar
          • 1/2 tsp cinnamon
          • 1/4 tsp freshly grated nutmeg
          • 2 tsp vanilla extract

          Toss all ingredients together in a glass baking dish and bake at 350 degrees for approximately half an hour. Thicken the compote by adding a slurry made by mixing together:
          • 1/4 cup water
          • 2-3 tbsp corn starch (depending on how much juice has been released from the peaches)
          Return to the oven until the mixture is bubbling well and thickened. Allow to cool completely.

          Vanilla Whipped Cream


          Beat to firm peaks:
          • 3 cups whipping cream
          • 6 tbsp icing sugar (powdered sugar)
          • 2 tsp vanilla extract


          To construct the cake:

          Use a piping bag or a Ziploc bag with the corner snipped off to pipe a 1/2 inch wide line of cream around the perimeter of the first layer of cake. This step is important because it will keep the peach filling from spilling out as you assemble the cake. Fill the center of the ring with peach compote and place the second layer of cake on top.

          Frost the sides of the cake and pipe another border on the top and bottom of the cake. Fill the center of the top border with peach compote. Chill for several hours before serving.

          As an alternative, you may find it easier to serve it as two separate single layer cakes.

          Roasted Peaches and Cream Cake
          Roasted Peaches and Cream Cake
          Summer peaches are among my absolute favorite fruits. I remember picking them up at roadside stands on the Niagara peninsula in Ontario during a family road trip as a kid when they were at their peak of sweetness and juiciness. I've been in love with them ever since and they are among my most preferred fruits for summer desserts too. My annual anticipation of baking my Perfect Peach Pie is one of the highlights of my culinary year. That one will have to wait a few weeks for Canadian peaches but with some quite good US peaches available in my local supermarket this week, I decided to try out this idea for a roasted peach compote used on a simple butter cake with vanilla whipped cream as a frosting.

          The result was utterly delicious as some of my neighbors who were the lucky recipients of much of this cake can attest. The roasting of the peaches released their sweet juice and intensified the flavor. This would make a great summer celebration cake for occasions like Father's Day, Canada Day, the Fourth of July or any summer birthday.

          Roasted Peaches and Cream Cake
          Roasted Peaches and Cream Cake

          Butter Cake

          Grease two 8 or 9 inch cake pans and line the bottoms with parchment paper. Preheat oven to 325 degrees F.
          |
          Sift together and set aside:

          • 1 1/4 cups sifted all purpose flour
          • 1 1/2 cups sifted cake flour                                                                           
          • 1/2  teaspoon baking soda
          • 1 1/2 tsp baking powder
          • 1 teaspoon salt
          In the bowl of an electric mixer beat together well at high speed with whisk attachment until light and fluffy :
          • 2/3 cup butter
          • 1/3 cup vegetable oil
          • 3 tablespoons good quality vanilla extract
          • 1 1/2 cups sugar 
          Beat in, one at a time,
          • 3 large eggs
          Fold in the dry ingredients alternately with:
          • 1 1/2 cups buttermilk
          I always add dry ingredients in three divisions and liquid ingredients in 2 divisions. It is very important to begin and end the additions with the dry ingredients. Do not over mix the batter. As soon as it has no lumps in the batter, pour into the two prepared 9 inch cake pans.

          Bake at 325 degrees F for 30-35 minutes or until a wooden toothpick inserted in the center comes out clean. Allow the cake to cool in the pans for 10 minutes before turning out onto wire racks to cool completely.

          Roasted Peach Compote

          • 2 1/2 pounds fresh peaches, peeled and diced large
          • 1/2 cup brown sugar
          • 1/2 tsp cinnamon
          • 1/4 tsp freshly grated nutmeg
          • 2 tsp vanilla extract

          Toss all ingredients together in a glass baking dish and bake at 350 degrees for approximately half an hour. Thicken the compote by adding a slurry made by mixing together:
          • 1/4 cup water
          • 2-3 tbsp corn starch (depending on how much juice has been released from the peaches)
          Return to the oven until the mixture is bubbling well and thickened. Allow to cool completely.

          Vanilla Whipped Cream


          Beat to firm peaks:
          • 3 cups whipping cream
          • 6 tbsp icing sugar (powdered sugar)
          • 2 tsp vanilla extract


          To construct the cake:

          Use a piping bag or a Ziploc bag with the corner snipped off to pipe a 1/2 inch wide line of cream around the perimeter of the first layer of cake. This step is important because it will keep the peach filling from spilling out as you assemble the cake. Fill the center of the ring with peach compote and place the second layer of cake on top.

          Frost the sides of the cake and pipe another border on the top and bottom of the cake. Fill the center of the top border with peach compote. Chill for several hours before serving.

          As an alternative, you may find it easier to serve it as two separate single layer cakes.

          reade more... Résuméabuiyad

          Classic Victoria Sandwich Cake

          I am a dedicated Anglophile. I gravitate toward all things British. My favorite TV comedies, cooking shows, documentary and history programs are all British. If it's British, I probably like it, so today, on the occasion of my birthday, I'm keeping it dead simple with a true British classic, the Victoria Sandwich Cake.
          Classic Victoria Sandwich Cake
          Classic Victoria Sandwich Cake

          Favored by Queen Victoria herself at afternoon tea, this very simple cake is much akin to pound cake in its ingredient proportions, using an equal weight of the basic four ingredients; flour, sugar, butter and eggs. Don't skimp on a generous layer of jam at the center either. Raspberry is traditional but any favorite jam will do. Put together some cucumber or cress sandwiches, bake some scones or Jammy Dodgers and indulge in afternoon tea with a generous slice of this simply perfect little cake. Happy Birthday to me!

          Grease and flour 2 eight inch cake pans and line the bottoms with parchment paper. Preheat oven to 350 degrees F.

          Sift together and set aside:
          • 1 1/4 cups flour
          • 1 tsp baking powder
          • pinch salt
          Cream together very well until very light and fluffy:
          • 3/4 cup butter
          • 2/3 cup sugar
          Add, one at a time, beating well after each addition:
          • 3 large eggs
          Beat in 1 tbsp of the flour mixture with each addition of egg, to keep the structure of the batter stable.

          Beat in:
          • 2 tsp vanilla extract
          Finally carefully and as lightly as possible, fold in the flour mixture in two equal portions. Divide the batter evenly between the two cake pans and bake for 20- 25 minutes until the middle of the cakes springs back when pressed lightly.

          Cool in the pans for a few minutes before turning them out onto a wire rack to cool completely. Fill the middle of the cake with a generous amount of

          • Raspberry Jam

          Dust the top of the cake with plenty of powdered sugar.

          I am a dedicated Anglophile. I gravitate toward all things British. My favorite TV comedies, cooking shows, documentary and history programs are all British. If it's British, I probably like it, so today, on the occasion of my birthday, I'm keeping it dead simple with a true British classic, the Victoria Sandwich Cake.
          Classic Victoria Sandwich Cake
          Classic Victoria Sandwich Cake

          Favored by Queen Victoria herself at afternoon tea, this very simple cake is much akin to pound cake in its ingredient proportions, using an equal weight of the basic four ingredients; flour, sugar, butter and eggs. Don't skimp on a generous layer of jam at the center either. Raspberry is traditional but any favorite jam will do. Put together some cucumber or cress sandwiches, bake some scones or Jammy Dodgers and indulge in afternoon tea with a generous slice of this simply perfect little cake. Happy Birthday to me!

          Grease and flour 2 eight inch cake pans and line the bottoms with parchment paper. Preheat oven to 350 degrees F.

          Sift together and set aside:
          • 1 1/4 cups flour
          • 1 tsp baking powder
          • pinch salt
          Cream together very well until very light and fluffy:
          • 3/4 cup butter
          • 2/3 cup sugar
          Add, one at a time, beating well after each addition:
          • 3 large eggs
          Beat in 1 tbsp of the flour mixture with each addition of egg, to keep the structure of the batter stable.

          Beat in:
          • 2 tsp vanilla extract
          Finally carefully and as lightly as possible, fold in the flour mixture in two equal portions. Divide the batter evenly between the two cake pans and bake for 20- 25 minutes until the middle of the cakes springs back when pressed lightly.

          Cool in the pans for a few minutes before turning them out onto a wire rack to cool completely. Fill the middle of the cake with a generous amount of

          • Raspberry Jam

          Dust the top of the cake with plenty of powdered sugar.

          reade more... Résuméabuiyad

          Strawberry Vanilla Buttercream Cheesecake Shortcake

          Strawberry Vanilla Buttercream Cheesecake Shortcake
          Strawberry Vanilla Buttercream Cheesecake Shortcake

          This over-the-top cake was a big hit at one of our recent sips-n-nibbles get-togethers with friends. A pound cake bottom gets topped by a whole, crust-less vanilla cheesecake before being crowned with whole ripe strawberries and completely covered in velvety Italian buttercream frosting. This one takes decadent to a whole new level. I'm sure you know some one who would deserve such a decadent celebration cake at your next special occasion.

          If you don't want the fuss of the Italian Buttercream Frosting (but it is worth the effort) you can easily use whipped cream instead to finish the cake.


          Strawberry Vanilla Buttercream Cheesecake Shortcake
          Pound Cake Base


          Grease and flour a 10 inch cake pan. I use the same spring form pan that I bake the cheesecake portion in to get them exactly the same size.

          Cream together:
          • 3/4 cup butter
          • 1 cup sugar
          Add, one at a time, beating well after each addition until light and fluffy:
          • 2 large eggs
          Add:
          • 2 tsp vanilla extract
          Sift together:
          • 1 1/2  cups cake flour
          • 1 tsp baking powder
          Fold dry ingredients into the creamed mixture alternately with
          • 1/2 cup milk
          beginning and ending with the dry ingredients.

          Bake at 325 degrees F for 25 to 30 minutes. Rely on the toothpick test to ensure that it is properly baked. Cool completely.


          Vanilla Cheesecake Layer

          I bake my cheesecakes in a 10 inch spring form pan that has the bottom and sides wrapped in multiple layers of wide heavy duty aluminum foil which forms a sort of boat that the cheesecake pan sits in. The roll of aluminum foil that I use is about 16 inches wide. I use at least 4 layers of foil to make sure that no water leaks in and ruins the crust of my cheesecake. The aluminum foil wrapped pan is then placed inside a larger baking pan; I use a 12 inch cake pan. Boiling water is then poured into the larger pan filling it from 1/2 to 2/3 of the way to the top.

          I find it best to pour the boiling water into the pan after it is placed on the rack in the oven as you are less likely to splash water onto the cheesecake or inside the aluminum foil. I reuse the aluminum foil for several future cheesecakes, adding a couple of layers to it each time just to be safe. 


          Even if you choose not to use a water bath method, wrapping the outside of your spring form pan with 4 or 5 layers of heavy duty aluminum foil will greatly help the even distribution of heat through your cheesecake as it bakes, making it more evenly creamy from edges to middle. 

          Line the bottom of a 10 inch pan with parchment paper. There is no crust in this cheesecake layer so the paper is essential to remove it from the pan later.

          Cream together:

          • 3 eight ounce packages ounces cream cheese
          • 1 cup sugar
          Add, one at a time:
          • 3 eggs
          beating well after each addition. Add:
          • 3 tsp vanilla extract
          Finally blend in:
          • 1 cup whipping cream
          Pour over the prepared base and bake in a bain marie at 300 degrees F for 55 minutes to an hour. The cheesecake does not have to brown at all in order to be fully baked; the surface of the cheesecake should lose any shine when the cake is properly baked. It can still be slightly wobbly just at the center at this point.

          Remove the cake from the oven and run a sharp knife completely around the edge of the pan. This will allow for the cheesecake to shrink as it cools and hopefully not crack (but who cares if it does? I am never bothered by a crack or two in the surface) Allow the cheesecake to cool thoroughly on a wire rack at room temperature. (NOT in the fridge). Refrigerate for several hours after fully cooled down until the cheesecake firms up well.
          Italian Buttercream Frosting
          • 2 cups sugar
          • 2/3 cup water
          Combine and bring to a boil. Continue to boil over medium heat without stirring until the mixture reaches 240 degrees on a candy thermometer.

          Meanwhile beat together to stiff peaks:

          • 6 egg whites at room temperature
          • ¼ tsp cream of tartar
          • 2 tsp vanilla extract
          Slowly pour in the sugar syrup hitting the side of the bowl and not the beaters. Continue beating the frosting for 10-15 minutes until the meringue is completely cool. I dip my mixing bowl into ice water several times during this time to help with the cooling process and speed it up a little. When completely cool, slowly begin to add, a few tablespoons at a time
          • 2 cups unsalted butter, soft but cooler than room temperature works best
          Beat until smooth after each addition. As the frosting cools to room temperature it will come together like stiffly whipped cream. Be careful not to over beat at this point or your frosting can separate. As soon as the textural change occurs, stop beating the frosting. You may have to chill it in the fridge for a few minutes before using, just to firm it up a little.
          To construct the cake, place the cooled vanilla pound cake on top of the cheesecake in the spring form pan. Invert the cake and cheesecake layers onto the serving plate, remove the spring form pan and peel off the parchment paper, which is now on top of the cake.

          Clean, trim and pat dry with paper towels
          • 2 pints fresh ripe strawberries (small to medium sized berries work best)

          Arrange the berries all over the top of the cheesecake layer. Frost the entire surface of the cake with the Italian Buttercream Frosting, covering the berries. 
          Store the cake in the fridge but take it out an hour or so before serving so that the Italian Buttercream Frosting has a chance to warm up a little to it's creamy, luscious, melt-in-your-mouth texture.

          Strawberry Vanilla Buttercream Cheesecake Shortcake
          Strawberry Vanilla Buttercream Cheesecake Shortcake

          This over-the-top cake was a big hit at one of our recent sips-n-nibbles get-togethers with friends. A pound cake bottom gets topped by a whole, crust-less vanilla cheesecake before being crowned with whole ripe strawberries and completely covered in velvety Italian buttercream frosting. This one takes decadent to a whole new level. I'm sure you know some one who would deserve such a decadent celebration cake at your next special occasion.

          If you don't want the fuss of the Italian Buttercream Frosting (but it is worth the effort) you can easily use whipped cream instead to finish the cake.


          Strawberry Vanilla Buttercream Cheesecake Shortcake
          Pound Cake Base


          Grease and flour a 10 inch cake pan. I use the same spring form pan that I bake the cheesecake portion in to get them exactly the same size.

          Cream together:
          • 3/4 cup butter
          • 1 cup sugar
          Add, one at a time, beating well after each addition until light and fluffy:
          • 2 large eggs
          Add:
          • 2 tsp vanilla extract
          Sift together:
          • 1 1/2  cups cake flour
          • 1 tsp baking powder
          Fold dry ingredients into the creamed mixture alternately with
          • 1/2 cup milk
          beginning and ending with the dry ingredients.

          Bake at 325 degrees F for 25 to 30 minutes. Rely on the toothpick test to ensure that it is properly baked. Cool completely.


          Vanilla Cheesecake Layer

          I bake my cheesecakes in a 10 inch spring form pan that has the bottom and sides wrapped in multiple layers of wide heavy duty aluminum foil which forms a sort of boat that the cheesecake pan sits in. The roll of aluminum foil that I use is about 16 inches wide. I use at least 4 layers of foil to make sure that no water leaks in and ruins the crust of my cheesecake. The aluminum foil wrapped pan is then placed inside a larger baking pan; I use a 12 inch cake pan. Boiling water is then poured into the larger pan filling it from 1/2 to 2/3 of the way to the top.

          I find it best to pour the boiling water into the pan after it is placed on the rack in the oven as you are less likely to splash water onto the cheesecake or inside the aluminum foil. I reuse the aluminum foil for several future cheesecakes, adding a couple of layers to it each time just to be safe. 


          Even if you choose not to use a water bath method, wrapping the outside of your spring form pan with 4 or 5 layers of heavy duty aluminum foil will greatly help the even distribution of heat through your cheesecake as it bakes, making it more evenly creamy from edges to middle. 

          Line the bottom of a 10 inch pan with parchment paper. There is no crust in this cheesecake layer so the paper is essential to remove it from the pan later.

          Cream together:

          • 3 eight ounce packages ounces cream cheese
          • 1 cup sugar
          Add, one at a time:
          • 3 eggs
          beating well after each addition. Add:
          • 3 tsp vanilla extract
          Finally blend in:
          • 1 cup whipping cream
          Pour over the prepared base and bake in a bain marie at 300 degrees F for 55 minutes to an hour. The cheesecake does not have to brown at all in order to be fully baked; the surface of the cheesecake should lose any shine when the cake is properly baked. It can still be slightly wobbly just at the center at this point.

          Remove the cake from the oven and run a sharp knife completely around the edge of the pan. This will allow for the cheesecake to shrink as it cools and hopefully not crack (but who cares if it does? I am never bothered by a crack or two in the surface) Allow the cheesecake to cool thoroughly on a wire rack at room temperature. (NOT in the fridge). Refrigerate for several hours after fully cooled down until the cheesecake firms up well.
          Italian Buttercream Frosting
          • 2 cups sugar
          • 2/3 cup water
          Combine and bring to a boil. Continue to boil over medium heat without stirring until the mixture reaches 240 degrees on a candy thermometer.

          Meanwhile beat together to stiff peaks:

          • 6 egg whites at room temperature
          • ¼ tsp cream of tartar
          • 2 tsp vanilla extract
          Slowly pour in the sugar syrup hitting the side of the bowl and not the beaters. Continue beating the frosting for 10-15 minutes until the meringue is completely cool. I dip my mixing bowl into ice water several times during this time to help with the cooling process and speed it up a little. When completely cool, slowly begin to add, a few tablespoons at a time
          • 2 cups unsalted butter, soft but cooler than room temperature works best
          Beat until smooth after each addition. As the frosting cools to room temperature it will come together like stiffly whipped cream. Be careful not to over beat at this point or your frosting can separate. As soon as the textural change occurs, stop beating the frosting. You may have to chill it in the fridge for a few minutes before using, just to firm it up a little.
          To construct the cake, place the cooled vanilla pound cake on top of the cheesecake in the spring form pan. Invert the cake and cheesecake layers onto the serving plate, remove the spring form pan and peel off the parchment paper, which is now on top of the cake.

          Clean, trim and pat dry with paper towels
          • 2 pints fresh ripe strawberries (small to medium sized berries work best)

          Arrange the berries all over the top of the cheesecake layer. Frost the entire surface of the cake with the Italian Buttercream Frosting, covering the berries. 
          Store the cake in the fridge but take it out an hour or so before serving so that the Italian Buttercream Frosting has a chance to warm up a little to it's creamy, luscious, melt-in-your-mouth texture.

          reade more... Résuméabuiyad