Pages

.

Speculoos & Chocolate Button Cookies for Santa

I have a Christmastime confession for you. Are you ready?
Speculoos & Chocolate Button Cookies ::: use biscoff or trader joe's cookie butter!
Many years ago when I was selling cookies, I was so exhausted from making Christmas cookies for other people that we set out a store-bought cookie assortment for Santa at our house.  How terrible is that?  A cookie maker feeding store-bought cookies to Santa?

I remember it clearly because as kiddo took each cookie from the package to place on Santa's plate, he took a bite out of each one. ;)  (He is his mother's child.)

lindt cookies plate 1 photo lindtcookies11of13.jpg
This year Santa is getting these: Speculoos & Chocolate Button Cookies.  
(That is if I don't eat them all first.)

lindt bittersweet chocolate bars
They feature my all-time favorite bittersweet chocolate for eating straight: Lindt Dark Swiss Bittersweet Chocolate Bar.  I keep it in my "chocolate basket" in the pantry at all times.  The size of the pieces just happen to be perfect for the cookies.

Speculoos & Chocolate Button Cookies ::: use biscoff or trader joe's cookie butter!
Speculoos:  I know it sounds funny, but I bet you've eaten it before.  You know those crunchy cinnamon cookies they serve on Delta Airlines?  Those are Speculoos cookies; the brand is Biscoff.  You can also buy Speculoos spread....which is like peanut butter MADE FROM COOKIES.  Look for Biscoff brand or Trader Joe's Cookie Butter.

The cookies are a little crispy around the edges, chewy in the center, covered in cinnamon-sugar, and topped off with the perfect piece of Lindt chocolate.  It's the chocolate that just catapults them from really yummy to ohmygoodness so delicious.

Speculoos & Chocolate Button Cookies ::: use biscoff or trader joe's cookie butter!
Let's make them.

print recipe photo printrecipe.jpg

Speculoos & Chocolate Button Cookies

{yield: 40 cookies}

1 & 1/2 cups unbleached, all-purpose flour
1/2 teaspoon kosher salt
1 teaspoon baking soda
1/2 cup (1 stick) salted butter, cut into chunks
3/4 cup Speculoos spread
1 teaspoon cinnamon sugar, plus more for rolling
1/3 cup granulated sugar
1/3 cup light brown sugar
1 egg
2 TBSP milk
2 Lindt Bittersweet Chocolate Bars, divided into pieces (you'll have leftover chocolate)

Cinnamon-Sugar (if you don't have it on hand)
1/2 cup granulated sugar
1 TBSP cinnamon (or to taste)

Preheat oven to 375.  Line cookies sheets with parchment paper.

Combine the flour, salt and baking soda in a bowl and set aside.

Cream the butter and Speculoos spread together until smooth.  Beat in the sugars.  Add in the egg and milk and beat until combined.

Add in the flour mixture on low, in three additions.

Refrigerate for 30 minutes.

lindt cookies roll photo lindtcookies4of13.jpg
Roll into 1 to 1.5 inch balls, then roll through the extra cinnamon-sugar.

lindt cookies baked photo lindtcookies5of13.jpg
Bake for 9-10 minutes or until done.  Remove from the oven and let sit on the cookie sheet for 1 minute.  (The cookies will be slightly poufy when they come out of the oven, then deflate.)

lindt cookies add photo lindtcookies6of13.jpg
Press a piece of chocolate onto the top of each cookie.

Remove the cookies to a cooling rack to cool completely.

Serve to Santa.
Speculoos & Chocolate Button Cookies ::: use biscoff or trader joe's cookie butter!
PS...I have it on good authority that if you put a few Lindt LINDOR truffles out with the cookies, Santa leaves extra goodies.

{This post was sponsored by Lindt Chocolate.  Thank you, Lindt.}

MERRY CHRISTMAS!!! 
Eat lots of cookies!

reade more... Résuméabuiyad

Stove Top Pasta with Sausage and Peppers #WeekdaySupper

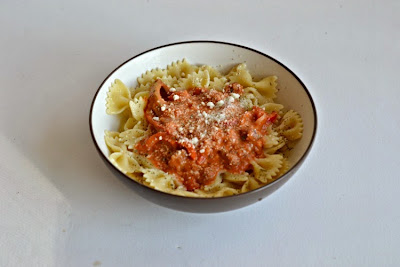
      A few months ago I made penne with sausage and peppers and it was delicious.  The flavors were great and it was an easy weeknight meal.  The only problem was that it baked in the oven so it took longer then I wanted it to.  I wanted to try a stove top version that was ready in under 25 minutes.  That's why this pasta dish is perfect for #WeekdaySupper.

Stove Top Pasta with Sausage and Peppers
      I also added in some onions and fresh tomatoes to this recipe which really enhanced the flavor.  The sauce was so creamy and delicious and the spicy andouille sausage worked well against the cream cheese in the sauce.  I think I might like this version better then the baked version!

Stove Top Pasta with Sausage and Peppers (adapted from Quick Recipes and Kitchen Tips)
12 oz. bow tie pasta
1/2 lb. andouille sausage
1 T. olive oil
1 red bell pepper, thinly sliced
1 green bell pepper, thinly sliced
1 small onion, thinly sliced
4 garlic cloves, minced
1 t. Italian herbs
2 medium tomatoes, chopped
24 oz. jar marinara sauce
4 oz. cream cheese, cubed


1.  Cook the pasta according to the package directions.  Drain and keep warm.

2.  Crumble the sausage into a large skillet and saute for 5-6 minutes or until it has browned.  Add the olive oil, red pepper, green pepper, and onions to the skillet and saute for 4-5 minutes.

3.  Add the garlic cloves, Italian herbs, and tomatoes to the pan and cook for 3 minutes.  Stir in the marinara sauce and cream cheese.  Mix until the cream cheese is melted.  

4.  Serve the sausage and peppers sauce over top of the bow tie pasta.  Sprinkle with Parmesan cheese if desired. 


Pasta with Sausage and Peppers in Cream Sauce from Hezzi-D's Books and Cooks

Check out the lineup of #WeekdaySupper for this week:

Monday - Hezzi-D's Books and Cooks - Stovetop Pasta with Sausage and Peppers
Tuesday - Sue's Nutrition Buzz - Roasted Salmon & Mango Salsa Lettuce Wraps
Wednesday - In The Kitchen With Audrey and Maurene - Spaghetti and Better Jarred Sauce
Thursday - Happy Baking Days - Spiced Pumpkin Soup
Friday - Alida's Kitchen - Roasted Red Pepper Pasta
reade more... Résuméabuiyad

Candy Cane Cake

Candy Cane Cake
Candy Cane Cake
This cake is a favorite of mine to bring to Holiday dinners and parties especially if they are all ages celebrations. Understandably kids will be quite happy with one of the cupcakes especially but most adults go mad for them too. It's no wonder, with such a moist scratch cake topped with plenty of peppermint marshmallow frosting that the sight of it brings out the wide-eyed kid in everyone. Merry Christmas everyone!

Candy Cane Cupcakes
Candy Cane Cupcakes

Candy Cane Cake
Recipe by Barry C. Parsons
Candy Cane Cake - this outstanding scratch cake is a kid favorite around here at Christmas time. My kids make the cupcakes to take along to their seasonal parties and they are very often the first items to get gobbled up.

Prep time: Approximately 20 minutes
Cook time: 35 minutes
Total time: Approximately 1 hour.
Yield: One 9 inch double layer cake or 3 dozen cupcakes

Ingredients
Candy Cane Cake
  • 1 1/4 cups sifted all purpose flour
  • 1 1/2 cups sifted cake flour
  • 1/2 teaspoon baking soda
  • 1 1/2 tsp baking powder
  • 1 teaspoon salt
  • 1 1/2 cups sugar
  • 2/3 cup vegetable oil
  • 1/3 cup vegetable shortening at room temperature
  • 2 tsp peppermint extract
  • 3 large eggs
  • 1 1/2 cups buttermilk
  • 1/4 cup crushed candy canes
  • 1/4 cup mixed red and green candy sprinkles
  • 6 roughly chopped candy canes
Directions
  1. Grease and flour two 9 inch cake pans and line the bottoms with 2 circles of parchment paper.
  2. Sift together both flours, baking soda. baking powder, salt and sugar, Set aside.
  3. In the bowl of an electric mixer beat together the vegetable oil, shortening and peppermint extract. Beat well at high speed with whisk attachment until light and fluffy
  4. Beat the eggs in one at a time.
  5. Fold in the dry ingredients alternately with the buttermilk.
  6. I always add dry ingredients in three divisions and liquid ingredients in 2 divisions. It is very important to begin and end the additions with the dry ingredients. Do not over mix the batter. As soon as it has no lumps in the batter, fold in the 1/4 cup crushed candy canes and sprinkles, then pour into the two prepared 9 inch cake pans.
  7. Bake at 325 degrees F for 30-35 minutes or until a wooden toothpick inserted in the center comes out clean. Allow the cake to cool in the pans for 10 minutes before turning out onto wire racks to cool completely.
  8. I've frosted this cake with Marshmallow Frosting with a little peppermint extract added but any good vanilla frosting is great on this cake. You can substitute a little peppermint extract to taste in your favorite frosting recipe but add just a little at a time, it's potent stuff. Find the marshmallow frosting recipe with our Black and White Cake.
  9. If making cupcakes I find that making 1/2 of the frosting recipe is sufficient.
  10. Sprinkle the roughly chopped candy canes over the top of the cake or cupcakes.
reade more... Résuméabuiyad

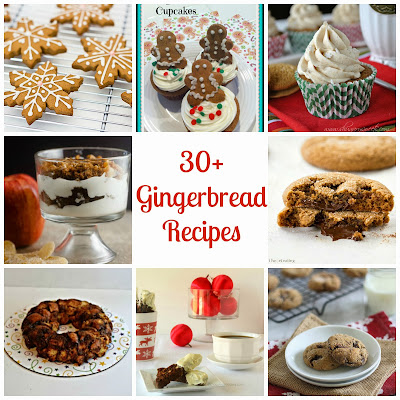
30+ Gingerbread Recipes

     Can you believe Christmas is only 3 days away?  I feel like this year it has come faster then ever before.  I don't know if it's because Thanksgiving was late this year or because I did a crazy amount of baking in December.  How much baking?  Well I ended up taking 24 holiday orders which totaled 41 dozen decorated sugar cookies, 9 dozen other cookies, 2 dozen fudge, 6 dozen hot cocoa on a stick, 8 dozen chocolate covered pretzels, and a few miscellaneous items.   Needless to say, I'm ready for my days off this week!

      Since Christmas is almost here, I wanted my last round up of the year to be holiday themed.  Nothing says Christmas like gingerbread and I've gathered quite a lot of delicious recipes!  The funny part is, I've never made anything gingerbread before last week!  As I was looking through my recipe index I couldn't believe I've never made anything with gingerbread flavor because I sure to eat a lot of it!


Gingerbread Recipes

30+ Gingerbread Recipes for breakfast, dessert, and snack

1.  Gingerbread Cut Out Cookies from bake.love.give
2.  Gingerbread Molasses Cookies from Running to the Kitchen
3.  Chocolate-Stuffed Gingerbread Cookies from i heart eating
5. Gingerbread Cupcakes from Organized Island
6.  Double Ginger Apple Gingerbread from Healthy.Delicious
7.  White Chocolate Gingerbread Biscotti from Chocolate Moosey
8.  Gingerbread Cupcakes from Shugary Sweets

9.   Gingerbread Spice Caramels from bake.love.give
10.  Gingerbread Baby Cakes from Karen's Kitchen Stories
11.  Spicy Chocolate Ginger Guys from Snappy Gourmet
12.  Three Ginger Gingersnaps from bake.love.give
13.  Gingerbread Pancakes from i heart eating
14.  Gingersnap S'mores from Healthy.Delicious
15.  Gingerbread Spice Syrup (for Gingerbread Lattes) from An Edible Mosaic
16.  Gingerbread Men Cookies from Chocolate, Chocolate, and More
17.  Apple Butter Gingerbread Loaf from Dizzy Busy and Hungry
19.  Gingerbread Popcorn from An Edible Mosaic
20.  Cocoa Ginger Crisps from Chocolate, Chocolate, and More
21.  Gingerbread Donuts with Vanilla Bean Glaze from All Day I Dream About Food 
22.  Gingerbread Cupcakes with Brown Sugar Cream Cheese Frosting from Busy in Brooklyn
23.  Apple and Red Currant Cobbler with Gingerbread Topping from Kitchen Tested
24.  Gingerbread Rice Krispie Treats from Shugary Sweets
25.  Gingerbread Waffles from The Kitchen is My Playground
26.  Gingerbread Cinnamon Rolls from Love From the Oven
27.  Gingerbread Pancakes from Growing up Gabel
28.  Chocolate Gingerbread Cupcakes with Cream Cheese Frosting from Chocolate Moosey
29.  Gingerbread Waffles with Maple Pecan Syrup from Canadian Tire Kitchen Crew
30.  Gingerbread Whoopie Pies from diethood
31.  Gingerbread Cake with Whiskey Frosting from Savour Flare
32.  Gingerbread Toaster Pastries with Bourbon Pear Filling from Eat the Love
33.  Holiday Gingerbread Loaves from Canadian Tire Kitchen Crew
reade more... Résuméabuiyad

Winter Whites

Winter Whites
Winter Whites
Here is the last of my remaining holiday treat ideas that didn't quite make it to the blog before Christmas. This is another old family favorite no-bake recipe. Again, my dear old Mudder is the guest chef because I stole these out of her freezer to take the pic! Thanks Mom!

Originally published Jan 7, 2010.

2013 update. The new photo above shows a batch of Winter Whites made by my teenage daughter Olivia, who now keeps us well supplied with this family favourite during the holidays. She loves to eat these straight from the freezer!

In a medium saucepan over medium low heat combine:

¾ cup butter

¾ cup sugar

1 ½ tsp vanilla extract

Very quickly whisk in

3 beaten eggs

and cook for about a minute whisking constantly. Remove from heat and add quickly fold in:

3 cups graham wafer crumbs

1 cup coconut

2 ½ cups mini marshmallow

In a 9x13 inch baking pan, line the bottom of the pan with graham wafer crackers. Spread the prepared mixture evenly over the crackers and chill well for a couple of hours or overnight. Top with whipped cream, cut in squares and serve. These freeze very well but you might like to use a non-dairy whipped topping if you want to freeze them with the cream already on them. If not, freeze them without the whipped cream and just add it before serving.
reade more... Résuméabuiyad

Caramel stuffed snickerdoodles

Historically, I have never been a big proponent of stuffing cookies with other things. It's not that I don't like eating them, because I do, but my big issue is that it just tastes too long. I have a hard time shaping the dough around the filling since my cookies don't usually turn out as pretty as I'd like. Also, my cookies tend to spring leaks so they get pretty ugly (and messy).

I made an exception to this and on a whim decided to bake up some caramel stuffed snickerdoodles. I hadn't made any snickerdoodles this year and thought that a caramel stuffed one would be mighty tasty. I already had pre-packaged caramels in the pantry so I used those. The hardest part about making these cookies was unwrapping the caramels - the shaping part was easy since the dough was pliable and forgiving.

This was the second type of cookies that I sent to my recipient for the online cookie exchange. I heard that she and her fiance enjoyed them both. One bad thing about these cookies is that the caramel hardened pretty quickly so they were quite chewy. I'd recommend eating these cookies while they are warm (you can always microwave them for 15 seconds to soften them up if needed). One other nitpicky thing is that the caramel leaked to the bottom of the cookie. If you want to help prevent them from leaking, you can turn the cookies upside down while they are cooling.

Hope the tips I provided above are helpful. These were very yummy cookies, and I'd definitely make them again.
Caramel stuffed snickerdoodles
  • 2 and 3/4 cups all-purpose flour
  • 2 teaspoons baking powder
  • 1/2 teaspoon coarse salt
  • 1 cups (2 sticks) unsalted butter, room temperature
  • 1 and 1/2 cups sugar
  • 2 large eggs
  • 36 unwrapped caramels (you can use homemade as well)
  • 2 TBSP sugar
  • 2 teaspoons ground cinnamon
Directions
Preheat your oven to 350 degrees F. Sift together flour, baking powder and salt into a bowl. Put butter and 1 1/2 cups sugar in the bowl of an electric mixer fitted with the paddle attachment. Mix on medium speed until pale and fluffy, about 3 minutes. Mix in eggs. Reduce speed to low; gradually mix in flour mixture.

Stir together cinnamon and remaining 2 tablespoons sugar in a small bowl. Using a cookie scoop (or a spoon), scoop out portions of dough and flatten them with your hand. Place an unwrapped caramel in the middle and wrap the dough around it completely. Then shape dough into balls and roll in cinnamon sugar. Space 3 inches apart on baking sheets lined with parchment paper.


Bake cookies, rotating sheets halfway through, until edges are golden, 12 to 15 minutes (mine baked for 12). Let cool on sheets on wire racks. Cookies can be stored between layers of parchment in airtight containers at room temperature up to 3 days.

Yield: I halved the recipe above, used a medium cookie scoop and got 18 cookies

Source: Adapted from my snickerdoodle post

Photobucket
reade more... Résuméabuiyad

Beep! Beep! It's Christmas!

 trucks with christmas trees cookies, decorating tutorial and link to cookie cutter
Guys, I've had this cookie cutter for YEARS.  It intimidated me.  Every year after Christmas I would think to myself, "next year, I'll use that cutter."  And, the next year rolled around and I just couldn't get the design quite right.
trucks with christmas trees cookies, decorating tutorial and link to cookie cutter
This year, though, the King Arthur Flour holiday catalog featured...Christmas Truck Cookies!!!  (After my last post, you guys might think all I do is sit around reading catalogs.)

Armed with inspiration from King Arthur Flour, I broke out my cookie cutter and went to work.
trucks with christmas trees cookies, decorating tutorial and link to cookie cutter

To make Christmas Tree Truck cookies, you'll need: 


  • truck cookies, using this recipe (similar cutter here...and on sale!)
  • royal icing tinted with AmeriColor super black, super red (two shades), egg yellow, grey (made with black), leaf green, chocolate brown, and bright white
  • disposable icing bags
  • squeeze bottles
  • decorating tips (#2, #3) and coupler
  • meringue powder
  • small paintbrush
  • white sanding sugar

christmas trucks outline photo christmastruckstutorial1of5.jpg
Use a #2 tips to outline the wheels (black) and truck body (darker red).. Reserve some of this red piping icing for later.

Thin the black, light red, grey and yellow icings with water, a bit at a time, stirring with a silicone spatula, until it is the consistency of a thick syrup.  You'll want to drop a "ribbon" of icing back into the bowl and have it disappear in a count of "one thousand one, one thousand two." Four is too thick, one is too thin.  Count of 2-3 is good.  Cover with a damp dishcloth and let sit for several minutes.

Stir gently with a rubber spatula to pop any large air bubbles that have formed. Transfer to squeeze bottles.
christmas trucks flood photo christmastruckstutorial2of5.jpg
Fill in the outlines with thinned icing.  Use a toothpick to guide into corners and pop large air bubbles.
christmas trucks flood 2 photo christmastruckstutorial3of5.jpg

Let the cookies dry for at least one hour.

christmas trucks detail photo christmastruckstutorial4of5.jpg
Use a #2 tip to outline the wheel wells (fenders?) in the darker red icing.  Pipe a line across the truck body and one for the door.

christmas trucks detail flood photo christmastruckstutorial5of5.jpg
Thin the dark red icing as above and fill in the outlines.

Use a #3 tip to add centers to the wheels in white.  

Let the cookies dry uncovered, 6-8 hours, or overnight.

Once the cookies are completely dry, combine equal parts meringue powder and water, and brush the mixture onto the wheel wells and piped detail lines. Sprinkle on the sanding sugar and shake off the excess.

Use a #2 tip to pipe branches for the trees in green.  I made one layer, then when back over and added several more on top.

Use a #2 tip to add a truck with brown icing.
trucks with christmas trees cookies, decorating tutorial and link to cookie cutter
Do you have any cookie cutters stashed away that intimidate you just a little bit?  
trucks with christmas trees cookies, decorating tutorial and link to cookie cutter
reade more... Résuméabuiyad

Cranberry Hazelnut Turkey Wellington

Cranberry Hazelnut Turkey Wellington

Here's a terrific festive entertaining idea for any day during the Holidays. I've heard from several readers who don't want or need to have all those turkey leftovers and are looking for an alternative to a traditional stuffed turkey. This is an ideal solution, especially for couples, small families or for dinner party entertaining. It's like Christmas baked into a beautiful puff pastry crust, which makes a stunningly gorgeous presentation when you bring it to the table to carve. I do serve this with gravy made from previously prepared turkey stock but if you like, it's also delicious with my recipe for Perfect Onion Gravy.

As a bonus recipe with this delicious dish, I came up with a delicious festive twist on a classic turkey accompaniment with this Citrus Fig Cranberry Sauce. You'll love the difference the addition of these traditional festive flavors makes to this easy to make sauce.

This turkey recipe is also the latest in our web video cooking series with CBC Newfoundland and Labrador. During December we have been featuring turkey recipes in the series to help promote the annual turkey drive to benefit local food banks during the holiday season. Please visit the CBC website for more information on how you too can help in this worthwhile charitable effort.

The video below shows how to prepare and put together this delicious dish. The complete recipe is on this page, below the video.

For some mobile users, if the video does not load below, please click this alternate link.


Cranberry Hazelnut Turkey Wellington


Cranberry Hazelnut Turkey Wellington
Prep time: 30 minutes
Cook time: 45-60 minutes
Total time: about 1 hour 30 minutes
Yield: 4 servings
Ingredients
  • 2 sheets, (12 x 12 inches) frozen puff pastry, thawed
  • 1 1/2 to 2 pounds uncooked turkey breast
  • 1 tbsp olive oil
  • 2 tbsp butter
  • 2 cloves minced garlic
  • 1/4 cup chopped onion
  • 1/2 cup chopped hazelnuts
  • 2 cups dry bread crumbs
  • few tbsp turkey or chicken stock
  • 1 1/2 tbsp dry chopped fresh thyme
  • salt and pepper to season
  • 1/2 cup fresh or frozen cranberries
  • 1 egg + 2 tbsp water (beaten together for an egg wash)
 Directions
  1. Begin by sautéing the garlic and onions  in the olive oil and butter for a minute or two.
  2. Add the bread crumbs and toss until they begin to brown slightly. Add the hazelnuts, thyme cranberries salt and pepper. Add only enough turkey stock to make the stuffing hold together.
  3. Place the first pastry sheet on a parchment lined cookie sheet. Place the turkey breast along the center line of the pastry sheet. Brush the edges of the pastry with the egg wash.
  4. Place the stuffing on top of the turkey. Place the second pastry sheet over the turkey and stuffing, Trim the edges to form an oval shape. Save the trimmings in the fridge.
  5. Bring the edges of the dough together by pinching them together to seal. Roll the dough from the bottom layer over the top layer and press down all the way around the perimeter of the pastry. This creates a tighter seal.
  6. Brush the egg wash over the entire surface of the pastry. Decorate with additional pastry leaf shapes if desired. Just cut leaf shapes out of the trimmed pastry and score leaf veining into them with the tip of a sharp knife. Cut four 1/2 inch slots in the top of the pastry to let steam escape. Chill for 20 minutes or longer in the fridge before baking. This helps the pastry to puff.
  7. Bake at 400 degrees F for about 15-20 minutes then reduce the heat to 350 degrees F.  Use a meat thermometer to make sure that the center has reached at least 170 degrees F to be sure the turkey is completely cooked, about 35-45 minutes longer. Let rest for 10 minutes before cutting into individual servings.
reade more... Résuméabuiyad

Vegan Chocolate Avocado Cake with Chocolate Avocado Icing

Vegan Chocolate Avocado Cake with Avocado Chocolate Icing

So yes, I know Christmas is only four days away. I have to admit I've not been very organised this year - I totally forgot about Nikolaus, I haven't baked a Christmas cake or mince pies (yet), we haven't decorated the flat, and we didn't even host a Christmas party. In fact, the extent of my Christmas spirit this year has been watching a lot of Christmas specials on Lifestyle Food (Nigella, Jamie, NigelDonna, Lorraine), and really really looking forward to the week off! I haven't done much planning, but fret not - we are having a proper Christmas Eve supper and Christmas lunch, as well as a couple of low-key foodie Christmastime catch ups with friends. The turkey and ham have been ordered, and today was spent at the market picking up supplies. Fun! Watch this space.

Recently I've been busier with non-Christmas baking. As you will have seen in my last post, "How to Slice an Avocado", I've had a glut of gigantic avocados on hand, and wanted to try making something sweet with them. I remembered seeing this delicious-looking "Almost Vegan Chocolate Avocado Cake" a while ago on The Chronicles of Ms I-Hua and The Boy, and thought it would be a good one to try! Reading I-Hua's post, I saw that she adapted the recipe from the Vegan Chocolate Avocado Cake on Joy the Baker, and I really wanted to see what the pure vegan version would taste like, so I ended up making Joy's recipe. (This also meant I got to share it with the children of a colleague of mine, who happen to have dairy and nut allergies - yay - they get to eat cake too!)

In my "avocado dessert" Googling, I came across this avocado-chocolate frosting on Paleo Spirit, and couldn't believe how rich, luscious and how chocolaty it looked, despite being 100% vegan - no cream, milk, butter or chocolate. I had to try it! I skipped Joy the Baker's bright green avocado buttercream and made the choccy avocado one. (Of course I completely un-Paleo'd it by using super refined icing sugar instead of the suggested maple syrup, haha).

Let's look at the icing - it's just a mixture of ripe avocados, cocoa powder and icing sugar, blended until smooth and creamy.

Barham Avocado

Icing ingredients

I couldn't believe it - twenty seconds in the mixer and bang - it turned into this amazing glossy icing.

Chocolate avocado icing

Of course I had to taste test, and you couldn't taste the avocado at all - it just tasted like dark chocolate, thanks to the cocoa powder. The quantities in the recipe I've given below make a very dark-tasting icing, definitely a grown-up taste. If you want something sweeter, I'd suggest starting with half the amount of cocoa and then adjusting to your liking.

The icing was a dream to work with - so smooth and creamy! It was way easier than a normal ganache or a standard chocolate buttercream as it doesn't seize up or set - it stays velvety smooth for ages.

Iced cake

Joy's recipe makes two 20cm cakes, which she makes into a sandwich cake, but I wanted something smaller that was easier to share around, so I did a small 18cm round cake, as well as a 20cm square slab cake.

Slab cake

I was so impressed with the cake too! Again, despite the inclusion of avocado and the lack of eggs, it didn't taste odd or have an unusual texture - it was just a moist chocolate cake.

Slice of cake - love that texture

I shared the cake with friends and colleagues - and none of them twigged that there was anything unusual about it until I mentioned that it included avocado. An easy-to-make crowd-pleasing chocolate cake that also satisfies a bunch of dietary requirements? Win win win!

Cake the next day

Slice of cake

Vegan Chocolate Cake with Avocado Chocolate Icing
Cake recipe from Joy the Baker
Avocado Chocolate Icing adapted from Paleo Spirit

Ingredients
For the Cake
3 cups plain flour
6 tablespoons unsweetened cocoa powder
1/2 teaspoon salt
2 teaspoons baking powder
2 teaspoons baking soda
1/4 cup vegetable oil
1/2 cup well mashed avocado
2 cups water
2 tablespoons white vinegar
2 teaspoons vanilla extract
2 cups caster sugar
For the Icing
1 very ripe avocado
1/2 cup unsweetened cocoa powder
3/4 cups icing sugar

Method
For the Cake
Preheat the oven to 175C. Line two 20cm round cake tins with baking paper. (I used a 20cm square tin and a 18cm round cake tin).
Sift together the flour, cocoa, salt, baking powder and baking soda into a mixing bowl and set aside.
Whisk together the oil, mashed avocado, water, vinegar and vanilla extract, followed by the caster sugar.
Mix the wet ingredients and dry ingredients together, whisking until smooth.
Pour the batter into the prepared tins. Bake for 40 minutes to an hour, or until cooked when tested with a skewer. Allow to cool in the tins for 10 minutes, then turn out onto a cake rack to cool completely.
For the Icing
Place the avocado flesh, cocoa powder and icing sugar in a food processor and whizz to combine. Add a tablespoon of water if necessary to achieve a spreadable consistency. Spread the icing over the top and sides of the cold cakes in a swirly fashion.
Makes 2 x 20cm cakes
Enjoy!

reade more... Résuméabuiyad