Pages

Showing posts with label frosting. Show all posts

Pina Colada Cake

Pina Colada Cake
Pina Colada Cake
When I first tasted the intense pineapple flavor in our experimental Roasted Pineapple Jam, I just knew that I would have to incorporate it into a great dessert cake. A pina colada cake first leapt to mind and it worked out very well indeed. I took a really great vanilla cake recipe, soaked in a little dark rum, filled a couple of the layers with the roasted pineapple jam and covered the whole thing in a thick layer of coconut marshmallow frosting and garnished with a final sprinkle of toasted coconut. This is an awesome celebration cake for those who love sweet, tropical, pineapple flavor but I'll bet the coconut lovers will go wild for this one too.
You will first need to make some of our incredible Roasted Pineapple Jam.


For the vanilla cake:

Sift together and set aside:
  • 1 1/2 cups cake and pastry flour
  • 1 1/4 cups all-purpose flour
  • 2 1/2 tsp baking powder
  • 1/4 tsp salt

For this recipe it is very important to be sure to sift the flour very well before measuring. Flour that is too compacted can cause a denser, heavier cake. If you do not have a flour sifter, put some flour in a bowl and whisk it for a minute before spooning the flour into the measuring cup to measure. Do this for both types of flour in the recipe.

Cream together until fluffy:
  • 1 cup unsalted butter, at room temperature
  • 2 cups sugar
Add, one at a time, beating well after every addition;
  • 4 eggs at room temperature
Beat in:
  • 4 teaspoons vanilla extract
Gently fold in the dry ingredients in three equal portions, alternately with
  • 1 cup undiluted evaporated milk
When adding dry and wet ingredients alternately in any baking recipe, always begin and end with the dry ingredients.
Pour batter evenly into 2 well greased and floured 9 inch cake pans. Bake in a 325 degree F oven for about 35-40 minutes or until a toothpick inserted in the center comes out clean. Watch it carefully, you will not want to over bake this cake, as soon as the toothpick comes out clean, remove the cake from the oven and let it rest in the pans for 5 minutes before turning it out onto a wire rack to cool completely.

Coconut Marshmallow Frosting

  • 4 egg whites
  • ¼ tsp cream of tarter
  • 2 tsp vanilla extract
  • 1 1/4 cups sugar
  • ½ cup corn syrup
  • 1/4 cup water
  • 1 cup dried unsweetened shredded coconut
In a small saucepan combine sugar, corn syrup and water. Bring to a boil over medium heat and continue to cook until the mixture reaches 240 degrees F on a candy thermometer or when a teaspoonful of the mixture dropped into ice water forms a soft ball that holds its shape when cool.

Whip the egg whites, cream of tartar and vanilla extract to soft peaks in a large bowl. With the mixer on medium high speed, slowly begin to pour the sugar syrup down the side of the egg white bowl in a thin continuous stream. Continue to whip the frosting until it forms stiff peaks. Finally fold the coconut in by hand.

To construct the cake you will also need:
  • 2 cups roasted pineapple jam ( Find that recipe here.)
  • 4 ounces dark rum
  • 1/2 cup toasted coconut
Split the 2 layers of cake into 4 by cutting them in half horizontally. Each layer will get sprinkled with an ounce of the rum. Sprinkle the first layer with an ounce of the rum then spread with 1 cup of the pineapple jam, add the next cake layer, sprinkle with an ounce of rum and spread with some of the coconut frosting. Add the next layer of cake, sprinkle with another ounce of rum and spread with the other cup of pineapple jam. Add the final layer of cake, sprinkle it with with the last of the rum and then frost the top and sides with the remaining coconut frosting. Sprinkle the toasted coconut on the top and sides to garnish.
Pina Colada Cake
Pina Colada Cake
When I first tasted the intense pineapple flavor in our experimental Roasted Pineapple Jam, I just knew that I would have to incorporate it into a great dessert cake. A pina colada cake first leapt to mind and it worked out very well indeed. I took a really great vanilla cake recipe, soaked in a little dark rum, filled a couple of the layers with the roasted pineapple jam and covered the whole thing in a thick layer of coconut marshmallow frosting and garnished with a final sprinkle of toasted coconut. This is an awesome celebration cake for those who love sweet, tropical, pineapple flavor but I'll bet the coconut lovers will go wild for this one too.
You will first need to make some of our incredible Roasted Pineapple Jam.


For the vanilla cake:

Sift together and set aside:
  • 1 1/2 cups cake and pastry flour
  • 1 1/4 cups all-purpose flour
  • 2 1/2 tsp baking powder
  • 1/4 tsp salt

For this recipe it is very important to be sure to sift the flour very well before measuring. Flour that is too compacted can cause a denser, heavier cake. If you do not have a flour sifter, put some flour in a bowl and whisk it for a minute before spooning the flour into the measuring cup to measure. Do this for both types of flour in the recipe.

Cream together until fluffy:
  • 1 cup unsalted butter, at room temperature
  • 2 cups sugar
Add, one at a time, beating well after every addition;
  • 4 eggs at room temperature
Beat in:
  • 4 teaspoons vanilla extract
Gently fold in the dry ingredients in three equal portions, alternately with
  • 1 cup undiluted evaporated milk
When adding dry and wet ingredients alternately in any baking recipe, always begin and end with the dry ingredients.
Pour batter evenly into 2 well greased and floured 9 inch cake pans. Bake in a 325 degree F oven for about 35-40 minutes or until a toothpick inserted in the center comes out clean. Watch it carefully, you will not want to over bake this cake, as soon as the toothpick comes out clean, remove the cake from the oven and let it rest in the pans for 5 minutes before turning it out onto a wire rack to cool completely.

Coconut Marshmallow Frosting

  • 4 egg whites
  • ¼ tsp cream of tarter
  • 2 tsp vanilla extract
  • 1 1/4 cups sugar
  • ½ cup corn syrup
  • 1/4 cup water
  • 1 cup dried unsweetened shredded coconut
In a small saucepan combine sugar, corn syrup and water. Bring to a boil over medium heat and continue to cook until the mixture reaches 240 degrees F on a candy thermometer or when a teaspoonful of the mixture dropped into ice water forms a soft ball that holds its shape when cool.

Whip the egg whites, cream of tartar and vanilla extract to soft peaks in a large bowl. With the mixer on medium high speed, slowly begin to pour the sugar syrup down the side of the egg white bowl in a thin continuous stream. Continue to whip the frosting until it forms stiff peaks. Finally fold the coconut in by hand.

To construct the cake you will also need:
  • 2 cups roasted pineapple jam ( Find that recipe here.)
  • 4 ounces dark rum
  • 1/2 cup toasted coconut
Split the 2 layers of cake into 4 by cutting them in half horizontally. Each layer will get sprinkled with an ounce of the rum. Sprinkle the first layer with an ounce of the rum then spread with 1 cup of the pineapple jam, add the next cake layer, sprinkle with an ounce of rum and spread with some of the coconut frosting. Add the next layer of cake, sprinkle with another ounce of rum and spread with the other cup of pineapple jam. Add the final layer of cake, sprinkle it with with the last of the rum and then frost the top and sides with the remaining coconut frosting. Sprinkle the toasted coconut on the top and sides to garnish.
reade more... Résuméabuiyad

Black and White Cake

Black and White Cake

2013 UPDATE: After 5 1/2 years on Rock Recipes and many dozens of cake recipes later, one of our earliest recipes, this Black and White Cake still remains in the top 2 cake recipes ever, surpassed only in popularity by our "Best Vanilla Cake" recipe. It's still a kid favorite at our house, even though those kids have now grown into hungry teenagers. This recipe also makes outstanding cupcakes for any celebration but are always particularly popular at school parties.

Originally published on March 27, 2008.

There is probably no counting the number of Black and White Cakes I have made over the years. Most often these days, as was the case yesterday, my kids like to make them on their own with a little help from dear old dad in preparing the frosting. This particular one was prepared for dessert at dinner last night by my daughter Olivia, 10 and her cousin Taylor, 11. The Dice Cake version shown was an idea from the 8 year old mind of my son Noah who let me help him make it a few weeks back as a treat for the staff at his school for Teacher Appreciation Week.

As you can imagine, a chocolate scratch cake with a marshmallow type frosting is a BIG kid favorite and has been made for countless kid parties where even crumbs are hard to come by afterward. More than a few adults I know love it as much as the kids. When it comes to standard recipes at our house, this one is unquestionably in the top 10.

Chocolate Cake

  • 2 cups sugar
  • 2 cups all purpose flour
  • 3/4 cup cocoa
  • 2 tsp. baking powder
  • 1 tsp baking soda
  • 1/2 tsp salt
  • 2 eggs
  • 1 cup soured milk
  • 1 cup black coffee
  • 1/2 cup vegetable oil
  • 1 tsp vanilla extract

Combine all ingredients in a mixing bowl and beat with electric mixer for 2 minutes.
Pour into 2 greased and floured 8 or 9 inch cake pans. Bake at 350 degrees F for 30-35 minutes or until toothpick inserted in the center comes out clean. Cool completely.

Marshmallow Frosting
  • 4 egg whites
  • ¼ tsp cream of tarter
  • 2 tsp vanilla extract
  • 1 1/4 cups sugar
  • ½ cup corn syrup
  • 1/4 cup water
In a small saucepan combine sugar, corn syrup and water. Bring to a boil over medium heat and continue to cook until the mixture reaches 240 degrees F on a candy thermometer or when a teaspoonful of the mixture dropped into ice water forms a soft ball that holds its shape when cool.

Black and White CakeWhip the egg whites, cream of tartar and vanilla extract to soft peaks in a large bowl. With the mixer on medium high speed, slowly begin to pour the sugar syrup down the side of the egg white bowl in a thin continuous stream. Continue to whip the frosting until it forms stiff peaks.

Frost your cake immediately with this frosting while it is still slightly warm as it is easier to spread smoothly than if allowed to cool completely.
Black and White Cake

2013 UPDATE: After 5 1/2 years on Rock Recipes and many dozens of cake recipes later, one of our earliest recipes, this Black and White Cake still remains in the top 2 cake recipes ever, surpassed only in popularity by our "Best Vanilla Cake" recipe. It's still a kid favorite at our house, even though those kids have now grown into hungry teenagers. This recipe also makes outstanding cupcakes for any celebration but are always particularly popular at school parties.

Originally published on March 27, 2008.

There is probably no counting the number of Black and White Cakes I have made over the years. Most often these days, as was the case yesterday, my kids like to make them on their own with a little help from dear old dad in preparing the frosting. This particular one was prepared for dessert at dinner last night by my daughter Olivia, 10 and her cousin Taylor, 11. The Dice Cake version shown was an idea from the 8 year old mind of my son Noah who let me help him make it a few weeks back as a treat for the staff at his school for Teacher Appreciation Week.

As you can imagine, a chocolate scratch cake with a marshmallow type frosting is a BIG kid favorite and has been made for countless kid parties where even crumbs are hard to come by afterward. More than a few adults I know love it as much as the kids. When it comes to standard recipes at our house, this one is unquestionably in the top 10.

Chocolate Cake

  • 2 cups sugar
  • 2 cups all purpose flour
  • 3/4 cup cocoa
  • 2 tsp. baking powder
  • 1 tsp baking soda
  • 1/2 tsp salt
  • 2 eggs
  • 1 cup soured milk
  • 1 cup black coffee
  • 1/2 cup vegetable oil
  • 1 tsp vanilla extract

Combine all ingredients in a mixing bowl and beat with electric mixer for 2 minutes.
Pour into 2 greased and floured 8 or 9 inch cake pans. Bake at 350 degrees F for 30-35 minutes or until toothpick inserted in the center comes out clean. Cool completely.

Marshmallow Frosting
  • 4 egg whites
  • ¼ tsp cream of tarter
  • 2 tsp vanilla extract
  • 1 1/4 cups sugar
  • ½ cup corn syrup
  • 1/4 cup water
In a small saucepan combine sugar, corn syrup and water. Bring to a boil over medium heat and continue to cook until the mixture reaches 240 degrees F on a candy thermometer or when a teaspoonful of the mixture dropped into ice water forms a soft ball that holds its shape when cool.

Black and White CakeWhip the egg whites, cream of tartar and vanilla extract to soft peaks in a large bowl. With the mixer on medium high speed, slowly begin to pour the sugar syrup down the side of the egg white bowl in a thin continuous stream. Continue to whip the frosting until it forms stiff peaks.

Frost your cake immediately with this frosting while it is still slightly warm as it is easier to spread smoothly than if allowed to cool completely.
reade more... Résuméabuiyad

Strawberry Mascarpone Cream Cake

Strawberry Mascarpone Cream Cake

Spouse's birthday was yesterday, or as I like to refer to it, the anniversary of her 39th birthday. She is a big fan of a classic sponge cake so I knew that would be the base of the cake. She also loves strawberry shortcake and under the pink frosting this is very much like that classic dessert with the added luscious richness of mascarpone cheese added to the whipped cream filling.

The easy decorators buttercream uses all butter in the frosting and uses no artificial color to achieve the bright pink frosting. Instead a little strawberry puree is all that is needed to bring both flavor and color to the icing. The end result turned out beautifully delicious and would make a perfect celebration cake for kids or adults alike.


Strawberry Mascarpone Cream Cake

Sponge Cake


Sift together and set aside:
1 cup flour
1 tsp baking powder
For the meringue base of the batter you will need:

6 eggs separated, room temperature
1/4 tsp cream of tarter
1 cup sugar, separated in 2 half cups
2 tsp vanilla extract
1/2 tsp lemon flavoring (optional)

Beat egg whites and cream of tarter until foamy. Add ½ cup sugar gradually until egg whites are stiff.

Beat egg yolks and ½ cup sugar until foamy and thickened.

Fold beaten egg yolks into the beaten egg whites along with the vanilla (and lemon) for only a few turns before slowly and gradually folding in the flour and baking powder mixture very gently BY HAND using a rubber spatula until just incorporated into the meringue mixture. I mix in the dry ingredients in 3 equal portions. Do not over mix, you just want the flour to be incorporated; over mixing will deflate the egg whites and result in a tough textured final product.

Pour into ungreased 8 or 9 inch round cake pans with the bottoms lined with parchment paper and bake at 325 degrees F for 25-30 minutes or until center springs back when touched. Cool completely in the pans before running a sharp knife around the edge to release the cakes from the pans and then remove the parchment paper from the bottoms. You can also bake this cake in a 9 inch spring form pan and slice it in half horizontally after it is completely cooled.

Filling

Whip together to firm peaks:

1 cup whipping cream
3 tbsp icing sugar (powdered sugar)
1 tsp pure vanilla extract

Quickly beat in until smooth:

1/2 cup mascarpone cheese

Finally fold in:

1 1/2 cups quartered fresh strawberries

Strawberry Buttercream Frosting

For the strawberry puree begin by tossing together:

3/4 cup sliced fresh ripe strawberries
4 tbsp white sugar

Cover and set aside for at least an hour. This step helps to remove some of the moisture from the strawberries and intensify the color. Drain the strawberries but reserve the syrup. Puree the strawberries until smooth.

Blend together:

8 cups icing sugar (powdered sugar)
2 cups butter

When the mixture becomes sort of crumbly and the butter is broken up add the strawberry puree along with


1 tsp pure vanilla extract

The frosting will be very stiff at this point so slowly add some of the reserved strawberry syrup , a tablespoon at a time and beating well until the frosting reaches a firm but spreadable consistency. Any leftover syrup can be brushed onto the cake layers before assembling the cake.

Fill the two cake layers with the cream and strawberries then frost with the strawberry buttercream.
Strawberry Mascarpone Cream Cake

Spouse's birthday was yesterday, or as I like to refer to it, the anniversary of her 39th birthday. She is a big fan of a classic sponge cake so I knew that would be the base of the cake. She also loves strawberry shortcake and under the pink frosting this is very much like that classic dessert with the added luscious richness of mascarpone cheese added to the whipped cream filling.

The easy decorators buttercream uses all butter in the frosting and uses no artificial color to achieve the bright pink frosting. Instead a little strawberry puree is all that is needed to bring both flavor and color to the icing. The end result turned out beautifully delicious and would make a perfect celebration cake for kids or adults alike.


Strawberry Mascarpone Cream Cake

Sponge Cake


Sift together and set aside:
1 cup flour
1 tsp baking powder
For the meringue base of the batter you will need:

6 eggs separated, room temperature
1/4 tsp cream of tarter
1 cup sugar, separated in 2 half cups
2 tsp vanilla extract
1/2 tsp lemon flavoring (optional)

Beat egg whites and cream of tarter until foamy. Add ½ cup sugar gradually until egg whites are stiff.

Beat egg yolks and ½ cup sugar until foamy and thickened.

Fold beaten egg yolks into the beaten egg whites along with the vanilla (and lemon) for only a few turns before slowly and gradually folding in the flour and baking powder mixture very gently BY HAND using a rubber spatula until just incorporated into the meringue mixture. I mix in the dry ingredients in 3 equal portions. Do not over mix, you just want the flour to be incorporated; over mixing will deflate the egg whites and result in a tough textured final product.

Pour into ungreased 8 or 9 inch round cake pans with the bottoms lined with parchment paper and bake at 325 degrees F for 25-30 minutes or until center springs back when touched. Cool completely in the pans before running a sharp knife around the edge to release the cakes from the pans and then remove the parchment paper from the bottoms. You can also bake this cake in a 9 inch spring form pan and slice it in half horizontally after it is completely cooled.

Filling

Whip together to firm peaks:

1 cup whipping cream
3 tbsp icing sugar (powdered sugar)
1 tsp pure vanilla extract

Quickly beat in until smooth:

1/2 cup mascarpone cheese

Finally fold in:

1 1/2 cups quartered fresh strawberries

Strawberry Buttercream Frosting

For the strawberry puree begin by tossing together:

3/4 cup sliced fresh ripe strawberries
4 tbsp white sugar

Cover and set aside for at least an hour. This step helps to remove some of the moisture from the strawberries and intensify the color. Drain the strawberries but reserve the syrup. Puree the strawberries until smooth.

Blend together:

8 cups icing sugar (powdered sugar)
2 cups butter

When the mixture becomes sort of crumbly and the butter is broken up add the strawberry puree along with


1 tsp pure vanilla extract

The frosting will be very stiff at this point so slowly add some of the reserved strawberry syrup , a tablespoon at a time and beating well until the frosting reaches a firm but spreadable consistency. Any leftover syrup can be brushed onto the cake layers before assembling the cake.

Fill the two cake layers with the cream and strawberries then frost with the strawberry buttercream.
reade more... Résuméabuiyad

Raspberry Lemon Buttercream Cake

Raspberry Lemon Buttercream Cake
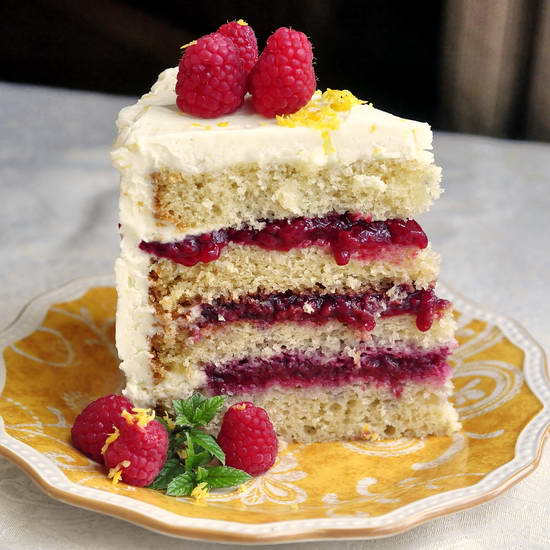
Spouse and I were invited over to a friends for the evening last weekend so I threw together something for a little late evening dessert. Our friend Barb is a big lemon fan, so this cake started out as a standard lemon buttercream cake but I had a large batch of raspberry compote in the fridge to use up and with lemons and raspberries being such good flavor friends I used it to fill the layers too.


Raspberry Lemon Buttercream Cake
Lemon Cake
Sift together and set aside:
  • 2 3/4 cups cake flour
  • 3 tsp baking powder
  • 1/4 tsp salt
Cream together until fluffy:
  • 1 cup unsalted butter, at room temperature
  • 2 cups sugar
Add, one at a time, beating well after every addition;
  • 4 eggs at room temperature
Beat in
  • 2 teaspoons vanilla extract
Fold in:
  • zest of one large lemon, finely minced
Gently fold in the dry ingredients in three equal portions, alternately with
  • 1 1/4 cups undiluted evaporated milk
When adding dry and wet ingredients alternately in any baking recipe, always begin and end with the dry ingredients.
Pour batter evenly into 2 well greased and floured 8 inch cake pans. Bake in a 325 degree F oven for about 35-40 minutes or until a toothpick inserted in the center comes out clean. Watch it carefully, you will not want to over bake this cake, as soon as the toothpick comes out clean, remove the cake from the oven and let it rest in the pans for 5 minutes before turning it out onto a wire rack to cool completely.
 
Raspberry Compote

  • 2 cups fresh or frozen raspberries
  • 1/3 to 1/2 cup sugar
  • 2 tbsp corn starch
  • aprox 1 ounce water


Slowly simmer the berries and sugar over low heat for about 10 minutes. Dissolve the corn starch in the water and slowly pour into the boiling berries stirring constantly until thickened.You may not use all of the cornstarch mixture depending upon how juicy the berries are or you may need a little more. 
Lemon Buttercream Frosting
  • 8 cups icing sugar (i.e. powdered sugar, confectioners' sugar)
  • 2 cups butter

Using an electric mixer on low, mix the butter and icing sugar together until the butter breaks up and get evenly dispersed throughout the sugar in small pieces. The mixture will still appear dry at this point. This stage ensures even distribution and prevents butter lumps in your frosting.

Add
  • 2 tsp vanilla extract
  • 3 tbsp lemon juice
  • zest of one lemon, finely minced
  • Approximately 4-6 tbsp milk, only enough to bring the frosting to a spreadable consistency

Both of these liquid measures can be adjusted. The milk can be adjusted to make a thicker frosting by adding less or a more spreadable frosting by adding a little more. Use your own judgement here. The lemon juice can be adjusted to your own taste too.

When the icing reaches the desired consistently continue to beat it on high speed for 5 minutes to incorporate more air into the frosting to make it lighter and fluffier.
To construct the cake:
Split the two layers of cake horizontally to create 4 layers.Place the first layer of cake on the cake plate and using a piping bag, or a heavy plastic bag with a half inch opening snipped off the corner, pipe a ring of frosting around the perimeter of the cake. Fill the ring with raspberry compote. Add the next layer of cake and repeat the process over the next two layers.

Add the final layer of cake and frost the top and sides of the cake with the lemon buttercream frosting.
Raspberry Lemon Buttercream Cake
Spouse and I were invited over to a friends for the evening last weekend so I threw together something for a little late evening dessert. Our friend Barb is a big lemon fan, so this cake started out as a standard lemon buttercream cake but I had a large batch of raspberry compote in the fridge to use up and with lemons and raspberries being such good flavor friends I used it to fill the layers too.


Raspberry Lemon Buttercream Cake
Lemon Cake
Sift together and set aside:
  • 2 3/4 cups cake flour
  • 3 tsp baking powder
  • 1/4 tsp salt
Cream together until fluffy:
  • 1 cup unsalted butter, at room temperature
  • 2 cups sugar
Add, one at a time, beating well after every addition;
  • 4 eggs at room temperature
Beat in
  • 2 teaspoons vanilla extract
Fold in:
  • zest of one large lemon, finely minced
Gently fold in the dry ingredients in three equal portions, alternately with
  • 1 1/4 cups undiluted evaporated milk
When adding dry and wet ingredients alternately in any baking recipe, always begin and end with the dry ingredients.
Pour batter evenly into 2 well greased and floured 8 inch cake pans. Bake in a 325 degree F oven for about 35-40 minutes or until a toothpick inserted in the center comes out clean. Watch it carefully, you will not want to over bake this cake, as soon as the toothpick comes out clean, remove the cake from the oven and let it rest in the pans for 5 minutes before turning it out onto a wire rack to cool completely.
 
Raspberry Compote

  • 2 cups fresh or frozen raspberries
  • 1/3 to 1/2 cup sugar
  • 2 tbsp corn starch
  • aprox 1 ounce water


Slowly simmer the berries and sugar over low heat for about 10 minutes. Dissolve the corn starch in the water and slowly pour into the boiling berries stirring constantly until thickened.You may not use all of the cornstarch mixture depending upon how juicy the berries are or you may need a little more. 
Lemon Buttercream Frosting
  • 8 cups icing sugar (i.e. powdered sugar, confectioners' sugar)
  • 2 cups butter

Using an electric mixer on low, mix the butter and icing sugar together until the butter breaks up and get evenly dispersed throughout the sugar in small pieces. The mixture will still appear dry at this point. This stage ensures even distribution and prevents butter lumps in your frosting.

Add
  • 2 tsp vanilla extract
  • 3 tbsp lemon juice
  • zest of one lemon, finely minced
  • Approximately 4-6 tbsp milk, only enough to bring the frosting to a spreadable consistency

Both of these liquid measures can be adjusted. The milk can be adjusted to make a thicker frosting by adding less or a more spreadable frosting by adding a little more. Use your own judgement here. The lemon juice can be adjusted to your own taste too.

When the icing reaches the desired consistently continue to beat it on high speed for 5 minutes to incorporate more air into the frosting to make it lighter and fluffier.
To construct the cake:
Split the two layers of cake horizontally to create 4 layers.Place the first layer of cake on the cake plate and using a piping bag, or a heavy plastic bag with a half inch opening snipped off the corner, pipe a ring of frosting around the perimeter of the cake. Fill the ring with raspberry compote. Add the next layer of cake and repeat the process over the next two layers.

Add the final layer of cake and frost the top and sides of the cake with the lemon buttercream frosting.
reade more... Résuméabuiyad

White Velvet Cake

White Velvet Cake
White Velvet Cake
Here's a close cousin to our incredibly popular Red Velvet Cake recipe. As a reader recently pointed out, many people are sensitive to artificial colors and a great buttermilk cake without the added dye is not only a great idea but a completely delicious one too. I've been wanting to develop a great white cake recipe anyway. I always think a bakery bought birthday cake when I think of white cake, probably with colorful candy sprinkles on top. Any kid, young or old would love to have this one as their next birthday cake.

This turned out to be an outstandingly moist white cake recipe and was perfectly paired with sweet fluffy marshmallow frosting, which is really a cooked meringue frosting that my kids absolutely love. As with many of my baking experiments, I brought this one to the office, where I was the Pied Piper of gateau; people literally followed me down the hall to our break room as I carried it in. I think this one now holds the office record for devouring speed. It disappeared in mere minutes.

Click the photo at the bottom of the post for our other velvet cake recipes, Red Velvet, Orange Velvet and Lemon Velvet.


White Velvet Cake

Recipe by Barry C. Parsons
White Velvet Cake - developed from an outstanding Red Velvet Cake recipe, this white cake is a perfectly moist and tender crumbed cake that would make an ideal birthday cake.
Prep time: Approximately 20 minutes
Cook time: 35 minutes
Total time: Approximately 1 hour.

Ingredients
  • 1 1/4 cups sifted all purpose flour
  • 1 1/2 cups sifted cake flour
  • 1/2 teaspoon baking soda
  • 1 1/2 tsp baking powder
  • 1 teaspoon salt
  • 1 1/2 cups sugar
  • 2/3 cup vegetable oil
  • 1/3 cup vegetable shortening at room temperature
  • 3 tablespoons good quality vanilla extract
  • 3 large eggs
  • 1 1/2 cups buttermilk
Cooking Directions
  1. Sift together both flours, baking soda. baking powder, salt and sugar, Set aside. 
  2. Grease and flour 2 nine inch round cake pans and line the bottom with 2 circles of parchment paper.
  3. In the bowl of an electric mixer beat together the vegetable oil, shortening and vanilla. Beat well at high speed with whisk attachment until light and fluffy
  4. Beat the eggs in one at a time.
  5. Fold in the dry ingredients alternately with the buttermilk.
  6. I always add dry ingredients in three divisions and liquid ingredients in 2 divisions. It is very important to begin and end the additions with the dry ingredients. Do not over mix the batter. As soon as it has no lumps in the batter, pour into the two prepared 9 inch cake pans.
  7. Bake at 325 degrees F for 30-35 minutes or until a wooden toothpick inserted in the center comes out clean. Allow the cake to cool in the pans for 10 minutes before turning out onto wire racks to cool completely.
  8. I've frosted this cake with Marshmallow Frosting but any good vanilla frosting is great on this cake. Find the frosting recipe with our Black and White Cake.
I've frosted this cake with Marshmallow Frosting but any good vanilla frosting is great on this cake. Find the frosting recipe with our Black and White Cake.

Click the photo below to see the other outstanding recipes in our 

White Velvet Cake
White Velvet Cake
Here's a close cousin to our incredibly popular Red Velvet Cake recipe. As a reader recently pointed out, many people are sensitive to artificial colors and a great buttermilk cake without the added dye is not only a great idea but a completely delicious one too. I've been wanting to develop a great white cake recipe anyway. I always think a bakery bought birthday cake when I think of white cake, probably with colorful candy sprinkles on top. Any kid, young or old would love to have this one as their next birthday cake.

This turned out to be an outstandingly moist white cake recipe and was perfectly paired with sweet fluffy marshmallow frosting, which is really a cooked meringue frosting that my kids absolutely love. As with many of my baking experiments, I brought this one to the office, where I was the Pied Piper of gateau; people literally followed me down the hall to our break room as I carried it in. I think this one now holds the office record for devouring speed. It disappeared in mere minutes.

Click the photo at the bottom of the post for our other velvet cake recipes, Red Velvet, Orange Velvet and Lemon Velvet.


White Velvet Cake

Recipe by Barry C. Parsons
White Velvet Cake - developed from an outstanding Red Velvet Cake recipe, this white cake is a perfectly moist and tender crumbed cake that would make an ideal birthday cake.
Prep time: Approximately 20 minutes
Cook time: 35 minutes
Total time: Approximately 1 hour.

Ingredients
  • 1 1/4 cups sifted all purpose flour
  • 1 1/2 cups sifted cake flour
  • 1/2 teaspoon baking soda
  • 1 1/2 tsp baking powder
  • 1 teaspoon salt
  • 1 1/2 cups sugar
  • 2/3 cup vegetable oil
  • 1/3 cup vegetable shortening at room temperature
  • 3 tablespoons good quality vanilla extract
  • 3 large eggs
  • 1 1/2 cups buttermilk
Cooking Directions
  1. Sift together both flours, baking soda. baking powder, salt and sugar, Set aside. 
  2. Grease and flour 2 nine inch round cake pans and line the bottom with 2 circles of parchment paper.
  3. In the bowl of an electric mixer beat together the vegetable oil, shortening and vanilla. Beat well at high speed with whisk attachment until light and fluffy
  4. Beat the eggs in one at a time.
  5. Fold in the dry ingredients alternately with the buttermilk.
  6. I always add dry ingredients in three divisions and liquid ingredients in 2 divisions. It is very important to begin and end the additions with the dry ingredients. Do not over mix the batter. As soon as it has no lumps in the batter, pour into the two prepared 9 inch cake pans.
  7. Bake at 325 degrees F for 30-35 minutes or until a wooden toothpick inserted in the center comes out clean. Allow the cake to cool in the pans for 10 minutes before turning out onto wire racks to cool completely.
  8. I've frosted this cake with Marshmallow Frosting but any good vanilla frosting is great on this cake. Find the frosting recipe with our Black and White Cake.
I've frosted this cake with Marshmallow Frosting but any good vanilla frosting is great on this cake. Find the frosting recipe with our Black and White Cake.

Click the photo below to see the other outstanding recipes in our 

reade more... Résuméabuiyad

Strawberry Vanilla Buttercream Cheesecake Shortcake

Strawberry Vanilla Buttercream Cheesecake Shortcake

This over-the-top cake was a big hit at one of our recent sips-n-nibbles get-togethers with friends. A pound cake bottom gets topped by a whole, crust-less vanilla cheesecake before being crowned with whole ripe strawberries and completely covered in velvety Italian buttercream frosting. This one takes decadent to a whole new level. I'm sure you know some one who would deserve such a decadent celebration cake at your next special occasion.

If you don't want the fuss of the Italian Buttercream Frosting (but it is worth the effort) you can easily use whipped cream instead to finish the cake.


Strawberry Vanilla Buttercream Cheesecake Shortcake
Pound Cake Base


Grease and flour a 10 inch cake pan. I use the same spring form pan that I bake the cheesecake portion in to get them exactly the same size.

Cream together:
  • 3/4 cup butter
  • 1 cup sugar
Add, one at a time, beating well after each addition until light and fluffy:
  • 2 large eggs
Add:
  • 2 tsp vanilla extract
Sift together:
  • 1 1/2  cups cake flour
  • 1 tsp baking powder
Fold dry ingredients into the creamed mixture alternately with
  • 1/2 cup milk
beginning and ending with the dry ingredients.

Bake at 325 degrees F for 25 to 30 minutes. Rely on the toothpick test to ensure that it is properly baked. Cool completely.


Vanilla Cheesecake Layer

I bake my cheesecakes in a 10 inch spring form pan that has the bottom and sides wrapped in multiple layers of wide heavy duty aluminum foil which forms a sort of boat that the cheesecake pan sits in. The roll of aluminum foil that I use is about 16 inches wide. I use at least 4 layers of foil to make sure that no water leaks in and ruins the crust of my cheesecake. The aluminum foil wrapped pan is then placed inside a larger baking pan; I use a 12 inch cake pan. Boiling water is then poured into the larger pan filling it from 1/2 to 2/3 of the way to the top.

I find it best to pour the boiling water into the pan after it is placed on the rack in the oven as you are less likely to splash water onto the cheesecake or inside the aluminum foil. I reuse the aluminum foil for several future cheesecakes, adding a couple of layers to it each time just to be safe. 


Even if you choose not to use a water bath method, wrapping the outside of your spring form pan with 4 or 5 layers of heavy duty aluminum foil will greatly help the even distribution of heat through your cheesecake as it bakes, making it more evenly creamy from edges to middle. 

Line the bottom of a 10 inch pan with parchment paper. There is no crust in this cheesecake layer so the paper is essential to remove it from the pan later.

Cream together:

  • 3 eight ounce packages ounces cream cheese
  • 1 cup sugar
Add, one at a time:
  • 3 eggs
beating well after each addition. Add:
  • 3 tsp vanilla extract
Finally blend in:
  • 1 cup whipping cream
Pour over the prepared base and bake in a bain marie at 300 degrees F for 55 minutes to an hour. The cheesecake does not have to brown at all in order to be fully baked; the surface of the cheesecake should lose any shine when the cake is properly baked. It can still be slightly wobbly just at the center at this point.

Remove the cake from the oven and run a sharp knife completely around the edge of the pan. This will allow for the cheesecake to shrink as it cools and hopefully not crack (but who cares if it does? I am never bothered by a crack or two in the surface) Allow the cheesecake to cool thoroughly on a wire rack at room temperature. (NOT in the fridge). Refrigerate for several hours after fully cooled down until the cheesecake firms up well.
Italian Buttercream Frosting
  • 2 cups sugar
  • 2/3 cup water
Combine and bring to a boil. Continue to boil over medium heat without stirring until the mixture reaches 240 degrees on a candy thermometer.

Meanwhile beat together to stiff peaks:

  • 6 egg whites at room temperature
  • ¼ tsp cream of tartar
  • 2 tsp vanilla extract
Slowly pour in the sugar syrup hitting the side of the bowl and not the beaters. Continue beating the frosting for 10-15 minutes until the meringue is completely cool. I dip my mixing bowl into ice water several times during this time to help with the cooling process and speed it up a little. When completely cool, slowly begin to add, a few tablespoons at a time
  • 2 cups unsalted butter, soft but cooler than room temperature works best
Beat until smooth after each addition. As the frosting cools to room temperature it will come together like stiffly whipped cream. Be careful not to over beat at this point or your frosting can separate. As soon as the textural change occurs, stop beating the frosting. You may have to chill it in the fridge for a few minutes before using, just to firm it up a little.
To construct the cake, place the cooled vanilla pound cake on top of the cheesecake in the spring form pan. Invert the cake and cheesecake layers onto the serving plate, remove the spring form pan and peel off the parchment paper, which is now on top of the cake.

Clean, trim and pat dry with paper towels
  • 2 pints fresh ripe strawberries (small to medium sized berries work best)

Arrange the berries all over the top of the cheesecake layer. Frost the entire surface of the cake with the Italian Buttercream Frosting, covering the berries. 
Store the cake in the fridge but take it out an hour or so before serving so that the Italian Buttercream Frosting has a chance to warm up a little to it's creamy, luscious, melt-in-your-mouth texture.

Strawberry Vanilla Buttercream Cheesecake Shortcake

This over-the-top cake was a big hit at one of our recent sips-n-nibbles get-togethers with friends. A pound cake bottom gets topped by a whole, crust-less vanilla cheesecake before being crowned with whole ripe strawberries and completely covered in velvety Italian buttercream frosting. This one takes decadent to a whole new level. I'm sure you know some one who would deserve such a decadent celebration cake at your next special occasion.

If you don't want the fuss of the Italian Buttercream Frosting (but it is worth the effort) you can easily use whipped cream instead to finish the cake.


Strawberry Vanilla Buttercream Cheesecake Shortcake
Pound Cake Base


Grease and flour a 10 inch cake pan. I use the same spring form pan that I bake the cheesecake portion in to get them exactly the same size.

Cream together:
  • 3/4 cup butter
  • 1 cup sugar
Add, one at a time, beating well after each addition until light and fluffy:
  • 2 large eggs
Add:
  • 2 tsp vanilla extract
Sift together:
  • 1 1/2  cups cake flour
  • 1 tsp baking powder
Fold dry ingredients into the creamed mixture alternately with
  • 1/2 cup milk
beginning and ending with the dry ingredients.

Bake at 325 degrees F for 25 to 30 minutes. Rely on the toothpick test to ensure that it is properly baked. Cool completely.


Vanilla Cheesecake Layer

I bake my cheesecakes in a 10 inch spring form pan that has the bottom and sides wrapped in multiple layers of wide heavy duty aluminum foil which forms a sort of boat that the cheesecake pan sits in. The roll of aluminum foil that I use is about 16 inches wide. I use at least 4 layers of foil to make sure that no water leaks in and ruins the crust of my cheesecake. The aluminum foil wrapped pan is then placed inside a larger baking pan; I use a 12 inch cake pan. Boiling water is then poured into the larger pan filling it from 1/2 to 2/3 of the way to the top.

I find it best to pour the boiling water into the pan after it is placed on the rack in the oven as you are less likely to splash water onto the cheesecake or inside the aluminum foil. I reuse the aluminum foil for several future cheesecakes, adding a couple of layers to it each time just to be safe. 


Even if you choose not to use a water bath method, wrapping the outside of your spring form pan with 4 or 5 layers of heavy duty aluminum foil will greatly help the even distribution of heat through your cheesecake as it bakes, making it more evenly creamy from edges to middle. 

Line the bottom of a 10 inch pan with parchment paper. There is no crust in this cheesecake layer so the paper is essential to remove it from the pan later.

Cream together:

  • 3 eight ounce packages ounces cream cheese
  • 1 cup sugar
Add, one at a time:
  • 3 eggs
beating well after each addition. Add:
  • 3 tsp vanilla extract
Finally blend in:
  • 1 cup whipping cream
Pour over the prepared base and bake in a bain marie at 300 degrees F for 55 minutes to an hour. The cheesecake does not have to brown at all in order to be fully baked; the surface of the cheesecake should lose any shine when the cake is properly baked. It can still be slightly wobbly just at the center at this point.

Remove the cake from the oven and run a sharp knife completely around the edge of the pan. This will allow for the cheesecake to shrink as it cools and hopefully not crack (but who cares if it does? I am never bothered by a crack or two in the surface) Allow the cheesecake to cool thoroughly on a wire rack at room temperature. (NOT in the fridge). Refrigerate for several hours after fully cooled down until the cheesecake firms up well.
Italian Buttercream Frosting
  • 2 cups sugar
  • 2/3 cup water
Combine and bring to a boil. Continue to boil over medium heat without stirring until the mixture reaches 240 degrees on a candy thermometer.

Meanwhile beat together to stiff peaks:

  • 6 egg whites at room temperature
  • ¼ tsp cream of tartar
  • 2 tsp vanilla extract
Slowly pour in the sugar syrup hitting the side of the bowl and not the beaters. Continue beating the frosting for 10-15 minutes until the meringue is completely cool. I dip my mixing bowl into ice water several times during this time to help with the cooling process and speed it up a little. When completely cool, slowly begin to add, a few tablespoons at a time
  • 2 cups unsalted butter, soft but cooler than room temperature works best
Beat until smooth after each addition. As the frosting cools to room temperature it will come together like stiffly whipped cream. Be careful not to over beat at this point or your frosting can separate. As soon as the textural change occurs, stop beating the frosting. You may have to chill it in the fridge for a few minutes before using, just to firm it up a little.
To construct the cake, place the cooled vanilla pound cake on top of the cheesecake in the spring form pan. Invert the cake and cheesecake layers onto the serving plate, remove the spring form pan and peel off the parchment paper, which is now on top of the cake.

Clean, trim and pat dry with paper towels
  • 2 pints fresh ripe strawberries (small to medium sized berries work best)

Arrange the berries all over the top of the cheesecake layer. Frost the entire surface of the cake with the Italian Buttercream Frosting, covering the berries. 
Store the cake in the fridge but take it out an hour or so before serving so that the Italian Buttercream Frosting has a chance to warm up a little to it's creamy, luscious, melt-in-your-mouth texture.

reade more... Résuméabuiyad

The Best Red Velvet Cake

The Best Red Velvet Cake


Click the photo at the bottom of the post for our other velvet cake recipes, White Velvet, Orange Velvet and Lemon Velvet.

Our Red Velvet Cake is a hybrid recipe taking its inspiration from several versions of this classic southern dessert cake that I've tried over the years. In general, I've found that the simpler the recipe, the better the cake. This recipe really could not be more simple; it just combines the wet ingredients and dry ingredients separately and then brings them together to form a very pourable batter, which produces a very moist cake.

I've seen some recipes that also include an outrageous amount of red food coloring, which I am not particularly fond of using in general but infrequently will for special occasions and this recipe uses a very reasonable 1 1/2 tsp of liquid red food coloring. The upcoming Canada Day weekend seemed like a good time to feature the red in this cake with the white of our double cream cheese frosting, the two colors of our national flag.

Recipes also vary greatly on the amount of cocoa in a Red Velvet Cake, ranging from only a teaspoon to several tablespoons. I prefer the higher end of the cocoa scale for just a little more chocolate edge to this terrific cake. Some folks object to this because it produces a more brownish red cake so if this is a concern, you can cut back on the cocoa if you like but do not omit it altogether, the red velvet purists will hunt you down for that crime against cake! I've read from several sources that toasted pecans in the frosting between the layers is also a critical component. I'm going to call it optional but since I really love lightly toasted pecans, I think they add outstanding favour and a crunchy component that I find irresistible.
Grease two 9 inch cake pans and line the bottom and sides with parchment paper. Preheat oven to 325 degrees F.

Sift together and set aside:

  • 1 1/4 cups all purpose flour
  • 1 1/4 cups cake flour
  • 1 1/2 cups sugar
  • 1/2 teaspoon baking soda
  • 1 1/2 tsp baking powder
  • 1 teaspoon salt
  • 3 tbsp cocoa

In the bowl of an electric mixer blend together well:

  • 1 cup vegetable oil
  • 1 1/2 cups buttermilk
  • 2 large eggs
  • 1 1/2 tsp liquid red food coloring
  • 1 1/2 teaspoon white vinegar
  • 2 teaspoons vanilla extract
Mix in the dry ingredients all at once and blend until smooth. Do not over mix the batter. As soon as it has no lumps in the batter, pour into the two prepared 8 inch cake pans.

Bake at 325 degrees F for 30-35 minutes or until a wooden toothpick inserted in the center comes out clean.
The Best Red Velvet Cake


Turn cakes onto a wire rack, remove the parchment paper and allow to cool completely. When the cake is completely cool, you can cut the two layers into 4 using a sharp serrated bread knife if you like or just have 2 layers in you prefer. I think the four layers helps to get a good ratio of cake to frosting in each bite.

  • 1 cup chopped toasted pecans

Fill all of the layers and the top of the cake with double cream cheese frosting, sprinkling each layer with 1/4 cup of the toasted pecans.

Double Cream Cheese Frosting
  • 1 1/2 cups (12 ounces) cream cheese
  • 3/4 cup butter
  • 2 tsp vanilla extract
  • 1 kilo bag of icing sugar (About 8 cups)
  • 1-3 tbsp milk; enough to bring the frosting to a spreadable consistency
Mix all the ingredients together and beat well until smooth and fluffy.

Click the photo below to see the other outstanding recipes in our 
The Best Red Velvet Cake


Click the photo at the bottom of the post for our other velvet cake recipes, White Velvet, Orange Velvet and Lemon Velvet.

Our Red Velvet Cake is a hybrid recipe taking its inspiration from several versions of this classic southern dessert cake that I've tried over the years. In general, I've found that the simpler the recipe, the better the cake. This recipe really could not be more simple; it just combines the wet ingredients and dry ingredients separately and then brings them together to form a very pourable batter, which produces a very moist cake.

I've seen some recipes that also include an outrageous amount of red food coloring, which I am not particularly fond of using in general but infrequently will for special occasions and this recipe uses a very reasonable 1 1/2 tsp of liquid red food coloring. The upcoming Canada Day weekend seemed like a good time to feature the red in this cake with the white of our double cream cheese frosting, the two colors of our national flag.

Recipes also vary greatly on the amount of cocoa in a Red Velvet Cake, ranging from only a teaspoon to several tablespoons. I prefer the higher end of the cocoa scale for just a little more chocolate edge to this terrific cake. Some folks object to this because it produces a more brownish red cake so if this is a concern, you can cut back on the cocoa if you like but do not omit it altogether, the red velvet purists will hunt you down for that crime against cake! I've read from several sources that toasted pecans in the frosting between the layers is also a critical component. I'm going to call it optional but since I really love lightly toasted pecans, I think they add outstanding favour and a crunchy component that I find irresistible.
Grease two 9 inch cake pans and line the bottom and sides with parchment paper. Preheat oven to 325 degrees F.

Sift together and set aside:

  • 1 1/4 cups all purpose flour
  • 1 1/4 cups cake flour
  • 1 1/2 cups sugar
  • 1/2 teaspoon baking soda
  • 1 1/2 tsp baking powder
  • 1 teaspoon salt
  • 3 tbsp cocoa

In the bowl of an electric mixer blend together well:

  • 1 cup vegetable oil
  • 1 1/2 cups buttermilk
  • 2 large eggs
  • 1 1/2 tsp liquid red food coloring
  • 1 1/2 teaspoon white vinegar
  • 2 teaspoons vanilla extract
Mix in the dry ingredients all at once and blend until smooth. Do not over mix the batter. As soon as it has no lumps in the batter, pour into the two prepared 8 inch cake pans.

Bake at 325 degrees F for 30-35 minutes or until a wooden toothpick inserted in the center comes out clean.
The Best Red Velvet Cake


Turn cakes onto a wire rack, remove the parchment paper and allow to cool completely. When the cake is completely cool, you can cut the two layers into 4 using a sharp serrated bread knife if you like or just have 2 layers in you prefer. I think the four layers helps to get a good ratio of cake to frosting in each bite.

  • 1 cup chopped toasted pecans

Fill all of the layers and the top of the cake with double cream cheese frosting, sprinkling each layer with 1/4 cup of the toasted pecans.

Double Cream Cheese Frosting
  • 1 1/2 cups (12 ounces) cream cheese
  • 3/4 cup butter
  • 2 tsp vanilla extract
  • 1 kilo bag of icing sugar (About 8 cups)
  • 1-3 tbsp milk; enough to bring the frosting to a spreadable consistency
Mix all the ingredients together and beat well until smooth and fluffy.

Click the photo below to see the other outstanding recipes in our 
reade more... Résuméabuiyad

The Ultimate Lemon Cake

The Ultimate Lemon Cake
With 5 different lemon components to this cake, it is not hard to see why I have dubbed it my ultimate lemon cake. I start with a homemade lemon scratch cake which gets brushed with some tangy lemon syrup, then filled with alternating layers of rich lemon curd and lemon buttercream frosting before being covered in more of the lemon frosting and finally garnished with homemade candied lemon zest. This is the perfect celebration cake for that lemon lover in your life.

The Ultimate Lemon Cake


Lemon Cake

Sift together and set aside:

  • 2 3/4 cups cake flour
  • 3 tsp baking powder
  • 1/4 tsp salt

Cream together until fluffy:

  • 1 cup unsalted butter, at room temperature
  • 2 cups sugar

Add, one at a time, beating well after every addition;

  • 4 eggs at room temperature

Beat in

  • 2 teaspoons vanilla extract

Fold in:

  • zest of one large lemon, finely minced

Gently fold in the dry ingredients in three equal portions, alternately with

  • 1 1/4 cups undiluted evaporated milk

When adding dry and wet ingredients alternately in any baking recipe, always begin and end with the dry ingredients.

Pour batter evenly into 2 well greased and floured 8 inch cake pans. Bake in a 325 degree F oven for about 35-40 minutes or until a toothpick inserted in the center comes out clean. Watch it carefully, you will not want to over bake this cake, as soon as the toothpick comes out clean, remove the cake from the oven and let it rest in the pans for 5 minutes before turning it out onto a wire rack to cool completely.

Candied Lemon Peel

Using a very sharp vegetable peeler remove the outside zest of 2 large lemons in large strips, avoiding the white part of the peel as much as possible. Add to a very small pot along with:

  • juice of 2 lemons
  • 3/4 cup sugar
  • 3/4 cup water
Simmer together gently for about 15-20 minutes. Remove zest and let it drain on a wire rack. Reserve about half the syrup to brush on the cake layers.

Lemon Curd

In a small saucepan combine:

  • 6 lightly beaten egg yolks
  • 1 cup sugar
  • 1/2 cup fresh lemon juice
  • zest of one lemon, finely minced

Cook slowly over medium low heat for about 10 minutes stirring constantly until the mixture thickens enough to coat the back of a wooden spoon.
Remove from heat and stir in the butter a few pieces at a time until completely smooth.

  • 1/2 cup butter cut into small pieces

Cover with plastic wrap and chill completely in the fridge.

Lemon Buttercream Frosting

  • 8 cups icing sugar (i.e. powdered sugar, confectioners' sugar)
  • 2 cups butter

Using an electric mixer on low, mix the butter and icing sugar together until the butter breaks up and get evenly dispersed throughout the sugar in small pieces. The mixture will still appear dry at this point. This stage ensures even distribution and prevents butter lumps in your frosting.

Add

  • 2 tsp vanilla extract
  • 3 tbsp lemon juice
  • zest of one lemon, finely minced
  • Approximately 4-6 tbsp milk

Both of these liquid measures can be adjusted. The milk can be adjusted to make a thicker frosting by adding less or a more spreadable frosting by adding a little more. Use your own judgement here. The lemon juice can be adjusted to your own taste too.

When the icing reaches the desired consistently continue to beat it on high speed for 5 minutes to incorporate more air into the frosting to make it lighter and fluffier.

To construct the cake:

Split the two layers of cake horizontally to create 4 layers. Brush the reserved syrup onto the cut sides of the cake layers.

Place the first layer of cake on the cake plate and top with some of the lemon buttercream frosting. Add the next layer and using a piping bag, or a heavy plastic bag with a half inch opening snipped off the corner, pipe a ring of frosting around the perimeter of the cake. Fill the ring with half of the lemon curd. Add the next layer of cake and top with more of the frosting.
Add the final layer of cake. At this point frost the sides of the cake and pipe a border on the top and bottom. Add the second half of the lemon curd to the top of the cake and garnish the top of the cake with pieces of candied lemon zest. I use kitchen scissors to cut 1/2 inch pieces to decorate the border and then add a small pile of slivered zest to the center of the cake. Chill for several hours or overnight before serving.

The Ultimate Lemon Cake
With 5 different lemon components to this cake, it is not hard to see why I have dubbed it my ultimate lemon cake. I start with a homemade lemon scratch cake which gets brushed with some tangy lemon syrup, then filled with alternating layers of rich lemon curd and lemon buttercream frosting before being covered in more of the lemon frosting and finally garnished with homemade candied lemon zest. This is the perfect celebration cake for that lemon lover in your life.

The Ultimate Lemon Cake


Lemon Cake

Sift together and set aside:

  • 2 3/4 cups cake flour
  • 3 tsp baking powder
  • 1/4 tsp salt

Cream together until fluffy:

  • 1 cup unsalted butter, at room temperature
  • 2 cups sugar

Add, one at a time, beating well after every addition;

  • 4 eggs at room temperature

Beat in

  • 2 teaspoons vanilla extract

Fold in:

  • zest of one large lemon, finely minced

Gently fold in the dry ingredients in three equal portions, alternately with

  • 1 1/4 cups undiluted evaporated milk

When adding dry and wet ingredients alternately in any baking recipe, always begin and end with the dry ingredients.

Pour batter evenly into 2 well greased and floured 8 inch cake pans. Bake in a 325 degree F oven for about 35-40 minutes or until a toothpick inserted in the center comes out clean. Watch it carefully, you will not want to over bake this cake, as soon as the toothpick comes out clean, remove the cake from the oven and let it rest in the pans for 5 minutes before turning it out onto a wire rack to cool completely.

Candied Lemon Peel

Using a very sharp vegetable peeler remove the outside zest of 2 large lemons in large strips, avoiding the white part of the peel as much as possible. Add to a very small pot along with:

  • juice of 2 lemons
  • 3/4 cup sugar
  • 3/4 cup water
Simmer together gently for about 15-20 minutes. Remove zest and let it drain on a wire rack. Reserve about half the syrup to brush on the cake layers.

Lemon Curd

In a small saucepan combine:

  • 6 lightly beaten egg yolks
  • 1 cup sugar
  • 1/2 cup fresh lemon juice
  • zest of one lemon, finely minced

Cook slowly over medium low heat for about 10 minutes stirring constantly until the mixture thickens enough to coat the back of a wooden spoon.
Remove from heat and stir in the butter a few pieces at a time until completely smooth.

  • 1/2 cup butter cut into small pieces

Cover with plastic wrap and chill completely in the fridge.

Lemon Buttercream Frosting

  • 8 cups icing sugar (i.e. powdered sugar, confectioners' sugar)
  • 2 cups butter

Using an electric mixer on low, mix the butter and icing sugar together until the butter breaks up and get evenly dispersed throughout the sugar in small pieces. The mixture will still appear dry at this point. This stage ensures even distribution and prevents butter lumps in your frosting.

Add

  • 2 tsp vanilla extract
  • 3 tbsp lemon juice
  • zest of one lemon, finely minced
  • Approximately 4-6 tbsp milk

Both of these liquid measures can be adjusted. The milk can be adjusted to make a thicker frosting by adding less or a more spreadable frosting by adding a little more. Use your own judgement here. The lemon juice can be adjusted to your own taste too.

When the icing reaches the desired consistently continue to beat it on high speed for 5 minutes to incorporate more air into the frosting to make it lighter and fluffier.

To construct the cake:

Split the two layers of cake horizontally to create 4 layers. Brush the reserved syrup onto the cut sides of the cake layers.

Place the first layer of cake on the cake plate and top with some of the lemon buttercream frosting. Add the next layer and using a piping bag, or a heavy plastic bag with a half inch opening snipped off the corner, pipe a ring of frosting around the perimeter of the cake. Fill the ring with half of the lemon curd. Add the next layer of cake and top with more of the frosting.
Add the final layer of cake. At this point frost the sides of the cake and pipe a border on the top and bottom. Add the second half of the lemon curd to the top of the cake and garnish the top of the cake with pieces of candied lemon zest. I use kitchen scissors to cut 1/2 inch pieces to decorate the border and then add a small pile of slivered zest to the center of the cake. Chill for several hours or overnight before serving.

reade more... Résuméabuiyad