Pages

Showing posts with label Beef. Show all posts

Beef Tagine over Couscous #SundaySupper


     What a crazy week it has been!  We had a half day on Tuesday, I had meetings all day Wednesday, Halloween on Thursday, and then a behavioral reward on Friday.  I'm exhausted but it's also been one of the most fun weeks.  My kids had a blast at our behavioral reward party and we even had an impromptu dance party!  (I may have been singing and dancing!)

Beef Tagine (Beef, tomatoes, and chickpeas in a flavorful sauce)
      At the end of the week I realized I still hadn't made my dish for this week's #SundaySupper theme Middle Eastern Cuisine.  There's a little placed called Ali Baba in Morgantown, WV where we like to go about once a month.  They have the best Mediterranean food around!  Seriously the lamb kabobs are amazing, the hummus is the best I've had, and the baba ganoush is out of this world!  I don't have much experience making any Middle Eastern Cuisine except for hummus, so I took this opportunity to make something totally new.

      I love lamb so I wanted to make lamb tagine.  After my crazy week I went to the market and of course there was no lamb to be found.  I spent months last year begging for ground lamb and they now stock that all the time but other lamb meat is not readily available in my area.  So unfortunately I had to go for my second choice which was beef.  In the end the beef tagine ended up being pretty awesome so I didn't mind.

Beef Tagine from Hezzi-D's Books and Cooks
     The flavors are sweet, savory, and a bit spicy.  I had mine with the chopped apricots but my husband doesn't like fruit in his entrees so I kept them out of his.  We both like the spices in this dish and that it was served over couscous.  It was a bright and vibrant dish that I can't wait to make again (with lamb!)

Beef Tagine over Couscous (adapted from Epicurious)
2 lb. beef stew meat, cut into 1 inch cubes
1 T. olive oil
1 t. salt
1/2 t. black pepper
1 medium onion, diced
4 garlic cloves, chopped
2 t. tumeric
2 t. paprika
1/2 t. cayenne pepper
1 T. ginger, peeled and chopped
1 can (15 oz) diced tomatoes
1 1/2 c. chicken broth
2 T. flour
1 can (15 oz) chickpeas, drained and rinsed
1/2 c. dried apricots, chopped
2 c. cooked couscous
3 T. chopped cilantro

1.  Heat the olive oil in a large skillet over medium heat.  Season the beef with salt and pepper then add to the skillet.  Brown on all sides.  Add in the onion and saute for 5 minutes.

2.  Stir in the garlic cloves and cook for 1 minute.  Add in the tumeric, paprika, and ginger and mix well.


3.  Stir in the diced tomatoes, chicken stock, and flour.  Mix well.  Bring to a boil then reduced heat to medium low and cook for 40 minutes.


4.  Stir in the chickpeas and apricots and cook for 5 minutes.  Remove from heat.

5.  Serve over top of couscous and sprinkle with cilantro. 


Beef, chickpeas, and tomatoes in a middle eastern sauce


See all the Middle Eastern goodness:

Mezze {Appetizers}
Salata {Salads and Sides}
Main
Halwa {Desserts}
reade more... Résuméabuiyad

French Onion Braised Beef Brisket

French Onion Braised Beef Brisket
Although weather-wise we have had not a a bad October at all so far here in St. John's, the Autumn chill is definitely in the air despite the sunny days. It's the time of year when simple comfort food and a good straightforward  hot meal to warm your bones is very much appreciated. Such was the case last week when I was inspired to have this delicious slow cooked meal.

Beef brisket does take a long time to slowly cook to tender perfection but it is so worth the time. Brisket has some of the best flavor of any cut of beef, so there is a reward for your effort. I don't really see slow cooked meals as a lot of work as some folks do. Once the initial preparation is done and the brisket is in the oven, it really becomes just a matter of time and not work, so if you're at home all afternoon anyway, I really don't see what the big deal is. I really see slow cooking as a relatively no-fuss sort of meal and they are very often the kinds of dishes we prepare on what we call Slow-Cooked Sundays.

Other cuts of beef suitable for braising, like chuck, bottom round or blade roast or even flank steak will work well in this recipe and will also shave at least an hour off the cooking time, depending on their size. Taking the time to slowly caramelize the onions is of paramount importance in this recipe; it is the flavor base of the entire recipe and shouldn't be rushed...and remember, once that part is done and it's in the oven, you really just coast through the next few hours until it's time to serve up this fantastic comfort food dinner.

The Yorkshire Pudding popovers shown in the photo are never optional at our house. We simply have to have them with any roast beef dinner; there would be many protestations and much whining if we did not. Perfecting popovers is a skill every good home cook needs to learn and we have full instructions with all the tips and tricks needed to make them successfully every time. It's one of those recipes that really is all about perfecting the method of baking much more than anything else. Unlock all the secrets to making perfect Yorkshire Pudding popovers by clicking here.

See the mouth watering photo of some Yorkshire pudding brisket sandwiches at the end of this recipe. Leftovers like those are a great reason to buy a larger brisket! 


French Onion Braised Beef Brisket

Recipe by Barry C. Parsons
Using my homemade French Onion Soup recipe as a base to create a braising liquid for beef brisket, produced one of the best and tastiest comfort food meals I've had in years.

Prep time: 1/2 hour
Cook time: 4 hours
Total time: 4 1/2 hours
Yield: Serves 6 - 8
Ingredients
  • 4 to 5 pound beef brisket
  • salt and pepper to season
  • 3 large onions, white or red, sliced thin
  • 2 tbsp butter
  • 2 cloves garlic, minced cloves garlic, minced
  • 1 quart/liter low sodium beef stock
  • 1 cup red wine
  • 2 bay leaves
  • 2 tbsp chopped fresh thyme (or 2 tsp dry thyme)
  • fresh ground nutmeg
  • 3 tbsp Worcestershire sauce
Cooking Directions
  1. Begin by caramelizing the onions. Add the butter to a saute pan along with the onions and garlic over medium heat. Season with salt and pepper.
  2. Slowly cook the onions until they are softened and begin to slowly caramelize and turn brown. Do not do this too quickly or they will develop a bitter flavor. Slow cooking the onions will bring out their natural sweetness. Don't rush this, it will take 15 o 20 minutes or so.
  3. In a cast iron pan over medium high heat, add a little canola oil. Season the brisket with salt and pepper and brown the brisket on all sides before adding it to a covered roasting pan.
  4. To the roasting pan, add all of the other ingredients, including the caramelized onions. Season with salt and pepper if necessary.
  5. Cover the roasting pan with aluminum foil as tightly as possible before adding the lid. Place in a 325 degree oven for 4 hours or until the brisket is fall apart tender.
  6. Skim the excess fat from the pan drippings and serve as a jus with the brisket or use it to make a gravy, whichever you prefer. 
Another fantastic serving suggestion for this tender beef brisket recipe and a perfect excuse to make additional Yorkshire pudding popovers, is this popover stuffed brisket sandwich with the French onion braising liquid as an au jus dip. Leftovers were never more satisfying or delicious than this.

French Onion Braised Beef Brisket Yorkshire Pudding Sandwich with French Onion Au Jus Dip
French Onion Braised Beef Brisket Yorkshire Pudding Sandwich
with French Onion Au Jus Dip

    French Onion Braised Beef Brisket
    French Onion Braised Beef Brisket
    Although weather-wise we have had not a a bad October at all so far here in St. John's, the Autumn chill is definitely in the air despite the sunny days. It's the time of year when simple comfort food and a good straightforward  hot meal to warm your bones is very much appreciated. Such was the case last week when I was inspired to have this delicious slow cooked meal.

    Beef brisket does take a long time to slowly cook to tender perfection but it is so worth the time. Brisket has some of the best flavor of any cut of beef, so there is a reward for your effort. I don't really see slow cooked meals as a lot of work as some folks do. Once the initial preparation is done and the brisket is in the oven, it really becomes just a matter of time and not work, so if you're at home all afternoon anyway, I really don't see what the big deal is. I really see slow cooking as a relatively no-fuss sort of meal and they are very often the kinds of dishes we prepare on what we call Slow-Cooked Sundays.

    Other cuts of beef suitable for braising, like chuck, bottom round or blade roast or even flank steak will work well in this recipe and will also shave at least an hour off the cooking time, depending on their size. Taking the time to slowly caramelize the onions is of paramount importance in this recipe; it is the flavor base of the entire recipe and shouldn't be rushed...and remember, once that part is done and it's in the oven, you really just coast through the next few hours until it's time to serve up this fantastic comfort food dinner.

    The Yorkshire Pudding popovers shown in the photo are never optional at our house. We simply have to have them with any roast beef dinner; there would be many protestations and much whining if we did not. Perfecting popovers is a skill every good home cook needs to learn and we have full instructions with all the tips and tricks needed to make them successfully every time. It's one of those recipes that really is all about perfecting the method of baking much more than anything else. Unlock all the secrets to making perfect Yorkshire Pudding popovers by clicking here.

    See the mouth watering photo of some Yorkshire pudding brisket sandwiches at the end of this recipe. Leftovers like those are a great reason to buy a larger brisket! 


    French Onion Braised Beef Brisket

    Recipe by Barry C. Parsons
    Using my homemade French Onion Soup recipe as a base to create a braising liquid for beef brisket, produced one of the best and tastiest comfort food meals I've had in years.

    Prep time: 1/2 hour
    Cook time: 4 hours
    Total time: 4 1/2 hours
    Yield: Serves 6 - 8
    Ingredients
    • 4 to 5 pound beef brisket
    • salt and pepper to season
    • 3 large onions, white or red, sliced thin
    • 2 tbsp butter
    • 2 cloves garlic, minced cloves garlic, minced
    • 1 quart/liter low sodium beef stock
    • 1 cup red wine
    • 2 bay leaves
    • 2 tbsp chopped fresh thyme (or 2 tsp dry thyme)
    • fresh ground nutmeg
    • 3 tbsp Worcestershire sauce
    Cooking Directions
    1. Begin by caramelizing the onions. Add the butter to a saute pan along with the onions and garlic over medium heat. Season with salt and pepper.
    2. Slowly cook the onions until they are softened and begin to slowly caramelize and turn brown. Do not do this too quickly or they will develop a bitter flavor. Slow cooking the onions will bring out their natural sweetness. Don't rush this, it will take 15 o 20 minutes or so.
    3. In a cast iron pan over medium high heat, add a little canola oil. Season the brisket with salt and pepper and brown the brisket on all sides before adding it to a covered roasting pan.
    4. To the roasting pan, add all of the other ingredients, including the caramelized onions. Season with salt and pepper if necessary.
    5. Cover the roasting pan with aluminum foil as tightly as possible before adding the lid. Place in a 325 degree oven for 4 hours or until the brisket is fall apart tender.
    6. Skim the excess fat from the pan drippings and serve as a jus with the brisket or use it to make a gravy, whichever you prefer. 
    Another fantastic serving suggestion for this tender beef brisket recipe and a perfect excuse to make additional Yorkshire pudding popovers, is this popover stuffed brisket sandwich with the French onion braising liquid as an au jus dip. Leftovers were never more satisfying or delicious than this.

    French Onion Braised Beef Brisket Yorkshire Pudding Sandwich with French Onion Au Jus Dip
    French Onion Braised Beef Brisket Yorkshire Pudding Sandwich
    with French Onion Au Jus Dip

      reade more... Résuméabuiyad

      Super Quick Sesame Beef and Asparagus

      Super Quick Sesame Beef and Asparagus
      Super Quick Sesame Beef and Asparagus
      So how quick is super quick? Well, with good organization, I had this on the table in about 20 minutes. I think good organization and time efficiency is really the key to these sorts of recipes. For example I always have two things going on simultaneously. While the water boils for blanching, chop the garlic and asparagus. While the asparagus blanches, slice the beef and grate the ginger. Always assemble all of the ingredients you will need on the counter next to the stove before you start cooking. You can even do that while waiting for the wok to heat. Pre-measuring the ingredients into small ramekins is also a huge help, especially for quick stir fried dishes because measuring as you go takes more time and the dish can easy overcook. Actively thinking of ways to optimize preparation and cooking time is a habit successful cooks all have and once you acquire that skill, I promise that much of your cooking stress will disappear.

      In this particular recipe, unlike many sesame beef recipes, you will notice that I do not pre-marinate the beef. Instead, I prefer to use tender cuts of beef like prime rib, striploin or even tenderloin steak which are excellent for quick stir-frying without getting tough. With such strong flavors in recipes like these I sometimes think that the flavor of the beef gets lost when marinating, so, many times I prefer just to prepare the meat and sauces separately and then bring them together briefly at the end. This recipe definitely is a good example of this concept because the flavor of the beef is still quite distinct even in the presence of the bold flavor of the sauce.

      Every busy family needs more of these sorts of recipes, so if you are looking for more like this, please click here to visit our Pinterest Quick and Easy Meals collection.


      Super Quick Sesame Beef and Asparagus

      Recipe by Barry C. Parsons
      A super quick and delicious meal in minutes. When there's practically no time for cooking, this highly flavorful dinner is ready in less time that you can pick up take-out.
      Prep time: 10 minutes
      Cook time: 10 minutes
      Total time: 20 minutes
      Yield: 4 servings

      Ingredients
      • 1 1/2 pounds thinly sliced steak
      • 2 cloves minced garlic
      • 2 tsp freshly grated ginger root
      • 3 tbsp oyster sauce (reduced sodium version if available)
      • 3 tbsp low sodium soy sauce
      • 1 tsp Chinese 5 Spice Powder
      • 3 tbsp rice wine vinegar
      • 1/2 tsp black pepper
      • 4 tbsp brown sugar 
      • 1 tbsp toasted sesame oil ( more or less to taste)
      • 1 tbsp corn starch
      • 1/4 cup beef stock (or water)
      • 3 tbsp toasted sesame seeds
      • 1/2 pound fresh asparagus
      • 3/4 cup sliced water chestnuts
      Cooking Directions
      1. Cut the asparagus into 1 1/2 inch pieces and blanch in boiling salted water for only 3 to 4 minutes.
      2. Drain the asparagus and immediately plunge it into ice water to stop the cooking and preserve its color. (You can use broccoli or green beans here if you prefer but use the same cooking method for them too.)
      3. After a minute, drain the ice water off of the asparagus and set it aside.
      4. Heat a wok over very high heat. Add 2 tbsp of peanut or regular sesame oil and quickly stir fry the steak slices for only 1 to 2 minutes.
      5. Remove the beef from the wok and set aside while you prepare the sauce.
      6. To the wok, add the ginger, oyster sauce, soy sauce, 5 spice powder, rice wine vinegar, black pepper, brown sugar and toasted sesame oil. Bring to a boil for only a minute.
      7. Dissolve the corn starch in the water and add to the simmering sauce in the wok, stirring constantly until the sauce thickens.
      8. Add the beef back to the sauce along with the blanched asparagus and water chestnuts.
      9. Simmer only for another minute or so until the beef, water chestnuts and asparagus are heated through. Serve over steamed rice or your favorite Chinese noodles.
      10. Sprinkle on the toasted sesame seeds when serving.
      Super Quick Sesame Beef and Asparagus
      Super Quick Sesame Beef and Asparagus
      So how quick is super quick? Well, with good organization, I had this on the table in about 20 minutes. I think good organization and time efficiency is really the key to these sorts of recipes. For example I always have two things going on simultaneously. While the water boils for blanching, chop the garlic and asparagus. While the asparagus blanches, slice the beef and grate the ginger. Always assemble all of the ingredients you will need on the counter next to the stove before you start cooking. You can even do that while waiting for the wok to heat. Pre-measuring the ingredients into small ramekins is also a huge help, especially for quick stir fried dishes because measuring as you go takes more time and the dish can easy overcook. Actively thinking of ways to optimize preparation and cooking time is a habit successful cooks all have and once you acquire that skill, I promise that much of your cooking stress will disappear.

      In this particular recipe, unlike many sesame beef recipes, you will notice that I do not pre-marinate the beef. Instead, I prefer to use tender cuts of beef like prime rib, striploin or even tenderloin steak which are excellent for quick stir-frying without getting tough. With such strong flavors in recipes like these I sometimes think that the flavor of the beef gets lost when marinating, so, many times I prefer just to prepare the meat and sauces separately and then bring them together briefly at the end. This recipe definitely is a good example of this concept because the flavor of the beef is still quite distinct even in the presence of the bold flavor of the sauce.

      Every busy family needs more of these sorts of recipes, so if you are looking for more like this, please click here to visit our Pinterest Quick and Easy Meals collection.


      Super Quick Sesame Beef and Asparagus

      Recipe by Barry C. Parsons
      A super quick and delicious meal in minutes. When there's practically no time for cooking, this highly flavorful dinner is ready in less time that you can pick up take-out.
      Prep time: 10 minutes
      Cook time: 10 minutes
      Total time: 20 minutes
      Yield: 4 servings

      Ingredients
      • 1 1/2 pounds thinly sliced steak
      • 2 cloves minced garlic
      • 2 tsp freshly grated ginger root
      • 3 tbsp oyster sauce (reduced sodium version if available)
      • 3 tbsp low sodium soy sauce
      • 1 tsp Chinese 5 Spice Powder
      • 3 tbsp rice wine vinegar
      • 1/2 tsp black pepper
      • 4 tbsp brown sugar 
      • 1 tbsp toasted sesame oil ( more or less to taste)
      • 1 tbsp corn starch
      • 1/4 cup beef stock (or water)
      • 3 tbsp toasted sesame seeds
      • 1/2 pound fresh asparagus
      • 3/4 cup sliced water chestnuts
      Cooking Directions
      1. Cut the asparagus into 1 1/2 inch pieces and blanch in boiling salted water for only 3 to 4 minutes.
      2. Drain the asparagus and immediately plunge it into ice water to stop the cooking and preserve its color. (You can use broccoli or green beans here if you prefer but use the same cooking method for them too.)
      3. After a minute, drain the ice water off of the asparagus and set it aside.
      4. Heat a wok over very high heat. Add 2 tbsp of peanut or regular sesame oil and quickly stir fry the steak slices for only 1 to 2 minutes.
      5. Remove the beef from the wok and set aside while you prepare the sauce.
      6. To the wok, add the ginger, oyster sauce, soy sauce, 5 spice powder, rice wine vinegar, black pepper, brown sugar and toasted sesame oil. Bring to a boil for only a minute.
      7. Dissolve the corn starch in the water and add to the simmering sauce in the wok, stirring constantly until the sauce thickens.
      8. Add the beef back to the sauce along with the blanched asparagus and water chestnuts.
      9. Simmer only for another minute or so until the beef, water chestnuts and asparagus are heated through. Serve over steamed rice or your favorite Chinese noodles.
      10. Sprinkle on the toasted sesame seeds when serving.
      reade more... Résuméabuiyad

      Bacon Double Cheeseburger Beer Cheese Soup in 30 Minutes


      It is the cool season around here. We are dipping in the 70's in Arizona and that means SOUP! I have to tell you we have made a ton of soup already and I do not see any stopping in the near future. So keep your eyes peeled we have a new soup planned each week throughout the cool season and they will knock your socks off.

      One of our new soups this season has kind of gone crazy around here. The Bacon Cheddar Beer Cheese Soup with Chicken has over 23,000 Pins and is already our #2 all time recipe on the site and it was just posted 4 weeks ago. We have had such a fantastic response to the recipe with rave reviews all over Facebook and our site. We have even eaten it a gazillion times so I decided to mix it up a bit.

      Continue Reading »
      reade more... Résuméabuiyad

      Italian Herb Baked Meatballs


      We are absolutely thrilled to be partnering with Lone Mountain Wagyu. If you have never heard of Wagyu, hold onto your socks, we will get back to that in a moment.

      If you know anything about me, you probably are aware of my frugal nature. I am always looking for the best deal. I watch sale prices so I get the most BANG for my buck on groceries and even clip the sale coupons before shopping at my favorite department store.

      Although, my mother always said "you get what you pay for" and she was so right. As of late I have spent a lot of time talking about beef. Chad and I have been discussing buying natural grass fed beef, for so many reasons.

      Continue Reading »
      reade more... Résuméabuiyad

      VIDEO RECIPE: The Best Beef and Broccoli

      The Best Beef and Broccoli
      The Best Beef and Broccoli
      The latest in our video recipe series in cooperation with CBC Newfoundland and Labrador has been a very popular dish on Rock Recipes. Our easy, delicious Beef and Broccoli has many rave reviews and many people have said it's better that most restaurant versions they've tried. Our family prefers it over Chinese noodles rather than rice for a quick and easy weekday meal when you have little time to spare.

      For the full recipe click here.

      For Mobile users, if the video doesn't load below, please try this link


      The Best Beef and Broccoli
      The Best Beef and Broccoli
      The latest in our video recipe series in cooperation with CBC Newfoundland and Labrador has been a very popular dish on Rock Recipes. Our easy, delicious Beef and Broccoli has many rave reviews and many people have said it's better that most restaurant versions they've tried. Our family prefers it over Chinese noodles rather than rice for a quick and easy weekday meal when you have little time to spare.

      For the full recipe click here.

      For Mobile users, if the video doesn't load below, please try this link


      reade more... Résuméabuiyad

      A Sunday Lunch for Four

      Shiraz-braised beef short rib, Petits pois à la Française, Scalloped potatoes 

      We had some friends over for lunch today, and as I sit down to write this post, I realise that I haven't entertained for ages. (I certainly haven't blogged any dinner/lunch parties since March's Miranda Party post, and before that, February's Lobster Party post!) Although I love cooking, and more importantly, feeding people, my current flat isn't particularly suited for entertaining - the lounge room is carpeted, which always makes me a bit nervous if we're drinking red wine, and our dining room is kinda set apart from the kitchen, so preparing and serving many courses can be a bit awkward. When we have had people over recently, I've preferred to do simple weeknight dinners with small groups of people, like a bowl of Taiwanese Meat Sauce on Rice, eaten off our laps in the lounge room, as opposed to my usual Cecil B. DeMille productions. Or perhaps those are just excuses and I've been really enjoying hibernating this winter!

      Anyway, for this particular lunch, I wanted to make something special, but still reassuringly "Sunday lunch-y". I thought that beef in a red wine sauce, scalloped potatoes and peas would do the trick.

      A Sunday Lunch for 4
      Shiraz-braised beef short rib
      Petits pois à la française
      Chocolate fudge cake

      I've written up the recipes or the short rib and peas at the bottom of this post. You can find the recipe for the scalloped potatoes on Martha Stewart's website (click here), and the chocolate fudge cake is from the The Ottolenghi Cookbook.

      The whole menu was reasonably easy to put together - I started cooking at ten in the morning, didn't feel particularly rushed, and we sat around the table to eat at one thirty.

      I started by making the chocolate cake. Ottolenghi's chocolate fudge cake is a super dense, rich, chocolatey monster of a cake - just chocolate, sugar, butter, and eggs. I love how glossy the mixture looks!

      Chocolate fudge cake mixture

      The cake's schtick (if cake can be said to have a schtick), as I've mentioned previously, is that you bake two thirds of the mixture first, before adding the rest of the mixture and baking it fully, to give you a two-textured cake.

      Cake after the first baking

      Topped with the remaining mixture

      The cake was still quite liquid after the allotted baking time, so I baked it for an extra ten minutes, then let it cool, and stashed it in the fridge to firm up while cooking and eating lunch.

      Now, onto the beef ribs. I enjoyed braised short ribs at Stillwater restaurant last year, and had been looking for an excuse to cook them at home. My local supermarket occasionally sells short ribs, but they come pre-marinated in a spooky looking sauce, and I prefer to have control over the flavourings! I made a special trip to Prahran Market to get these beautiful short ribs.

      Beef Short Ribs

      I didn't follow a recipe to cook the ribs - having made a zillion stews during my How to Eat project, I now make them on easy autopilot. (I did take notes however of what I did, and have written the full recipe below for your, and my, reference!) So, I dusted the ribs in seasoned flour...

      Floured beef ribs

      ...browned them over a high heat, and set them aside.

      Browned beef ribs

      In the same pan, I then cooked a mixture of aromatic vegetables - celery, carrots, shallots...

      Mirepoix

      ... as well as some garlic.

      Garlic

      I added some tomato paste, a whole bottle of Shiraz, some beef stock and herbs. Then the whole lot went in the pressure cooker for forty-five minutes, until the meat was tender and falling off the bone. To finish, I set the beef aside and viciously boiled down the sauce until it was thick and glossy, adding porcini powder, salt and sugar to correct the flavour.

      Shiraz-braised beef ribs

      I loved the glossy, rich sauce and the tender, melting meat. I know it looks like a really wintry dish, and we're well into Spring, but Melbourne's variable weather means you never know when you'll feel like hunkering down with a nice bowl of stew. I'm a bit low on iron, and I recently heard that cooking beef bones (e.g. in a stew like I did, or in soup or stock) increases the iron content of the dish - bonus!

      Let's have a look at the accompaniments! Here are the scalloped potatoes. (Martha's recipe is my favourite recipe for scalloped potatoes).

      Scalloped Potatoes with Leek

      I love cooking peas French style - I've included my recipe below, which is a simplified, pared down version of Nigella's petits pois à la Française from Feast.

      Petits pois à la Française

      Cake time! I served the cake with cinnamon whipped cream. (1 cup cream, 1/2 teaspoon cinnamon and 1 teaspoon caster sugar, whipped until fluffy).

      Chocolate fudge cake with cinnamon cream

      Ok, so I know the last time I made this cake it was super melty and I said: "Next time I'll be more patient and let it firm up completely before digging in. Maybe."

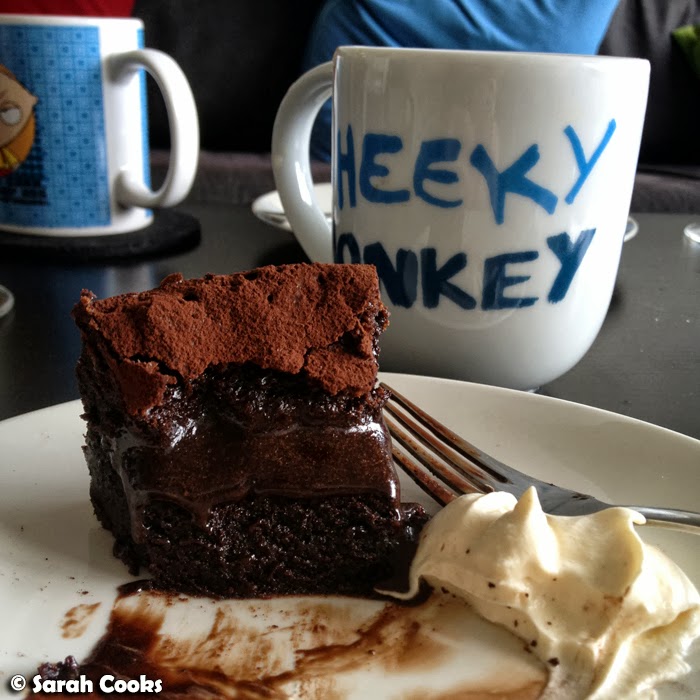
      Clearly I was not good to my word. Dammit, it was even meltier than last time! Check out this river of molten chocolate!

      Chocolate fudge cake

      Next time, I promise I'll make it the night before and let it firm up properly in the fridge overnight before slicing it. Maybe.

      Luckily no-one was complaining, haha.

      Chocolate fudge cake

      Melty, melty goodness

      Two-textured cake

      Shiraz-braised Beef Short Rib
      An original recipe by Sarah Cooks

      Ingredients
      1.5 kg beef short rib
      1/2 cup plain flour
      2 tablespoons olive oil
      3 shallots, finely sliced
      2 sticks of celery, chopped into small squares
      2 carrots, peeled and chopped into small squares
      2 cloves of garlic, finely sliced
      2 tablespoons tomato paste
      250 millilitres beef stock
      750 millilitres Shiraz wine
      2 stalks thyme
      2 bay leaves
      1 tablespoon brown sugar
      1 teaspoon porcini powder

      Method
      Dust the beef ribs in the flour. Season with salt and pepper.
      Heat half the olive oil in a large saucepan (or in a pressure cooker). In batches, brown the beef ribs on all sides, allowing them to get nice and brown. Set aside.
      Add the remaining oil to the saucepan, followed by the shallots, celery and carrots. Cook for 5-10 minutes, until the shallots are softened. Add the garlic and cook for a further 2 minutes. Add the tomato paste and stir to combine.
      Place the vegetable mixture in the base of a pressure cooker. Arrange the browned beef ribs on top. Pour over the stock and Shiraz. Add the thyme and bay leaves. Cook on high pressure for 45 minutes.
      Remove the beef ribs with a slotted spoon to a serving dish and keep warm under a tent of foil. Cook the sauce over a high heat, boiling until reduced by half. Add the brown sugar, porcini powder and salt to taste, stirring and cooking until dissolved.
      Pour the hot sauce over the beef ribs to serve.
      Serves 6

      Petits pois à la Française 
      Adapted from Nigella Lawson's Feast

      Ingredients
      1 teaspoon olive oil
      1 shallot
      500 grams frozen baby peas
      1/2 cup chicken stock

      Method
      Heat the oil in a saucepan over a medium heat. Finely slice the shallots and add to the pan, stirring occasionally, until softened. Tip in the peas and stir to coat in the oil and shallots. Add the chicken stock. Bring to the boil, then turn down to a simmer. Cook for 5-10 minutes, until the peas are cooked through and are piping hot.
      Serves 6 as an accompaniment
      reade more... Résuméabuiyad

      Whiskey Jack's Down Home Steak Chili in Just 30 Minutes


      I am pretty sure every midwestern man is a meat and potatoes lover. Chad grew up in Iowa with a love of hearty meals. You know those stick to your ribs kind of dinners that after you eat leave you feeling completely satisfied.

      As fall is upon us I have been working on some chili recipes and although I may be perfectly content with my Italian Chili or Hearty Vegetarian Chili, Chad is not! Naturally, I set out to make him the most satisfying chili that I could think of.

      Continue Reading »
      reade more... Résuméabuiyad

      Chilli Beef on Rice

      Chilli Beef on Rice

      So... "weather". Am I right guys? It suddenly got cold and rainy again this week, and I wanted something comforting and warming for dinner. I was also feeling a bit fluey and rundown, so certainly did not want to be going out to the supermarket after I got home from work. I had peas and minced beef in the freezer, and a whole lotta Chinese sauces in the pantry. And bang, dinner was born.

      During the day, I had the idea of flavouring the minced beef with my beloved Sichuanese chilli bean sauce, (although I know Fuchsia Dunlop would say the Cantonese Lee Kum Kee brand is terribly inauthentic), but wasn't quite sure what proportions to use, or what other flavourings I'd need. Then I remembered that Nigella has a recipe for Korean keema in Kitchen - minced turkey, cooked with Korean gochujang chilli sauce and other flavourings, and I thought that would be a good place to start. (Incidentally, I've never tried gochujang but if it has, as Nigella says, "a liquorice intensity", I assume that I wouldn't like it, hehe.)

      Chilli Bean Sauce, Shao Hsing rice wine, soy sauce, marinating minced beef

      I used Nigella's proportions of sauce flavourings, replacing her gochujang with my Sichuanese chilli sauce and reducing the soy (undersalted food can be adjusted, oversalted food is a waste). I also (obviously) used minced beef instead of the minced turkey she suggests. I used a red onion instead of spring onions, as I didn't have any to hand, and at the end of cooking I added black vinegar to balance the flavours, and added potato flour to give the sauce a lovely glossy thickness.

      Caramelising onions

      I was so pleased with this dinner - the sauce had a gentle warm spiciness, with a nice touch of slightly crisp caramelization on the mince from the honey in the sauce. It's also a bonus, in terms of the comfort factor, if you can eat dinner with just a spoon. It also only took about half an hour, from start to finish, including cooking the rice. Comforting spicy deliciousness in record time. Win!

      Chilli beef on rice

      Chilli Beef on Rice
      Recipe adapted from Nigella's Korean Keema, from Kitchen

      Ingredients
      2 tablespoons Sichuanese chilli bean sauce (Toban Djan)
      1 teaspoon soy sauce
      1 tablespoon honey
      3 tablespoons Chinese rice wine (Shao Hsing)
      250 grams minced beef
      125 grams frozen peas
      1 tablespoon peanut oil
      1/2 a red onion, finely sliced
      4 tablespoons water
      1 teaspoon potato flour
      1/2 teaspoon Chinkiang black vinegar

      Method
      Whisk together the chilli bean sauce, soy sauce, honey and 1 tablespoon of the rice wine. Mix this sauce through the minced beef and allow to marinate while you continue with the recipe.
      Place the frozen peas into a sieve, and pour hot water from the kettle over them to defrost.
      Heat the oil in a wok or saucepan, then add the red onion and cook, stirring occasionally, until softened and golden brown. Tip in the defrosted peas and stir to combine.
      Add the minced beef and all the sauce to the pan, stirring to break up the meat. Cook for about 5 minutes, or until the beef is cooked through.
      Place the 4 tablespoons water, remaining 2 tablespoons Chinese rice wine and potato flour into the bowl that was holding the beef. Whisk to combine and then pour into the pan. Stir through, and allow to cook for a further minute or so, until the sauce is thickened and glossy. Off the heat, stir in the black vinegar.
      Serve with steamed rice.
      Serves 2 -3
      Chilli Beef on Rice

      So... "weather". Am I right guys? It suddenly got cold and rainy again this week, and I wanted something comforting and warming for dinner. I was also feeling a bit fluey and rundown, so certainly did not want to be going out to the supermarket after I got home from work. I had peas and minced beef in the freezer, and a whole lotta Chinese sauces in the pantry. And bang, dinner was born.

      During the day, I had the idea of flavouring the minced beef with my beloved Sichuanese chilli bean sauce, (although I know Fuchsia Dunlop would say the Cantonese Lee Kum Kee brand is terribly inauthentic), but wasn't quite sure what proportions to use, or what other flavourings I'd need. Then I remembered that Nigella has a recipe for Korean keema in Kitchen - minced turkey, cooked with Korean gochujang chilli sauce and other flavourings, and I thought that would be a good place to start. (Incidentally, I've never tried gochujang but if it has, as Nigella says, "a liquorice intensity", I assume that I wouldn't like it, hehe.)

      Chilli Bean Sauce, Shao Hsing rice wine, soy sauce, marinating minced beef

      I used Nigella's proportions of sauce flavourings, replacing her gochujang with my Sichuanese chilli sauce and reducing the soy (undersalted food can be adjusted, oversalted food is a waste). I also (obviously) used minced beef instead of the minced turkey she suggests. I used a red onion instead of spring onions, as I didn't have any to hand, and at the end of cooking I added black vinegar to balance the flavours, and added potato flour to give the sauce a lovely glossy thickness.

      Caramelising onions

      I was so pleased with this dinner - the sauce had a gentle warm spiciness, with a nice touch of slightly crisp caramelization on the mince from the honey in the sauce. It's also a bonus, in terms of the comfort factor, if you can eat dinner with just a spoon. It also only took about half an hour, from start to finish, including cooking the rice. Comforting spicy deliciousness in record time. Win!

      Chilli beef on rice

      Chilli Beef on Rice
      Recipe adapted from Nigella's Korean Keema, from Kitchen

      Ingredients
      2 tablespoons Sichuanese chilli bean sauce (Toban Djan)
      1 teaspoon soy sauce
      1 tablespoon honey
      3 tablespoons Chinese rice wine (Shao Hsing)
      250 grams minced beef
      125 grams frozen peas
      1 tablespoon peanut oil
      1/2 a red onion, finely sliced
      4 tablespoons water
      1 teaspoon potato flour
      1/2 teaspoon Chinkiang black vinegar

      Method
      Whisk together the chilli bean sauce, soy sauce, honey and 1 tablespoon of the rice wine. Mix this sauce through the minced beef and allow to marinate while you continue with the recipe.
      Place the frozen peas into a sieve, and pour hot water from the kettle over them to defrost.
      Heat the oil in a wok or saucepan, then add the red onion and cook, stirring occasionally, until softened and golden brown. Tip in the defrosted peas and stir to combine.
      Add the minced beef and all the sauce to the pan, stirring to break up the meat. Cook for about 5 minutes, or until the beef is cooked through.
      Place the 4 tablespoons water, remaining 2 tablespoons Chinese rice wine and potato flour into the bowl that was holding the beef. Whisk to combine and then pour into the pan. Stir through, and allow to cook for a further minute or so, until the sauce is thickened and glossy. Off the heat, stir in the black vinegar.
      Serve with steamed rice.
      Serves 2 -3
      reade more... Résuméabuiyad

      Our Best Simple Bolognese Sauce

      Our Best Simple Bolognese Sauce
      Our Best Simple Bolognese Sauce
      There are so many recipes out there for Bolognese sauce and with such a much loved traditional recipe, there is no wonder that so many variations of it available. Italians can be quite fierce in their opinions about what constitutes a proper Bolognese sauce; is milk added?...oregano? ...basil? ...other herbs? ..tomato sauce or tomato paste? Ask any of those questions and you are going to get answers...and probably lots of them. So, with so many differing opinions, I'm going to ignore most of them and give you our family's most loved Bolognese Sauce recipe.

      The Bolognese Sauce that our family really loves concentrates on simplicity, slow cooking, modest seasoning and the approach that, even though it does contain tomatoes, it is a meat sauce and not a tomato sauce. Since I like to simmer my sauce for a long time to concentrate the flavor, I do not use tomato paste but canned San Marzano tomatoes, my favorite, which I puree in the blender. In addition to red wine, I also use some beef stock in order to allow for a longer simmering time and to deepen the rich beefy flavor of the sauce. This particular batch actually simmered very slowly for almost four hours, to be served as one of our most loved Sunday suppers. It is well worth the time. Serve with plenty of very good grated Parmesan or Romano cheese. Our family's preference is the best Parmagiano Reggiano cheese we can find, freshly grated over the top. There is no such thing as too much.

      This recipe produces a very thick, rich, intensely flavored sauce which we serve over tagliatelle, spaghetti or for my son Noah, almost always penne. Leftover sauce at our house can get used to make the absolute best lasagne or even Bolognese Sloppy Joes with some provolone cheese melted over the meat sauce and served on toasted crusty bread. I recommend you plan for leftovers, especially those sloppy Joes; they are so delicious!

      Save your Parmesan rinds to add to Bolognese sauce.
      Save your Parmesan rinds to add to Bolognese sauce.
      Do you throw out the rinds from Parmesan cheese? Stop! Save them in a Ziploc bag in the freezer for the next time you make Bolognese sauce and drop 2 or 3 in as soon as the sauce begins to simmer. People will wonder what the secret is to your delicious Bolognese. Our motto here at Rock Recipes is "No flavor left behind!"


      Our Best Bolognese Sauce

      Recipe by Barry C. Parsons
      Our Best Bolognese Sauce - This recipe produces a very thick, simply seasoned, rich, intensely flavored sauce. Delicious over any pasta, in lasagne or to make Bolognese Sloppy Joes!
      Prep time: 1/2 hour
      Cook time: 3 to 4 hours
      Total time: 3 1/2 to 4 1/2 hours
      Yield: 8-10 servings
      Ingredients
      • 3 tbsp olive oil
      • 6 ounces finely diced pancetta or bacon
      • 3 pounds lean ground beef
      • 1 tsp freshly ground black pepper
      • 1 tsp sea salt
      • 1 tsp freshly ground nutmeg
      • 4 cups pureed canned tomatoes
      • 2 cups dry red wine
      • 3 cups low sodium beef stock
      • 1/2 cup milk
      • 3 large bay leaves
      • 2 large carrots, finely diced
      • 3 celery sticks, finely diced
      • 2 large onions, finely diced
      • 6 cloves garlic, finely minced
      • 2 pounds fresh or dried pasta of your choice
      • 1 cup freshly grated Parmesan or Romano cheese
      Cooking Directions
      1. In a large dutch oven or small stock pot over medium heat, add the olive oil and chopped pancetta or bacon. Cook until the pancetta or bacon is almost crispy.
      2. Add the onions, garlic, celery and carrots and cook until the onions have softened and begin to caramelize to a light brown color, stirring often.
      3. Add the ground beef, salt, pepper, and nutmeg and cook until the beef is well browned.
      4. Add the pureed tomatoes, wine, beef stock, milk and bay leaves. Stir.
      5. Cover and bring to a slow simmer.
      6. Simmer very gently, stirring occasionally for 3 to 4 hours. If you feel you need to add more beef stock, that's fine but you may want to turn down the heat if the liquid is boiling away too rapidly. A slow simmer is important here.
      7. The liquid should be almost completely gone at the end and the meat sauce will be quite thick. Stir in the
      8. Serve over or tossed with cooked pasta topped with lots of freshly grated Parmesan or Romano cheese.
        Bolognese Sloppy Joes
        Bolognese Sloppy Joes
      Our Best Simple Bolognese Sauce
      Our Best Simple Bolognese Sauce
      There are so many recipes out there for Bolognese sauce and with such a much loved traditional recipe, there is no wonder that so many variations of it available. Italians can be quite fierce in their opinions about what constitutes a proper Bolognese sauce; is milk added?...oregano? ...basil? ...other herbs? ..tomato sauce or tomato paste? Ask any of those questions and you are going to get answers...and probably lots of them. So, with so many differing opinions, I'm going to ignore most of them and give you our family's most loved Bolognese Sauce recipe.

      The Bolognese Sauce that our family really loves concentrates on simplicity, slow cooking, modest seasoning and the approach that, even though it does contain tomatoes, it is a meat sauce and not a tomato sauce. Since I like to simmer my sauce for a long time to concentrate the flavor, I do not use tomato paste but canned San Marzano tomatoes, my favorite, which I puree in the blender. In addition to red wine, I also use some beef stock in order to allow for a longer simmering time and to deepen the rich beefy flavor of the sauce. This particular batch actually simmered very slowly for almost four hours, to be served as one of our most loved Sunday suppers. It is well worth the time. Serve with plenty of very good grated Parmesan or Romano cheese. Our family's preference is the best Parmagiano Reggiano cheese we can find, freshly grated over the top. There is no such thing as too much.

      This recipe produces a very thick, rich, intensely flavored sauce which we serve over tagliatelle, spaghetti or for my son Noah, almost always penne. Leftover sauce at our house can get used to make the absolute best lasagne or even Bolognese Sloppy Joes with some provolone cheese melted over the meat sauce and served on toasted crusty bread. I recommend you plan for leftovers, especially those sloppy Joes; they are so delicious!

      Save your Parmesan rinds to add to Bolognese sauce.
      Save your Parmesan rinds to add to Bolognese sauce.
      Do you throw out the rinds from Parmesan cheese? Stop! Save them in a Ziploc bag in the freezer for the next time you make Bolognese sauce and drop 2 or 3 in as soon as the sauce begins to simmer. People will wonder what the secret is to your delicious Bolognese. Our motto here at Rock Recipes is "No flavor left behind!"


      Our Best Bolognese Sauce

      Recipe by Barry C. Parsons
      Our Best Bolognese Sauce - This recipe produces a very thick, simply seasoned, rich, intensely flavored sauce. Delicious over any pasta, in lasagne or to make Bolognese Sloppy Joes!
      Prep time: 1/2 hour
      Cook time: 3 to 4 hours
      Total time: 3 1/2 to 4 1/2 hours
      Yield: 8-10 servings
      Ingredients
      • 3 tbsp olive oil
      • 6 ounces finely diced pancetta or bacon
      • 3 pounds lean ground beef
      • 1 tsp freshly ground black pepper
      • 1 tsp sea salt
      • 1 tsp freshly ground nutmeg
      • 4 cups pureed canned tomatoes
      • 2 cups dry red wine
      • 3 cups low sodium beef stock
      • 1/2 cup milk
      • 3 large bay leaves
      • 2 large carrots, finely diced
      • 3 celery sticks, finely diced
      • 2 large onions, finely diced
      • 6 cloves garlic, finely minced
      • 2 pounds fresh or dried pasta of your choice
      • 1 cup freshly grated Parmesan or Romano cheese
      Cooking Directions
      1. In a large dutch oven or small stock pot over medium heat, add the olive oil and chopped pancetta or bacon. Cook until the pancetta or bacon is almost crispy.
      2. Add the onions, garlic, celery and carrots and cook until the onions have softened and begin to caramelize to a light brown color, stirring often.
      3. Add the ground beef, salt, pepper, and nutmeg and cook until the beef is well browned.
      4. Add the pureed tomatoes, wine, beef stock, milk and bay leaves. Stir.
      5. Cover and bring to a slow simmer.
      6. Simmer very gently, stirring occasionally for 3 to 4 hours. If you feel you need to add more beef stock, that's fine but you may want to turn down the heat if the liquid is boiling away too rapidly. A slow simmer is important here.
      7. The liquid should be almost completely gone at the end and the meat sauce will be quite thick. Stir in the
      8. Serve over or tossed with cooked pasta topped with lots of freshly grated Parmesan or Romano cheese.
        Bolognese Sloppy Joes
        Bolognese Sloppy Joes
      reade more... Résuméabuiyad

      Ginger Braised Beef Roast with Hoisin Jus

      Ginger Braised Beef Roast with Hoisin Jus
      Ginger Braised Beef Roast with Hoisin Jus
      Here's a different take on your Sunday pot roast... and a really delicious one too. My kids and Kathryn, our spare teenager and frequent dinner guest, particularly liked the beef jus that we served with this roast. It's simply made from the leftover braising liquid that's simmered with Hoisin sauce and soy sauce for familiar Asian flavor that goes so well with the slow cooked beef. All three teenagers at the table devoured this meal in short order, even going back for seconds. We served it with simple stir fried baby bok choy and peppers and some sweet potato mash for a completely satisfying dinner.

      Ginger Braised Beef Roast with Hoisin Jus

      Recipe by Barry C. Parsons

      A beautiful, fall-apart tender, braised pot roast with Asian inspired flavors. Served with a delicious beef jus that's flavored with Hoisin and soy sauce at the end.
      Prep time: Aproximately 20 minutes
      Cook time: 3 to 4 hours
      Total time: Aproximately 4 hours
      Yield: Serves 6 to 8
      Ingredients
      • 4 lb beef roast, cross rib or sirloin work well
      • 3 cups beef stock
      • 1 cup orange juice
      • 1 large onion, finely diced
      • 3 cloves minced garlic
      • 1 tsp five spice powder
      • 1/2 tsp freshly ground black pepper
      • 1/2 tsp salt
      • 3 tbsp freshly grated ginger
      • 1/2 tsp ground fennel seed
      • 2 tbsp honey
      • 3 tbsp soy sauce
      • 1/2 cup Hoisin sauce
      • 6 carrots, cut in sticks or coins
      Cooking Directions
      1. Season the roast with salt and pepper and brown on all sides in a cast iron pan with a little canola oil added to the pan. Transfer the roast to a covered roaster or heavy dutch oven.
      2. Add the beef stock, orange juice, onion, garlic, five spice powder, salt, pepper, ginger and honey. Stir to blend the ingredients together.
      3. Cover the roasting pan tightly with aluminum foil before adding the lid. Place in a preheated 350 degree oven for 3 to 4 hours until the meat is tender and almost falling apart.
      4. In the last half hour or so of cooking time add the carrots to the roasting pan.
      5. Remove the meat from the pan, cover with aluminum foil and hold in a 150 degree oven while you prepare the jus.
      6. Pour the beef braising liquid from the roasting pan into a saucepan and skim any excess fat.
      7. Simmer to reduce the volume by about 1/4, then add the soy sauce and Hoisin sauce. Simmer for just a few minutes more and serve with the carved beef roast.
      8. Delicious served with simple steamed rice or sweet potato mash and stir fried Chinese vegetables. 
      Ginger Braised Beef Roast with Hoisin Jus
      Ginger Braised Beef Roast with Hoisin Jus

        Ginger Braised Beef Roast with Hoisin Jus
        Ginger Braised Beef Roast with Hoisin Jus
        Here's a different take on your Sunday pot roast... and a really delicious one too. My kids and Kathryn, our spare teenager and frequent dinner guest, particularly liked the beef jus that we served with this roast. It's simply made from the leftover braising liquid that's simmered with Hoisin sauce and soy sauce for familiar Asian flavor that goes so well with the slow cooked beef. All three teenagers at the table devoured this meal in short order, even going back for seconds. We served it with simple stir fried baby bok choy and peppers and some sweet potato mash for a completely satisfying dinner.

        Ginger Braised Beef Roast with Hoisin Jus

        Recipe by Barry C. Parsons

        A beautiful, fall-apart tender, braised pot roast with Asian inspired flavors. Served with a delicious beef jus that's flavored with Hoisin and soy sauce at the end.
        Prep time: Aproximately 20 minutes
        Cook time: 3 to 4 hours
        Total time: Aproximately 4 hours
        Yield: Serves 6 to 8
        Ingredients
        • 4 lb beef roast, cross rib or sirloin work well
        • 3 cups beef stock
        • 1 cup orange juice
        • 1 large onion, finely diced
        • 3 cloves minced garlic
        • 1 tsp five spice powder
        • 1/2 tsp freshly ground black pepper
        • 1/2 tsp salt
        • 3 tbsp freshly grated ginger
        • 1/2 tsp ground fennel seed
        • 2 tbsp honey
        • 3 tbsp soy sauce
        • 1/2 cup Hoisin sauce
        • 6 carrots, cut in sticks or coins
        Cooking Directions
        1. Season the roast with salt and pepper and brown on all sides in a cast iron pan with a little canola oil added to the pan. Transfer the roast to a covered roaster or heavy dutch oven.
        2. Add the beef stock, orange juice, onion, garlic, five spice powder, salt, pepper, ginger and honey. Stir to blend the ingredients together.
        3. Cover the roasting pan tightly with aluminum foil before adding the lid. Place in a preheated 350 degree oven for 3 to 4 hours until the meat is tender and almost falling apart.
        4. In the last half hour or so of cooking time add the carrots to the roasting pan.
        5. Remove the meat from the pan, cover with aluminum foil and hold in a 150 degree oven while you prepare the jus.
        6. Pour the beef braising liquid from the roasting pan into a saucepan and skim any excess fat.
        7. Simmer to reduce the volume by about 1/4, then add the soy sauce and Hoisin sauce. Simmer for just a few minutes more and serve with the carved beef roast.
        8. Delicious served with simple steamed rice or sweet potato mash and stir fried Chinese vegetables. 
        Ginger Braised Beef Roast with Hoisin Jus
        Ginger Braised Beef Roast with Hoisin Jus

          reade more... Résuméabuiyad

          Bite Size Bacon Double Cheeseburger Puffs


          'Bite size' finger food seems to be the theme around here. We have enjoyed countless quinoa bite lunches. Then came the pizza bites and you had to know the cheeseburger bites would not be far behind. Bite Size Bacon Double Cheeseburger Puffs tastes just like a burger in a bite size puff. They are soft, tender and a little buttery just like a hamburger bun.

          Loaded with makings of our favorite burgers: beef, bacon and cheese. They are a complete hit. Chad raved about them. He was so excited. He kept dipping them in ketchup and saying "Its amazing they taste just like a bacon double cheeseburger". I was in total agreement. Well there you have it....

          Continue Reading »
          reade more... Résuméabuiyad

          Meat Lover's Cheesy Stuffed Pizza Burgers in 30 Minutes


          Summer is winding to a halt as the kids head back to school and the sweltering heat finally starts to cool. Many people will start to pack up their grills. But, I caution you... Before you do, you MUST try this fabulous burger. Meat Lover's Cheesy Stuffed Pizza Burger is spectacular!

          Continue Reading »
          reade more... Résuméabuiyad

          Back to School - Bite Size Meals - Poppers, Nuggets and Bites


          As we all prepare for back to school I have found myself shopping, researching and planning. Munchkin starts preschool this year. The supplies list is as long as my arm. Scissors, crayons, pencils, markers, notebooks, iPad, Mac Book Pro (ha! Just checking if you are listening), paper, art supplies, folders, paints... The list goes on and on. You would think we were starting our own academy.

          I know everyone is preparing as 100 other parents are in the back to school aisle with us. They are aimlessly wandering the aisles like zombies with a list in hand. I do hope I am a little more organized, but even so it is overwhelming. Like most parents I feel lost gathering these supplies for my kid.

          However, I feel more confident preparing healthy meals for my preschooler. I am am expert in the kitchen, not the back to school aisle, so answering all of the anxious parents requests for recipes that can be made ahead, frozen and reheated and are healthier options for the kids to take to school or eat after school is my forte. We decided to put together our favorite bites for our Munchkin. She loves them and I am sure you will too! Either way, all these meals will be a hit with your family.

          Seeing your kids go back to school... Are you excited, sad or a little bit of both?

          Continue Reading »
          reade more... Résuméabuiyad

          Moo Shu Wrappers + Beef Wellington for Daring Bakers

                In a "celebration" of past Daring Baker and Daring Cook challenges, Lisa challenged all of us to search through the Daring Kitchen archives and pick any one we'd like! The REAL challenge was picking which delicious recipe(s) to try!   I decided to try a few of the Daring Cook challenges since I'm only in the Daring Bakers.  I made the Moo Shu Wrappers and the Beef Wellington (for the En Croute challenge)

          We eat a lot of Asian food in our house.  I generally put it on the menu once a week.  I make most of it from scratch but one thing I haven't yet been able to make are eggrolls.  They really intimidate me.  I'm not sure why although I do hate rolling foods into packages because it never seems to work for me.

               I made Moo Shu Tofu  several months ago when I brought wrapers back from Pittsburgh but I figured I'd go to the store and buy the wrappers here this time.  Of course when I got to our store I couldn't find them anywhere.  While this was a partial disaster, it also made my Daring Bakers challenge for this month easy to choose.  This month we were able to choose any previous Daring Bakers or Daring Cooks challenge.  I actually chose two, the first being the Moo Shu from the Daring Cooks 2011 challenge.  The recipe I used for the wrappers had the same ingredients, just in different proportions. 

               The wrappers only include three ingredients so I didn't think they would be too hard to make.  Boy was I wrong.  I had the worst time with these.  I think the whole concept of putting two wrappers together, rolling them out, cooking them, and then trying to separate them was crazy.  The next time I make these, yes I will be making them again, I will cook them one at a time.  I ended up burning my fingers several times while trying to separate the wrappers and tore a few holes in them as well.

               While it ended up being a lot of work, it was totally worth it.  Even my husband was impressed with my mu shu wrapper skills.  They turn out to be slightly crisp on the outside but soft on the flip side.  When they are heated up they are easy to roll.  They ended up working well with the mu shu tofu and tasted great as well.

          Moo Shu Wrappers (from Fine Cooking, as seen on The Way The Cookie Crumbles)
          1 3/4 c. flour
          3/4 c. boiling water
          1 t. salt
          1 T. sesame oil
          1 Mu Shu tofu recipe


          1.  In a mixing bowl combine the flour, water, and salt.  Mix with a wooden spoon until the dough comes together.

          2.  Turn out onto a floured surface and knead for 3-5 minutes.  Cover with a towel and let rest for a half hour.

          3.  Shape the dough into a long cylander.  With a sharp knife cut the dough into 10 equal pieces.

          4.  Lightly flour your hands and use them to flatten each dough ball into a 2 inch circle.  Brush the top of each circle with sesame oil and then lay one round on top of a second round so that the oiled sides meet.  Flatten the pair of dough circles with your hand.

          5.  Using a floured rolling pin, roll each pair into a thin pancake about 7 inches in diameter.

          6.  Heat a non-stick pan over medium high heat.  Cook the pancakes one at a time.  heat until one side because less opaque and starts to bubble.  Flip it over and cook until a few light brown spots appear on the other side, about 45 seconds.

          7.  While the pancake is still hot, look for a seam and carefully separate the pancake into two pancakes.  Be careful as the steam from the middle of them is very hot.

          8.  Stack the pancakes on a plate and keep them warm.  If not using right away, refrigerate until ready to use.


               Then I made the Beef Wellington.  I'll be the first to admit I was scared.  I think Chef Gordon Ramsay has made this a scary dish for many people.  If you've ever watched Hell's Kitchen, this is one thing always on the menu and one thing that trips up a lot of the chefs.  The hard part is that the beef is wrapped in puff pastry so there is so real way to check the temperature before slicing the beef open.  If you slice it too early and have to put it back in the oven then it dries out.

               When I saw the recipe I was even more nervous.  I was thinking it was just a piece of beef tenderloin with puff pastry around it, right?  WRONG!  Apparently there are several components to a Beef Wellington.  There's the beef tenderloin, there's the mushroom duxelle, there's a savory crepe, and then the puff pastry.

                I wasn't sure about the crepe because it seemed like too much bread product but let me tell you, make it because it holds in the juices and adds flavor to the beef.  It was really delicious.  In fact, I'd make these as a savory crepe all on their own.

               All the components were not nearly as hard to make as I thought they'd be.  I managed to make the Wellingtons, macaroni and cheese, and green beans, all in under an hour.  I made individual portions and cooked them in the oven for about 20 minutes.  When I pulled them out of the oven I allowed them to rest for 5 minutes and when I cut it open, nervous that they wouldn't be cooked, we had a perfect medium-rare to medium steak....they were great!

               My husband loved his and I thoroughly enjoyed mine as well.  In fact, he told me this should be one of the recipes we put on a rotating basis!  I generally made 2-4 new recipes a week and rotate 8-10 of our favorites throughout the month and for him to tell me he wanted to have this on a monthly basis, well that means it was pretty darn good!

          Beef Wellington (adapted from finecooking.com)
          For the duxelles:
          1 T. butter
          1 t. vegetable oil
          1 shallot, finely chopped
          3/4 c. baby bella mushrooms, finely chopped
          1 t. salt
          1/2 t. black pepper

          For the crepes:
          1/4 c. flour
          1/2 t. salt
          1 egg
          1/4 c. milk
          1 T. butter
          1/2 t. rosemary

          For assembly:
          2 beef tenderloin filets (about 8 oz each)
          1 t. sea salt
          1 t. black pepper
          1 t. vegetable oil
          1 sheet puff pastry
          1 egg
          1 t. butter

          1.  To make the duxelles, heat the butter and oil in a small skillet over medium heat.

          2.   Add the shallots and cook, stirring often, for 3-4 minutes.

          3.  Add the mushrooms and stir well.  Cook for 15 minutes, stirring occasionally.  Sprinkle with salt and pepper, stir, then remove from heat.

          4.  To make the crepe combine the flour and salt in a small bowl.  In another small bowl beat the egg and then stir in the milk.

          5.  Pour the egg and milk mixture into the center of the flour and mix well until incorporated into the flour.  Stir in the rosemary.

          6.  Melt the butter in a 10 inch skillet over medium heat.  Pour half of the butter into the crepe mixture and stir until combined.

          7.  Increase the heat to medium high and pour 1/4 cup of the batter into the skillet and swirl so that the batter is thin and evenly coats the pan.

          8.  Cook for 1-2 minutes or until the underside is brown.  Flip over and cook for an additional minute.  Remove to a plate and repeat with remaining batter.  I was able to make 3 crepes.
           
          9.  Remove the beef from the refrigerator 30 minutes before cooking.  Pat the beef dry and season with salt and pepper.

          10.  Heat oil in a large skillet over high heat until very hot.  Add the filets and sear for 2-3 minutes, flip and sear the other side for 2-3 minutes.  Remove from the skillet and place on a pate to cool.

          11.  Roll out the puff pastry sheet making a large rectangle.  Cut in half with a knife.   Place the two sheets side by side.  Place 1 crepe in the middle of each puff pastry sheet.

          12.  Spread several tablespoons of the mushroom duxelles over top of the crepes, spreading evenly.

          13.  Place a filet in the center of each crepe.  Carefully wrap a crepe around each filet, pressing to mold it to the meat.  Trim off any extra crepe.


          14.  Wrap the puff pastry around the beef and crepe.  Brush some of the beaten egg along the bottom edge to seam.  Press gently to seal and trim off any excess.

          15.  Lightly grease a baking dish with butter and place the Wellingtons onto the dish, seam side down.  

          16.  Place in the refrigerator and chill for 15-20 minutes.  


          17.  While the beef is chilling preheat the oven to 475 degrees.  Brush the Wellington's with remaining beaten egg. Using a knife, score the surface of the pastry with diagnoal lines, being careufl not to cut all the way through the pastry.

          18.  Put the Wellington's into the oven and reduce the heat to 425 degrees.  Bake for 20 minutes.  remove from oven and place on a cutting board.  Allow to rest for at least 5 minutes.

          19.  Cut the Wellington's in half and serve hot.


          reade more... Résuméabuiyad