Pages

Showing posts with label Nuts. Show all posts

Reese's Peanut Butter Cup Brownies

Reese's Peanut Butter Cup Brownies

If you know me, you'll probably know that I'm just a little bit obsessed with peanut butter. I love any peanut butter dessert, I love peanut butter on toast, and I love peanut butter as a snack, either spread on apple slices or - gasp! - straight out of the jar, by the spoonful. Yum. So it should come as no surprise that I totally love Reese's Peanut Butter Cups too!

Last week, a coworker of mine gave me a 1.58 kilogram bag of Reese's peanut butter cups from Costco, and I knew I had to do more with them than just stuff my face. (Not that I haven't been doing a lot of that!) I did a bit of googling, came across this recipe for Peanut Butter Cup Sprinkled Brownies on the Hershey's website, and knew that I'd have to make them. And soon! They're a chocolate brownie with peanut butter cups through the batter, with a peanut butter swirl, and topped with extra peanut butter cups. Wow!

Funnily enough, I already had enough super-mini peanut butter cups at home to make the recipe without even digging into my new stash. So - any recipe ideas for the remaining peanut butter cups?

Brownie batter, mini peanut butter cup, unwrapped minis, Reese's peanut butter

In the above photo, we have Reese's creamy peanut butter, unwrapped mini cups, and the normal peanut butter cups that I was given in the plastic container on the right. I had both the peanut butter and unwrapped mini cups in the pantry already - we'd bought the peanut butter at one of those shops that sells American candy, and we'd gotten the unwrapped mini cups from Costco a few months back (although sadly I don't think they sell them any more). The unwrapped mini cups are even smaller than normal peanut butter cups - so cute!

Ok, let's have a look at the brownie-baking process. They're dangerously easy - all you need to do is melt, stir, swirl, and bake! It hardly took any time at all.
Dolloping the peanut butter mixture on

Swirly brownie batter

Baked brownie

Once it's baked and slightly cooled, you chuck some extra peanut butter cups over, and let them melt a bit before squishing them in.

Mini peanut butter cups sprinkled on top

Mmm... melty

Peanut Butter Cup Brownies

Peanut Butter Cup Brownies

Looking at the ingredients list, I knew they'd be very sweet and rich, so I cut them into tiny little squares to serve with a cuppa. I wasn't prepared for how delicious they'd be - woah - they were so, so good! Super peanut buttery, deeply chocolatey (despite there being no melted chocolate, only cocoa powder), and really moist and squidgy. Impossible to stop at just one!


Reese's Peanut Butter Cup Brownies
Recipe from the Hershey's Website, with some adaptations from me

Ingredients
60 grams unsalted butter
1 cup plus 1 tablespoon caster sugar
1/3 cup unsweetened cocoa
2 eggs
1 teaspoon vanilla extract
1/4 cup plus 2 tablespoons plain flour
1/2 teaspoon salt
1/8 teaspoon baking soda
2/3 cups Reese's Mini Peanut Butter Cups
1/4 cup smooth peanut butter

Method
Preheat the oven to 175C. Line a 20cm square cake tin with baking paper.
Melt the butter in a small saucepan over a medium heat. Add 1 cup of the sugar and all of the cocoa. Whisk to blend.
Remove from the heat. Whisk in the eggs and vanilla.
Sift together the flour, salt and baking soda, then gently whisk into the chocolate mixture.
Fold in 1/3 cup of the Peanut Butter Cups.
Spread the mixture into the prepared tin.
Mix the peanut butter with the remaining 1 tablespoon of sugar. Dollop spoonfuls of the peanut mixture over the chocolate mixture. Swirl the mixtures together with a butter knife to create a marbled effect.
Bake for 20 minutes, or until the brownie is just set and the edges are pulling away from the side of the pan. Allow to cool for thirty minutes. Sprinkle the remaining Peanut Butter Cups over the brownie, allow to sit for a minute, then press in slightly. Allow to cool completely in the pan.
Cut into little little squares to serve.
Makes a 20cm squared brownie.

Reese's Peanut Butter Cup Brownies

If you know me, you'll probably know that I'm just a little bit obsessed with peanut butter. I love any peanut butter dessert, I love peanut butter on toast, and I love peanut butter as a snack, either spread on apple slices or - gasp! - straight out of the jar, by the spoonful. Yum. So it should come as no surprise that I totally love Reese's Peanut Butter Cups too!

Last week, a coworker of mine gave me a 1.58 kilogram bag of Reese's peanut butter cups from Costco, and I knew I had to do more with them than just stuff my face. (Not that I haven't been doing a lot of that!) I did a bit of googling, came across this recipe for Peanut Butter Cup Sprinkled Brownies on the Hershey's website, and knew that I'd have to make them. And soon! They're a chocolate brownie with peanut butter cups through the batter, with a peanut butter swirl, and topped with extra peanut butter cups. Wow!

Funnily enough, I already had enough super-mini peanut butter cups at home to make the recipe without even digging into my new stash. So - any recipe ideas for the remaining peanut butter cups?

Brownie batter, mini peanut butter cup, unwrapped minis, Reese's peanut butter

In the above photo, we have Reese's creamy peanut butter, unwrapped mini cups, and the normal peanut butter cups that I was given in the plastic container on the right. I had both the peanut butter and unwrapped mini cups in the pantry already - we'd bought the peanut butter at one of those shops that sells American candy, and we'd gotten the unwrapped mini cups from Costco a few months back (although sadly I don't think they sell them any more). The unwrapped mini cups are even smaller than normal peanut butter cups - so cute!

Ok, let's have a look at the brownie-baking process. They're dangerously easy - all you need to do is melt, stir, swirl, and bake! It hardly took any time at all.
Dolloping the peanut butter mixture on

Swirly brownie batter

Baked brownie

Once it's baked and slightly cooled, you chuck some extra peanut butter cups over, and let them melt a bit before squishing them in.

Mini peanut butter cups sprinkled on top

Mmm... melty

Peanut Butter Cup Brownies

Peanut Butter Cup Brownies

Looking at the ingredients list, I knew they'd be very sweet and rich, so I cut them into tiny little squares to serve with a cuppa. I wasn't prepared for how delicious they'd be - woah - they were so, so good! Super peanut buttery, deeply chocolatey (despite there being no melted chocolate, only cocoa powder), and really moist and squidgy. Impossible to stop at just one!


Reese's Peanut Butter Cup Brownies
Recipe from the Hershey's Website, with some adaptations from me

Ingredients
60 grams unsalted butter
1 cup plus 1 tablespoon caster sugar
1/3 cup unsweetened cocoa
2 eggs
1 teaspoon vanilla extract
1/4 cup plus 2 tablespoons plain flour
1/2 teaspoon salt
1/8 teaspoon baking soda
2/3 cups Reese's Mini Peanut Butter Cups
1/4 cup smooth peanut butter

Method
Preheat the oven to 175C. Line a 20cm square cake tin with baking paper.
Melt the butter in a small saucepan over a medium heat. Add 1 cup of the sugar and all of the cocoa. Whisk to blend.
Remove from the heat. Whisk in the eggs and vanilla.
Sift together the flour, salt and baking soda, then gently whisk into the chocolate mixture.
Fold in 1/3 cup of the Peanut Butter Cups.
Spread the mixture into the prepared tin.
Mix the peanut butter with the remaining 1 tablespoon of sugar. Dollop spoonfuls of the peanut mixture over the chocolate mixture. Swirl the mixtures together with a butter knife to create a marbled effect.
Bake for 20 minutes, or until the brownie is just set and the edges are pulling away from the side of the pan. Allow to cool for thirty minutes. Sprinkle the remaining Peanut Butter Cups over the brownie, allow to sit for a minute, then press in slightly. Allow to cool completely in the pan.
Cut into little little squares to serve.
Makes a 20cm squared brownie.

reade more... Résuméabuiyad

Nut Meringue Cookies

Nut Meringue Cookies
Today's cookie could not be simpler and is a real treat for those who love sweet meringues and crunchy nuts. I've used ground hazelnuts in the cookies pictured but you can substitute any nut you like. These cookies seem more like candy and will melt in your mouth with a crispy sugary exterior and a slightly chewy interior when baked just right.

2 cups ground nuts
1 cup sugar
2 egg whites
1 tsp vanilla extract

Beat the egg whites and vanilla to soft peaks and slowly start beating in the sugar a table spoon at a time until all the sugar is incorporated and the meringue is light and fluffy. Very gently fold in the ground nuts. Drop by heaping teaspoonfuls, 2 inches apart on a parchment lined baking sheet.

Bake at 350 degrees F for 15 minutes until golden. Let rest on the sheet for 10 minutes before transferring to a wire rack to cool completely. Store in an airtight container.

Because meringues don't like humidity, I don't think these would freeze particularly well.
reade more... Résuméabuiyad

Smoky Sweet Spiced Almonds

Smoky Sweet Spiced Almonds

I was first introduced to these terrific snacking nuts when my work colleague, Elizabeth brought them to share at an office get together. I loved them immediately and from chatting with her discovered it was a very adaptable recipe, that can use other nuts, a combination of nuts, and whatever spice combinations you think would work.

With the holiday season right around the corner, here's the perfect pre-dinner nibble for Thanksgiving or to serve with drinks any time. These are fantastic when served warm from the oven; a little sweet, a little salty, a little smokey from the spices chosen and with just a touch of spicy heat. You may find yourself making these all year round.

2 cups whole raw almonds

Place the almonds on a parchment paper lined cookie sheet and bake at 350 degrees F for 5 minutes. Toss the around and bake for another 5 minutes.

Let them cool as you mix together in a medium sized bowl:

1 tbsp melted butter
3 tbsp brown sugar
1/2 teaspoon ground cinnamon
3/4 teaspoon chile powder


1/2 tsp cayenne pepper
1 tsp smoked paprika
1/2 tsp chipotle powder
1 1/2 tbsp maple syrup
1 tsp kosher salt

Toss the warm nuts in the mixture until evenly coated, then roast on a parchment lined baking sheet for 12-18 minutes depending on the size of the nuts to get them perfectly toasted.

Watch them carefully and toss them around several time during the baking times to make sure they are staying separate and not clumping together.Allow them to cool on the pan for at least 10 minutes before serving. Continue to toss them severa; times as they cool to keep the nuts separated.

When completely cool, these can be stored in an airtight container for up to a weeek or so.
reade more... Résuméabuiyad

Cinnamon Walnut Sweet Bread

Fall is in the air and nothing says fall quite like the warm comforting scent of cinnamon wafting from the kitchen. This fresh bread baking brought my family to the kitchen as if the scent itself had carried them by their noses, like in a cartoon.
Continue Reading »
Fall is in the air and nothing says fall quite like the warm comforting scent of cinnamon wafting from the kitchen. This fresh bread baking brought my family to the kitchen as if the scent itself had carried them by their noses, like in a cartoon.
Continue Reading »
reade more... Résuméabuiyad

Juicy Nut Cake - Saftiger Nußkuchen

Juicy Nut Cake

You all must know by now that I'm obsessed with German culture and German food.  I often get asked how good my German is, and to be honest, it's just ok.  I can communicate at a basic level; i.e. I can order in restaurants, ask for directions, and ask and answer simple questions about myself and others, but often with grammar mistakes.  (And always with pronunciation mistakes).  However, I can mostly get my point across, and that's good enough for me at the moment.  As is always the way with learning languages, I can understand a lot more than I can actually say, and the one area in which I've always excelled, unsurprisingly, is understanding German recipes.

Juicy Nut Cake

Despite that, I did struggle to translate the name of this one for you, this Saftiger Nußkuchen.  "Saftig" means juicy, and "Nußkuchen" means nut cake, so literally this is a "Juicy Nut Cake".  Sounds odd in English, doesn't it?  Here we don't tend to refer to cake as juicy, whereas they do in Germany.  (I remember feeling very confused when Sandra's cousin in Germany said: "This pizza is so juicy!" over dinner one night, hehe.)  In English, we'd most often refer to a juicy/wet/damp cake as "moist", so whilst the literal translation would be "Juicy Nut Cake", the correct translation would be "Moist Nut Cake".  But, (and this is a big BUT), I absolutely, totally, cannot stand the word "moist".  *Shudder*  So, the unusual-sounding "Juicy Nut Cake" it remains.


This whole translating thing reminds me of a wonderful Italian phrase my uncle taught me: traduttore, traditore, which literally means "to translate is to betray".  Of course, the phrase loses the beauty and snappiness of the original when translated into English, which perfectly illustrates its meaning. Gorgeous!

A few other points about translating German cake recipes:

I'm often asked what can be substituted for the very German vanilla sugar and backaromen (baking flavour essences), and clearly, ordinary vanilla extract could replace vanilla sugar, and any suitable flavour essence could be used in place of the backaromen.  I'm sure the results would be just fine, and, just quietly, I actually like vanilla extract better than the slightly synthetic taste of vanilla sugar.  However, to make it taste like an echte German cake, just like Mama used to make when you were a kleines Kind, you really need to track down German baking products, which I find easily enough in Continental delis and specialty supermarkets like Leo's.


My next point about German cakes is that they tend to be huge.  Huge!  By German standards, 25 or 26cm is a normal sized cake.  Woah!  As a rough guide, I usually halve the recipes and bake them in a 20cm round tin, with a slightly shorter cooking time, to make a more normal-sized cake.  (I did buy a couple of Mini-Kuchen recipe books on my last trip to Germany, and think it's funny that in those books, a 20cm round cake counts as a "mini"!)


On this particular occasion, I wanted to give some of this cake away as a gift, so I divided the halved batter between an 18cm round springform tin and a small loaf tin.  However, in my recipe below I suggest using all the batter in a 20cm round springform tin.  (Of course, if you want a big 26cm German cake, simply double my quantities below and bake for 45-55 minutes).
Juicy? Or moist?
This flourless nut cake is lovely and moist (or juicy?), with a gorgeous aroma from both ground and slivered almonds.  The original recipe uses hazelnut meal and chopped hazelnuts instead of almonds, which I'm sure would be good as well.  The cake also happens to be gluten free - bonus!  (Just make sure you use gluten free baking powder, vanilla and rum flavourings.)  I like it served simply with a dusting of icing sugar, but you can also top it with an easy glaze, instructions for which are included below.

Juicy Nut Cake - Saftiger Nußkuchen
Adapted and translated from Dr. Oetker Backen Macht Freude: Das Original

Ingredients
4 eggs
65g softened butter
65g sugar
1/2 packet vanilla sugar
Few drops rum aroma
1 pinch salt
150g almond meal
25g slivered almonds
1/2 tsp baking powder

Method
Preheat the oven to 180C.  Grease and line a 20cm springform tin.
Separate the eggs.  Whisk the egg whites in an electric mixer until stiff peaks form. Place the egg whites in a separate bowl and set aside.
Using the same mixer (no need to clean it out), beat the butter until pale and creamy. Slowly beat in the sugar, vanilla sugar and rum essence.  Beat in the egg yolks, one at a time.  (Each egg yolk will need about 30 seconds beating).
Stir the almond meal, slivered almonds and baking powder together.  Fold into the butter mixture in three batches.  Gently fold in the egg whites.
Pour the batter into the prepared tin, and bake for 30-45 minutes, or until cooked when tested with a skewer.  Allow to cool in the tin for 10 minutes, and turn out onto a wire rack to cool completely.  Dust with icing sugar to serve.

Alternative: Glaze the cake with an icing made from: 125g sifted icing sugar, 1.5tsp lemon juice, and enough warm water to make a thin, pouring consistency.
Juicy Nut Cake

You all must know by now that I'm obsessed with German culture and German food.  I often get asked how good my German is, and to be honest, it's just ok.  I can communicate at a basic level; i.e. I can order in restaurants, ask for directions, and ask and answer simple questions about myself and others, but often with grammar mistakes.  (And always with pronunciation mistakes).  However, I can mostly get my point across, and that's good enough for me at the moment.  As is always the way with learning languages, I can understand a lot more than I can actually say, and the one area in which I've always excelled, unsurprisingly, is understanding German recipes.

Juicy Nut Cake

Despite that, I did struggle to translate the name of this one for you, this Saftiger Nußkuchen.  "Saftig" means juicy, and "Nußkuchen" means nut cake, so literally this is a "Juicy Nut Cake".  Sounds odd in English, doesn't it?  Here we don't tend to refer to cake as juicy, whereas they do in Germany.  (I remember feeling very confused when Sandra's cousin in Germany said: "This pizza is so juicy!" over dinner one night, hehe.)  In English, we'd most often refer to a juicy/wet/damp cake as "moist", so whilst the literal translation would be "Juicy Nut Cake", the correct translation would be "Moist Nut Cake".  But, (and this is a big BUT), I absolutely, totally, cannot stand the word "moist".  *Shudder*  So, the unusual-sounding "Juicy Nut Cake" it remains.


This whole translating thing reminds me of a wonderful Italian phrase my uncle taught me: traduttore, traditore, which literally means "to translate is to betray".  Of course, the phrase loses the beauty and snappiness of the original when translated into English, which perfectly illustrates its meaning. Gorgeous!

A few other points about translating German cake recipes:

I'm often asked what can be substituted for the very German vanilla sugar and backaromen (baking flavour essences), and clearly, ordinary vanilla extract could replace vanilla sugar, and any suitable flavour essence could be used in place of the backaromen.  I'm sure the results would be just fine, and, just quietly, I actually like vanilla extract better than the slightly synthetic taste of vanilla sugar.  However, to make it taste like an echte German cake, just like Mama used to make when you were a kleines Kind, you really need to track down German baking products, which I find easily enough in Continental delis and specialty supermarkets like Leo's.


My next point about German cakes is that they tend to be huge.  Huge!  By German standards, 25 or 26cm is a normal sized cake.  Woah!  As a rough guide, I usually halve the recipes and bake them in a 20cm round tin, with a slightly shorter cooking time, to make a more normal-sized cake.  (I did buy a couple of Mini-Kuchen recipe books on my last trip to Germany, and think it's funny that in those books, a 20cm round cake counts as a "mini"!)


On this particular occasion, I wanted to give some of this cake away as a gift, so I divided the halved batter between an 18cm round springform tin and a small loaf tin.  However, in my recipe below I suggest using all the batter in a 20cm round springform tin.  (Of course, if you want a big 26cm German cake, simply double my quantities below and bake for 45-55 minutes).
Juicy? Or moist?
This flourless nut cake is lovely and moist (or juicy?), with a gorgeous aroma from both ground and slivered almonds.  The original recipe uses hazelnut meal and chopped hazelnuts instead of almonds, which I'm sure would be good as well.  The cake also happens to be gluten free - bonus!  (Just make sure you use gluten free baking powder, vanilla and rum flavourings.)  I like it served simply with a dusting of icing sugar, but you can also top it with an easy glaze, instructions for which are included below.

Juicy Nut Cake - Saftiger Nußkuchen
Adapted and translated from Dr. Oetker Backen Macht Freude: Das Original

Ingredients
4 eggs
65g softened butter
65g sugar
1/2 packet vanilla sugar
Few drops rum aroma
1 pinch salt
150g almond meal
25g slivered almonds
1/2 tsp baking powder

Method
Preheat the oven to 180C.  Grease and line a 20cm springform tin.
Separate the eggs.  Whisk the egg whites in an electric mixer until stiff peaks form. Place the egg whites in a separate bowl and set aside.
Using the same mixer (no need to clean it out), beat the butter until pale and creamy. Slowly beat in the sugar, vanilla sugar and rum essence.  Beat in the egg yolks, one at a time.  (Each egg yolk will need about 30 seconds beating).
Stir the almond meal, slivered almonds and baking powder together.  Fold into the butter mixture in three batches.  Gently fold in the egg whites.
Pour the batter into the prepared tin, and bake for 30-45 minutes, or until cooked when tested with a skewer.  Allow to cool in the tin for 10 minutes, and turn out onto a wire rack to cool completely.  Dust with icing sugar to serve.

Alternative: Glaze the cake with an icing made from: 125g sifted icing sugar, 1.5tsp lemon juice, and enough warm water to make a thin, pouring consistency.
reade more... Résuméabuiyad

Mexican Wedding Cakes


I made these Mexican wedding cakes when I wanted a something small and sweet to go with coffee at a dinner party, but didn't want to go all out with a proper dessert.  Made with ground nuts - pecans, walnuts or hazelnuts are traditional - and lots of butter, these are crumbly little shortbread biscuits, heavily dusted in icing sugar, much like my beloved Vanillakipferl.

I first found a recipe for Mexican wedding cakes in Belinda Jeffrey's Mix and Bake, which she herself got from her Auntie Beryl.  However, whilst researching the recipe online, I realised, that like many traditional recipes, there are hundreds of versions out there, all of which are pretty much the same.  Lord knows who 'invented' the recipe, or who owns the original copyright, if such a thing is at all possible!

I took elements from a few different recipes to get my recipe, below, based on what I thought would work well.  I also adapted the traditional biscuit to make the most of some gorgeous hazelnuts I'd been given by Wendy at Fare Enough in Euroa.  (See my blogpost, here.) They were so fresh, slightly sweet and very hazelnutty, and I wanted to show off and intensify their inherent hazelnuttiness as much as I could.


As per tradition, I toasted some of the hazelnuts in the oven, before grinding them with flour, salt and cinnamon, to use in the biscuit dough.
Toasted hazelnuts

Creamed butter and sugar

Dry ingredients (including ground toasted hazelnuts) being added to the butter
And - here's where I diverge from tradition - I included one whole hazelnut in each biscuit, for an extra crunchy surprise!  (This idea came from baker extraordinaire Duncan, who made fab hazelnut shortbreads to bring to a party I hosted a couple of years ago).

Biscuit dough

Stick that hazelnut in...

And roll it up to encase the hazelnut!

Using a scant teaspoon of dough for each hazelnut, I ended up with 69 (heh) biscuits in total.  Obviously the number of biscuits you get would change depending on how generous you are with the dough.


These are absolutely beautiful biscuits - very short, crumbly and delicate, with a wonderful nuttiness from the combo of ground and whole hazelnuts.  If you happen to come across some proper, very fresh nuts, I'd highly recommend you give them a go!


Mexican Wedding Surprises
Sarah's version of a classic recipe

70g whole hazelnuts
2 cups flour
1/4 tsp salt
1/2 tsp cinnamon
1/2 cup icing sugar
1.5 tsp vanilla extract
250g unsalted butter
Approx. extra 70 whole hazelnuts
Approx. 2 cups more icing sugar for dusting

Preheat the oven to 180C.  Place the 70g hazelnuts on a baking tray in a single layer, and roast for 12-15 minutes, or until lightly golden brown and fragrant.  Allow to cool slightly, loosely wrapped in a clean tea towel.  Rub vigorously to remove as much of the papery skin as you can.  (Don't get too worked up about it, a few flecks of brown won't harm the finished product).

Place the roasted and denuded hazelnuts, flour, salt and cinnamon into the bowl of a food processor fitted with the double blade, and process until the hazelnuts are finely ground.  Set aside.

Cream butter, sugar and vanilla in an electric mixer until pale and fluffy, about 5 minutes.  Gently stir in the hazelnut and flour mixture with a wooden spoon until combined.  (Stop as soon as there are no more lumps of flour remaining - if you overwork the dough, the resulting biscuits will be tough, and you want these to be crumbly and short!)

Take a scant teaspoonful of the mixture, press a whole hazelnut into it, and roll the dough to encase the hazelnut.  Place on a lined cookie tray, leaving a little room for spreading.  Repeat with the remaining dough.

Bake for 10-15 minutes, or until golden brown at the edges.  Dredge the biscuits thickly with icing sugar and allow to cool slightly before digging in.

Makes 69
reade more... Résuméabuiyad

Belinda Jeffrey's most fabulous banana cake and David Lebovitz' crunchy nuts


A little while ago I bought some bananas from someone in the office raising money for their kid's school.  However, I happened to be away on a conference when the bananas arrived, so by the time I came back, they were overripe and not nice to eat any more. D'oh!

Bananas! Excuse the dodgy picture on the box, hehe.
But, all keen bakers know what overripe bananas mean - banana cake!  I wanted a good, old-fashioned banana cake, topped with cream cheese icing - yum! - and after searching through my cookbooks, I settled on Belinda Jeffrey's "Most Fabulous Banana Cake", from her Mix and Bake book.  (This particular recipe only used 3 bananas, so I peeled and froze the rest.  More baking to come!)

The recipe calls for a large round tin, but I made it in an oblong, as I thought this might make it easier to share at work.  I used this fabulous extendable baking tray thingo that I bought on my most recent trip to Germany - love it!

Raw dough, cooked cake.

So, once cooked, I sliced the rectangle in half lengthways...


One layer

... and layered on the icing!  I totally, totally love cream cheese icing!

Layering the icing


Layered up!

To fancify things a little, I topped the cake with some salted candied macadamias (recipe from David Lebovitz' Ready for Dessert, and available here on his blog!).  They were easy to make, even though I always find hot sugar a bit daunting.  All you gotta do for these is to put some sugar, nuts and water into a pan, whack it on high heat, and stir, stir stir until the sugar melts, gets crystally, and then re-melts again into a medium brown caramel.  Then you add cinnamon and some salt.

Cooking the caramel nuts

These were incredibly addictive.  Crunchy and sweet and salty and faaabulous!  Word of warning: Wait for them to cool before you try picking one up!  Hot sugar BURNS.  (Don't learn this the hard way).

Salted candied macadamias

I only needed a small amount to top the cake, so popped them into a snap-lock bag, and whacked them with a rolling pin the crush them a bit.  The remainder got eaten, very quickly.
Crush those nuts!
And here we have the finished cake...


Finished cake

And from the top...  As you can see, I had to slice some off so it would fit in the container.  (That's my story, and I'm sticking to it!)
Cake in container


I quite liked the cake, but I don't think I'd describe it as the "most fabulous".  Texturally it was good, but I found it to be very sweet.  I know this is partly my fault, what with the crazy-thick icing and the candied nuts, but the cake itself was really sweet too.  And this was after I reduced the quantity of sugar quite significantly from the recipe.  You can't really reduce sugar in the icing, as this would affect the texture.  Perhaps the cake would work best in a single flat slab, with just a thin layer of icing on the top.

I think for the remainder of the bananas I'll stick to some tried-and-tested recipes, like Nigella Lawson's banana bread (my dad loves it!), or my favourite, Bill Granger's choc-chip banana bread.  Although having said that, Nigella does have some tempting banana recipes in Kitchen: banoffee cheesecake, coconut and cherry banana bread, and banana chocolate muffins!  And I remember drooling over the insanely decadent banana, chocolate and peanut butter muffins that Panda & Cakes made.  Too many options!  Hehe, maybe I should just use them in smoothies and stop obsessing over all these recipes!
reade more... Résuméabuiyad

Victoria Sponge with Hazelnut Crunch Buttercream

And now for something completely different...


Yes, there are a *lot* more photos from Vanuatu to share, but I thought I'd change it up a little. Remember my blog's 5th birthday? I wanted to make a a very funky cake to celebrate, and having just received my copy of Warren Brown's Cake Love to review for The Gastronomer's Bookshelf, I decided to try a recipe from there.

One of the first blog posts I ever wrote, back in 2004 (can you believe it?!) was about the Cake Love bakery in Washington DC. I saw the bakery featured on Tyler's Ultimate, and was inspired by the story of its owner, Warren Brown, the one-time lawyer-turned cake baker. What an inspiration!

My review of Cake Love has been published at The Gastronomer's Bookshelf, so I will just talk about the cake! After much reading and indecision, I chose to make a Yellow Buttercake, filled with Hazelnut Crunch Buttercream.

Let's start with the buttercream. I realised it's a German-buttercream, which means it is a crème pâtissière, with cubes of butter whipped through. Intense stuff.

To get the hazelnut flavour, you heat hazelnuts in hot milk, and let it steep for 10 minutes. The drained, hazelnutty milk is then used to make the crème pâtissière, as below.

Once it's thick enough, you turn it into a mixer, add some other flavourings and whisk until room temperature.

Then you add cubes of room-temperature butter, one by one, whisking all the while. Then something quite magic happens...

WOW. Check out that cream! I have no idea how adding butter to custard results in something that looks and feels like a cloud, but there you go.

The recipe calls for you to crush the hazelnuts and fold them back through the buttercream, (hence hazelnut-CRUNCH buttercream), but a very vocal contingent in my house wanted smooth filling, so I saved the hazelnuts and toasted them in sugar to decorate the top.


Now, the cake. I'm not sure if it was the American measurements that I'm not used to, or Brown's super-wordy, highly detailed recipe, but something went wrong. Look below:
Argh! What the hell is that?! Check out all the creepy vertical air hole tunnels! It was so dense and heavy, and it took forever to cook through (about twice the time stated in the recipe). I think it could have hurt someone if I threw it at them. Very disappointing, but I couldn't bear to let all that buttercream go to waste. Instead, I whipped up a Victoria sponge in 2 sandwich tins.

Humped, but reliably delicious.

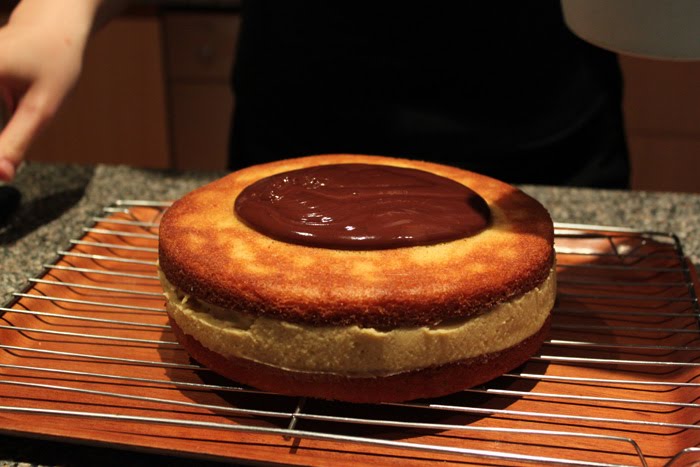
I flipped the cakes so the flat sides were outermost, and filled them with the buttercream...


...topped it with ganache....

... and spread it out smoothly with an offset spatula.

A crown of sugared hazelnuts (with a few judiciously taste-tested first!), a little candle, and my birthday-blog cake was done!

I was very pleased with this cake, and we ate it happily over the next few days. The hazelnut flavour was very delicate, and went well with the buttery Vic sponge. The ganache was made with dark chocolate, and a little too intense for the cake, actually. I thought choc and hazelnut would go well together, but I didn't realise how delicate the hazelnut flavour would be.


If I were to make this cake again (any takers?), I'd pare it down a little, and just layer up the cake with thick swathes of hazelnut buttercream. Heaven on a plate!
reade more... Résuméabuiyad