Pages

Showing posts with label chipotle. Show all posts

Maple Chipotle Pulled Pork and Beans

Maple Chipotle Pulled Pork and Beans
On a cold, rainy Saturday a few weeks ago I decided a slow cooked day was in order. How better to ignore the torrent of rain outside than to sit back and watch old movies all afternoon while supper languidly bubbles away in the oven for several hours, needing very little attention.

On days like that, my son usually requests one of his two slow cooked favorites, either baked beans or pulled pork. Since pork and beans is a natural combination I decided to try combining the two. Needless to say, the boy was very pleased.

Before preparing the slow cooked meal for the oven, I took the time to make some bread dough, which would also take its time to rise for the better part of the afternoon before sharing some oven time with the pork and beans. This rainy day supper was a slice of comfort food heaven; a thoroughly satisfying meal.

This would make such an ideal pot-luck contribution but be sure to bring along some of that Homemade Bread too.


Maple Chipotle Pulled Pork and Beans

Recipe by Barry C. Parsons
Maple Chipotle Pulled Pork and Beans - an ultimate comfort food meal combining two slow cooked favorites, pulled pork and baked beans.

Prep time: 1/2 hour
Cook time: 4 hours
Total time: 4 1/2 hours
Yield: 10 servings

Ingredients
  • 1 pound dry white beans
  • 3 pounds pork shoulder or butt
  • 1 tsp powdered ginger
  • 1 tsp black pepper
  • 1/2 tsp ground cumin
  • 1 tsp chili powder
  • 1/2tsp salt
  • 3 tbsp canola oil
  • 1/2 pound smoked bacon, cut in small pieces
  • 1 large white onion chopped
  • 3 cloves minced garlic
  • 2 cups water
  • 2 tsp freshly ground black pepper
  • 2 tsp chipotle powder (more or less to taste)
  • 1 tsp salt
  • 1/2 cup brown sugar
  • 1/2 cup apple cider vinegar
  • 1 1/2 tsp dry thyme
  • 4 cups pureed canned tomatoes
  • 1 cup maple syrup
  • 3 large bay leaves
Cooking Directions
  1. You will need to pre-soak the beans in water at least overnight. The longer you soak the beans the less time it takes to cook them, although it will still be several hours. I have soaked beans for up to 48 hours in advance.
  2. Cut the pork into about 1/2 to 2 inch cubes.
  3. Mix together the ginger, pepper, cumin, chili powder and salt to form a rub for the pork. Rub it into the cubed pork.
  4. Heat the canola oil in the bottom of a large dutch oven over medium to medium high heat. Add the seasoned pork cubes and brown them well. Remove from the pot and set aside.
  5. Add the bacon to the pot and cook until almost crispy. Drain excess fat.
  6. Add the onion and minced garlic and cook until softened.
  7. Drain the beans from the water they were soaked in and add them to the pot.
  8. Add all of the remaining ingredients to the pot. If your dutch oven is not large enough you can transfer everything to a large covered roaster.
  9. Stir all together well, cover and place in a 325 degree F oven for 3 to 4 hours stirring occasionally.
  10. The beans should be fully cooked and tender and the sauce should thicken. I sometimes add a little extra boiling water during the cooking time if the sauce thickens too quickly before the beans are fully cooked. This is not a problem at all and can be done more than once if necessary. 
Maple Chipotle Pulled Pork and Beans

Maple Chipotle Pulled Pork and Beans
On a cold, rainy Saturday a few weeks ago I decided a slow cooked day was in order. How better to ignore the torrent of rain outside than to sit back and watch old movies all afternoon while supper languidly bubbles away in the oven for several hours, needing very little attention.

On days like that, my son usually requests one of his two slow cooked favorites, either baked beans or pulled pork. Since pork and beans is a natural combination I decided to try combining the two. Needless to say, the boy was very pleased.

Before preparing the slow cooked meal for the oven, I took the time to make some bread dough, which would also take its time to rise for the better part of the afternoon before sharing some oven time with the pork and beans. This rainy day supper was a slice of comfort food heaven; a thoroughly satisfying meal.

This would make such an ideal pot-luck contribution but be sure to bring along some of that Homemade Bread too.


Maple Chipotle Pulled Pork and Beans

Recipe by Barry C. Parsons
Maple Chipotle Pulled Pork and Beans - an ultimate comfort food meal combining two slow cooked favorites, pulled pork and baked beans.

Prep time: 1/2 hour
Cook time: 4 hours
Total time: 4 1/2 hours
Yield: 10 servings

Ingredients
  • 1 pound dry white beans
  • 3 pounds pork shoulder or butt
  • 1 tsp powdered ginger
  • 1 tsp black pepper
  • 1/2 tsp ground cumin
  • 1 tsp chili powder
  • 1/2tsp salt
  • 3 tbsp canola oil
  • 1/2 pound smoked bacon, cut in small pieces
  • 1 large white onion chopped
  • 3 cloves minced garlic
  • 2 cups water
  • 2 tsp freshly ground black pepper
  • 2 tsp chipotle powder (more or less to taste)
  • 1 tsp salt
  • 1/2 cup brown sugar
  • 1/2 cup apple cider vinegar
  • 1 1/2 tsp dry thyme
  • 4 cups pureed canned tomatoes
  • 1 cup maple syrup
  • 3 large bay leaves
Cooking Directions
  1. You will need to pre-soak the beans in water at least overnight. The longer you soak the beans the less time it takes to cook them, although it will still be several hours. I have soaked beans for up to 48 hours in advance.
  2. Cut the pork into about 1/2 to 2 inch cubes.
  3. Mix together the ginger, pepper, cumin, chili powder and salt to form a rub for the pork. Rub it into the cubed pork.
  4. Heat the canola oil in the bottom of a large dutch oven over medium to medium high heat. Add the seasoned pork cubes and brown them well. Remove from the pot and set aside.
  5. Add the bacon to the pot and cook until almost crispy. Drain excess fat.
  6. Add the onion and minced garlic and cook until softened.
  7. Drain the beans from the water they were soaked in and add them to the pot.
  8. Add all of the remaining ingredients to the pot. If your dutch oven is not large enough you can transfer everything to a large covered roaster.
  9. Stir all together well, cover and place in a 325 degree F oven for 3 to 4 hours stirring occasionally.
  10. The beans should be fully cooked and tender and the sauce should thicken. I sometimes add a little extra boiling water during the cooking time if the sauce thickens too quickly before the beans are fully cooked. This is not a problem at all and can be done more than once if necessary. 
Maple Chipotle Pulled Pork and Beans

reade more... Résuméabuiyad

Chipotle Sweet Corn Meatloaf Chili or Chili Sloppy Joes

Chipotle Sweet Corn Meatloaf Chili or Chili Sloppy Joes
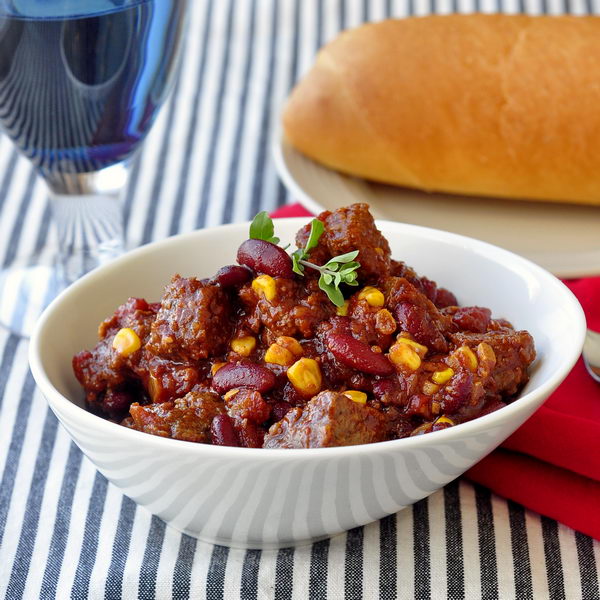
Here's another delicious budget stretching recipe that lets nothing go to waste. Our leftover Sweet Onion Glazed Meatloaf was put to tasty use in this quick and easy chili recipe that was particularly delicious when served on  toasted rolls with mozzarella cheese as some of the best Sloppy Joes we have ever tried. This recipe works so well that I'd suggest making a larger meatloaf than planned as part of your weekly meal plan, just so you cam enjoy this great chili a day or two later.

Chipotle Sweet Corn Meatloaf Chili or Chili Sloppy Joes


Soak in water overnight:
  • 1 cup dry kidney beans
Simmer in lightly salted water for about 40 minutes. Drain. You may use canned beans if you prefer, about 1 1/2 cups.

In a large pot heat 
  • 3 tbsp olive oil.
Add:
  • 3 cloves minced garlic
  • 1 medium red onion or two large shallots
Cook until the onions begin to soften.

Add

  • 1 cup tomato sauce
  • 4 cups crushed tomatoes
  • 1 diced red bell pepper
  • 1 1/2 cups fresh or frozen sweet corn
  • 1 minced jalapeño pepper( optional)
  • 1 tbsp cumin
  • 2 tbsp chili powder
  • 3 tablespoons molasses or 4 tbsp brown sugar
  • 1 tsp ground chipotle powder
  • 1/2 tsp ground black pepper
  • 1 tsp salt
  • cooked kidney beans from above
Simmer very gently over low heat for about 45 minutes stirring occasionally or if using an oven safe pot, for about an hour. Add:
  • 1 1/2 pounds leftover meatloaf, diced 
Simmer for another 10 to 15 minutes before serving. Serve alone or with tortilla chips and garnishes of grated cheddar cheese, sour cream and lime guacamole.
Chipotle Sweet Corn Meatloaf Chili or Chili Sloppy Joes
Here's another delicious budget stretching recipe that lets nothing go to waste. Our leftover Sweet Onion Glazed Meatloaf was put to tasty use in this quick and easy chili recipe that was particularly delicious when served on  toasted rolls with mozzarella cheese as some of the best Sloppy Joes we have ever tried. This recipe works so well that I'd suggest making a larger meatloaf than planned as part of your weekly meal plan, just so you cam enjoy this great chili a day or two later.

Chipotle Sweet Corn Meatloaf Chili or Chili Sloppy Joes


Soak in water overnight:
  • 1 cup dry kidney beans
Simmer in lightly salted water for about 40 minutes. Drain. You may use canned beans if you prefer, about 1 1/2 cups.

In a large pot heat 
  • 3 tbsp olive oil.
Add:
  • 3 cloves minced garlic
  • 1 medium red onion or two large shallots
Cook until the onions begin to soften.

Add

  • 1 cup tomato sauce
  • 4 cups crushed tomatoes
  • 1 diced red bell pepper
  • 1 1/2 cups fresh or frozen sweet corn
  • 1 minced jalapeño pepper( optional)
  • 1 tbsp cumin
  • 2 tbsp chili powder
  • 3 tablespoons molasses or 4 tbsp brown sugar
  • 1 tsp ground chipotle powder
  • 1/2 tsp ground black pepper
  • 1 tsp salt
  • cooked kidney beans from above
Simmer very gently over low heat for about 45 minutes stirring occasionally or if using an oven safe pot, for about an hour. Add:
  • 1 1/2 pounds leftover meatloaf, diced 
Simmer for another 10 to 15 minutes before serving. Serve alone or with tortilla chips and garnishes of grated cheddar cheese, sour cream and lime guacamole.
reade more... Résuméabuiyad

Smokey Spiced Homemade Mayonnaise in Avocado Turkey Club Wraps

Smokey Spiced Homemade Mayonnaise in Avocado Turkey Club Wraps
Sometimes all it takes is a little something special to elevate something as simple as a relatively standard lunch sandwich wrap. Great quality ingredients like home roasted turkey, ripe, creamy avocado and applewood smoked bacon are all that is necessary for a delicious sandwich but when we served these at a recent lunch, the simple addition of some delicious, homemade smokey spiced mayo really took the flavor over the top. We may have only served simple wraps for lunch but trust me, nobody was disappointed.

Smokey Spiced Mayo


In a blender or food processor combine until thick and pale in color
  • 2 large or extra large egg yolks
  • 3/4 teaspoon salt
  • 1 teaspoon sugar
  • A pinch cayenne pepper
Add oil alternately with lime juice in three parts, adding the oil very slowly in a thin stream.
  • 1 cup extra virgin olive oil
  • Juice of one lemon.
Blend in:
  • 1 tsp chipotle powder
  • 1 1/2 tsp smoked paprika
This should produce a thick mayonnaise.

For the wraps we used:
  • 10 to 12 inch whole wheat or multi-grain tortilla wraps
  • sliced tomato
  • sliced avocado
  •  mixed baby lettuce
  • crisp cooked applewood smoked bacon
  • sliced roasted turkey breast
  • smokey spiced mayonnaise
I like to toss the turkey slices or cubed turkey breast in some of the mayo before adding it to the wraps. This makes for a cleaner look in the presentation when cut and placed on the plate. I also always use 14-16 inch squares of parchment paper to roll the wraps in when serving. Just place the wrap in the center near the edge of one side, fold two sides toward the center to cover the ends of the wrap, then, as tightly as you can, roll the wrap in the paper. Use a couple of pieces of tape is you like to keep it from unraveling, then cut at a diagonal through the center before serving. You can peel back the paper as you eat the sandwich and help prevent lunch lap disasters!
Smokey Spiced Homemade Mayonnaise in Avocado Turkey Club Wraps
Sometimes all it takes is a little something special to elevate something as simple as a relatively standard lunch sandwich wrap. Great quality ingredients like home roasted turkey, ripe, creamy avocado and applewood smoked bacon are all that is necessary for a delicious sandwich but when we served these at a recent lunch, the simple addition of some delicious, homemade smokey spiced mayo really took the flavor over the top. We may have only served simple wraps for lunch but trust me, nobody was disappointed.

Smokey Spiced Mayo


In a blender or food processor combine until thick and pale in color
  • 2 large or extra large egg yolks
  • 3/4 teaspoon salt
  • 1 teaspoon sugar
  • A pinch cayenne pepper
Add oil alternately with lime juice in three parts, adding the oil very slowly in a thin stream.
  • 1 cup extra virgin olive oil
  • Juice of one lemon.
Blend in:
  • 1 tsp chipotle powder
  • 1 1/2 tsp smoked paprika
This should produce a thick mayonnaise.

For the wraps we used:
  • 10 to 12 inch whole wheat or multi-grain tortilla wraps
  • sliced tomato
  • sliced avocado
  •  mixed baby lettuce
  • crisp cooked applewood smoked bacon
  • sliced roasted turkey breast
  • smokey spiced mayonnaise
I like to toss the turkey slices or cubed turkey breast in some of the mayo before adding it to the wraps. This makes for a cleaner look in the presentation when cut and placed on the plate. I also always use 14-16 inch squares of parchment paper to roll the wraps in when serving. Just place the wrap in the center near the edge of one side, fold two sides toward the center to cover the ends of the wrap, then, as tightly as you can, roll the wrap in the paper. Use a couple of pieces of tape is you like to keep it from unraveling, then cut at a diagonal through the center before serving. You can peel back the paper as you eat the sandwich and help prevent lunch lap disasters!
reade more... Résuméabuiyad

Low Fat Chipotle Ranch Dip...or Salad Dressing!

Low Fat Chipotle Ranch Dip or Salad Dressing
This amazingly flavorful low fat dip is perfect for veggies, whole grain pita chips, or anything else you can think of dipping into it. This is a low fat yogurt based dip but you can use low fat or fat free sour cream if you like. I drain the yogurt overnight to get it extra thick; when it comes to dips I say thicker is better because it is easier to scoop up and far less likely to land in your lap or on your shirt at a party. I strain my yogurt by lining a colander with coffee filters and then pour in the yogurt. Place the colander over a bowl so that there is ample space between the bottom of the colander and the bottom of the bowl. Let the yogurt drain for several hours or overnight in the fridge. We also love, love, love this dip with our amazing Deep Fried Pickles!

  • 2 cups drained yogurt
  • 2 cloves garlic, very well minced
  • 2 tbsp basil, very finely chopped
  • 2 tbsp fresh dill, finely chopped
  • 3 tbsp apple cider vinegar
  • 2 tbsp Worcestershire Sauce
  • 1 tbsp dijon mustard
  • 1 tbsp honey
  • 1/2 tsp kosher salt
  • 1/2 tsp freshly ground black pepper
  • 1/2 tsp chipotle powder (more or less to taste)

Whisk together well until all the ingredients are well combined. The dip can be used immediately but is always better after it sits for an hour or so in the fridge or even overnight. You can thin this dip with a little buttermilk if you think it is too thick.

To turn this dip into an amazing low fat salad dressing, just stir in some buttermilk, a little at a time to get it to the consistency you like.
Low Fat Chipotle Ranch Dip or Salad Dressing
This amazingly flavorful low fat dip is perfect for veggies, whole grain pita chips, or anything else you can think of dipping into it. This is a low fat yogurt based dip but you can use low fat or fat free sour cream if you like. I drain the yogurt overnight to get it extra thick; when it comes to dips I say thicker is better because it is easier to scoop up and far less likely to land in your lap or on your shirt at a party. I strain my yogurt by lining a colander with coffee filters and then pour in the yogurt. Place the colander over a bowl so that there is ample space between the bottom of the colander and the bottom of the bowl. Let the yogurt drain for several hours or overnight in the fridge. We also love, love, love this dip with our amazing Deep Fried Pickles!

  • 2 cups drained yogurt
  • 2 cloves garlic, very well minced
  • 2 tbsp basil, very finely chopped
  • 2 tbsp fresh dill, finely chopped
  • 3 tbsp apple cider vinegar
  • 2 tbsp Worcestershire Sauce
  • 1 tbsp dijon mustard
  • 1 tbsp honey
  • 1/2 tsp kosher salt
  • 1/2 tsp freshly ground black pepper
  • 1/2 tsp chipotle powder (more or less to taste)

Whisk together well until all the ingredients are well combined. The dip can be used immediately but is always better after it sits for an hour or so in the fridge or even overnight. You can thin this dip with a little buttermilk if you think it is too thick.

To turn this dip into an amazing low fat salad dressing, just stir in some buttermilk, a little at a time to get it to the consistency you like.
reade more... Résuméabuiyad

The Best Deep Fried Pickles

The Best Deep Fried Pickles
Okay, confession time, on the Saturday morning before Superbowl Sunday, we had these for breakfast! ...and loved them! When we were at the Penguin diner in Charlotte, North Carolina this past summer we had some very, very tasty deep fried pickles and I finally got around to trying some of my own. The batter here is a very simple tempura style batter with ginger and chipotle powder added to it for a little extra kick. The pickles were soaked in buttermilk which releases some of the vinegar so that taste does not dominate. We served this with some of our homemade Chipotle Ranch Dip which was just perfect with these crispy snacks; an ideal party snack for Superbowl Sunday or at any time of the year.

8 to 10 large garlic dill pickles, sliced
1 cup buttermilk, approximately

Soak the pickle slices in the buttermilk for a couple of hours or overnight. Rinse the pickles in cold water and pat dry with a clean dish towel or paper towels. Preheat deep fryer to 375 degrees F. I use canola oil for frying but peanut oil or corn oil would be fine too.

Tempura Batter


1 extra large egg
1 cup ice cold water
1 cup sifted flour
1 tbsp ground ginger
1/2 tsp chipotle powder

Sift together the flour and spices. It is important to sift your flour here or the batter will be too thick. Tempura batter should be quite thin in consistency. Add a little more water at the end if you feel you need to.

Whisk together the egg and cold water then quickly whisk in the dry ingredients. Small lumps are perfectly fine, even preferred. Dip each pickle slice in corn starch before dipping into the tempura batter to help the batter stick much better. Drop into the hot oil and fry to golden brown about 6 -8 minutes. Drain on wire rack before serving.

The Best Deep Fried Pickles
Okay, confession time, on the Saturday morning before Superbowl Sunday, we had these for breakfast! ...and loved them! When we were at the Penguin diner in Charlotte, North Carolina this past summer we had some very, very tasty deep fried pickles and I finally got around to trying some of my own. The batter here is a very simple tempura style batter with ginger and chipotle powder added to it for a little extra kick. The pickles were soaked in buttermilk which releases some of the vinegar so that taste does not dominate. We served this with some of our homemade Chipotle Ranch Dip which was just perfect with these crispy snacks; an ideal party snack for Superbowl Sunday or at any time of the year.

8 to 10 large garlic dill pickles, sliced
1 cup buttermilk, approximately

Soak the pickle slices in the buttermilk for a couple of hours or overnight. Rinse the pickles in cold water and pat dry with a clean dish towel or paper towels. Preheat deep fryer to 375 degrees F. I use canola oil for frying but peanut oil or corn oil would be fine too.

Tempura Batter


1 extra large egg
1 cup ice cold water
1 cup sifted flour
1 tbsp ground ginger
1/2 tsp chipotle powder

Sift together the flour and spices. It is important to sift your flour here or the batter will be too thick. Tempura batter should be quite thin in consistency. Add a little more water at the end if you feel you need to.

Whisk together the egg and cold water then quickly whisk in the dry ingredients. Small lumps are perfectly fine, even preferred. Dip each pickle slice in corn starch before dipping into the tempura batter to help the batter stick much better. Drop into the hot oil and fry to golden brown about 6 -8 minutes. Drain on wire rack before serving.

reade more... Résuméabuiyad

Maple Chipotle Glazed Roast Chicken

Maple Chipotle Glazed Roast Chicken


A roast chicken dinner is about as homey as good cooking gets. At our house roasted potatoes are a must with a good roast chicken; not making roast potatoes would be a cardinal sin in my son's eyes especially. You can find our very popular version of English style roast potatoes here. We often roast off other root vegetables like carrots and Spouse's favorite parsnip to serve as well but the star of the show is always a perfectly roasted chicken.  
  
I like to brine my poultry before roasting but it's not essential if you are pressed for time. You can read more about my brining technique here. 

This one was particularly good with a sweet and smoky glaze to make for a perfect Sunday roast dinner.

Maple Chipotle Glaze

In a small pot sauté together:

2 cloves minced garlic
2 tbsp olive oil
Add
1/3 cup low sodium chicken stock
1/3 cup maple syrup
2 tbsp balsamic vinegar
1 tbsp dried thyme
1 tsp chipotle powder

Simmer slowly stirring often until the glaze reduces by at least half in volume.
Roast your chicken uncovered in a 350 degree oven. In the last half hour or so of cooking time, brush several layers of the glaze all over the chicken about every 10 minutes. Let the chicken rest for 10 minutes when it comes out of the oven before carving and serving.
Maple Chipotle Glazed Roast Chicken


A roast chicken dinner is about as homey as good cooking gets. At our house roasted potatoes are a must with a good roast chicken; not making roast potatoes would be a cardinal sin in my son's eyes especially. You can find our very popular version of English style roast potatoes here. We often roast off other root vegetables like carrots and Spouse's favorite parsnip to serve as well but the star of the show is always a perfectly roasted chicken.  
  
I like to brine my poultry before roasting but it's not essential if you are pressed for time. You can read more about my brining technique here. 

This one was particularly good with a sweet and smoky glaze to make for a perfect Sunday roast dinner.

Maple Chipotle Glaze

In a small pot sauté together:

2 cloves minced garlic
2 tbsp olive oil
Add
1/3 cup low sodium chicken stock
1/3 cup maple syrup
2 tbsp balsamic vinegar
1 tbsp dried thyme
1 tsp chipotle powder

Simmer slowly stirring often until the glaze reduces by at least half in volume.
Roast your chicken uncovered in a 350 degree oven. In the last half hour or so of cooking time, brush several layers of the glaze all over the chicken about every 10 minutes. Let the chicken rest for 10 minutes when it comes out of the oven before carving and serving.
reade more... Résuméabuiyad

Smokey Chipotle Fried Chicken

Smokey Chipotle Fried Chicken

I have had this idea for a while now and was inspired to push it up in my "recipes to complete" list after having enjoyed some succulent , juicy brined poultry last week in our Lemon and Rosemary Brined Roast Turkey. Brining poultry is something you just  must try  if you never have; it adds great seasoning and extra juiciness throughout the meat, making it tender and perfect.

While it works well for roasting, I think it works even better for fried chicken. I have never brined chicken parts for more than a full day but when I unexpectedly had to leave it for a second day I was flabbergasted by the result. I had been wanting to try a very simple smoky spiced fried chicken for a while now, using two of my favorite smoked spices, smoked paprika and chipotle powder, so  I thought this was the perfect opportunity. 

I don't say this lightly at all...this was the best fried chicken that I have ever eaten. 

Smokey Chipotle Fried Chicken

It was amazingly moist and juicy. The meat was completely seasoned throughout from the brine and using a tip I saw on "Diners, Drive-ins and Dives",  I added some butter to my canola oil to fry the crust to an amazingly perfect crispy texture with just the right amount of smoky spice. Amazing. Amazing. Amazing. I absolutely know I will make this again and again. This is one recipe you absolutely have to try!

We served this outstanding fried chicken with grilled corn, mashed potatoes, buttermilk biscuits and gravy. Does it get any better than that?  Need a recipe for great Buttermilk Biscuits? Click right here!

Smokey Chipotle Fried Chicken

I begin by washing:

  • one large chicken, about  3 1/2 to 4 pounds

Cut and trim the chicken into 8 pieces ( 2 legs, 2 thighs, 2 wings and 2 breasts)

Place the chicken in a large plastic container and cover it with the brine mixture. Cover and refrigerate for up to 48 hours. If you need to add a little more water to completely cover the chicken, that's not a problem.

Tabasco Brine Mixture

 Begin with 2 quarts (liters) of water
  
Add:
  • 1/4 cup kosher salt
  • 1/4 cup brown sugar
  • 2 tbsp honey or maple syrup
Stir until the salt and sugar is dissolved, then add:

  • 3 tbsp black peppercorns
  • 8 cloves thinly sliced garlic
  • 1 large onion, thinly sliced
  • 1/2 cup Tabasco sauce (add more if you like)

After 48 hours, remove the chicken from the brine mixture. Toss it into the flour and spice dredge.|

Flour and Spice Dredge

  • 1 1/2 cups all purpose flour
  • 1 tsp kosher salt
  • 1 tsp freshly ground black pepper
  • 3 heaping tbsp smoked paprika
  • 2 heaping tbsp chipotle powder

Mix all ingredients together in a large bowl until very well combined. Add the brined chicken pieces. Toss well and press the chicken pieces into the flour dredge with your palms to get good contact with the meat. \let stand for ten minutes, then toss again and press down with your palms again. Now it's time to warm up your oil.

In a 12 inch cast iron skillet heat 1 inch canola or corn oil with 1/2 cup real dairy butter until it reaches 35O degrees F. Just below medium heat works well on my stove but use a thermometer to be sure.  A cast iron skillet is the best for fried chicken. Be extra careful to regulate the heat properly of using anything other than cast iron. Even cooking is essential.

Drop the dredged chicken pieces into the hot oil/butter mix and cook for approximately 35- 40 minutes depending on the size of your chicken pieces, turning at least once halfway through the  cooking time. I start with the dark meat pieces and add the breasts about 10-15 minutes into the cooking time because these will cook faster. I always use my meat thermometer to ensure that the largest pieces have reached an internal temperature of 165 degrees F, which is perfect for fried chicken. The chicken should be a beautiful golden brown when it comes out of the oil. Let it rest on a wire rack to drain for 5 minutes before serving.


Smokey Chipotle Fried Chicken

I have had this idea for a while now and was inspired to push it up in my "recipes to complete" list after having enjoyed some succulent , juicy brined poultry last week in our Lemon and Rosemary Brined Roast Turkey. Brining poultry is something you just  must try  if you never have; it adds great seasoning and extra juiciness throughout the meat, making it tender and perfect.

While it works well for roasting, I think it works even better for fried chicken. I have never brined chicken parts for more than a full day but when I unexpectedly had to leave it for a second day I was flabbergasted by the result. I had been wanting to try a very simple smoky spiced fried chicken for a while now, using two of my favorite smoked spices, smoked paprika and chipotle powder, so  I thought this was the perfect opportunity. 

I don't say this lightly at all...this was the best fried chicken that I have ever eaten. 

Smokey Chipotle Fried Chicken

It was amazingly moist and juicy. The meat was completely seasoned throughout from the brine and using a tip I saw on "Diners, Drive-ins and Dives",  I added some butter to my canola oil to fry the crust to an amazingly perfect crispy texture with just the right amount of smoky spice. Amazing. Amazing. Amazing. I absolutely know I will make this again and again. This is one recipe you absolutely have to try!

We served this outstanding fried chicken with grilled corn, mashed potatoes, buttermilk biscuits and gravy. Does it get any better than that?  Need a recipe for great Buttermilk Biscuits? Click right here!

Smokey Chipotle Fried Chicken

I begin by washing:

  • one large chicken, about  3 1/2 to 4 pounds

Cut and trim the chicken into 8 pieces ( 2 legs, 2 thighs, 2 wings and 2 breasts)

Place the chicken in a large plastic container and cover it with the brine mixture. Cover and refrigerate for up to 48 hours. If you need to add a little more water to completely cover the chicken, that's not a problem.

Tabasco Brine Mixture

 Begin with 2 quarts (liters) of water
  
Add:
  • 1/4 cup kosher salt
  • 1/4 cup brown sugar
  • 2 tbsp honey or maple syrup
Stir until the salt and sugar is dissolved, then add:

  • 3 tbsp black peppercorns
  • 8 cloves thinly sliced garlic
  • 1 large onion, thinly sliced
  • 1/2 cup Tabasco sauce (add more if you like)

After 48 hours, remove the chicken from the brine mixture. Toss it into the flour and spice dredge.|

Flour and Spice Dredge

  • 1 1/2 cups all purpose flour
  • 1 tsp kosher salt
  • 1 tsp freshly ground black pepper
  • 3 heaping tbsp smoked paprika
  • 2 heaping tbsp chipotle powder

Mix all ingredients together in a large bowl until very well combined. Add the brined chicken pieces. Toss well and press the chicken pieces into the flour dredge with your palms to get good contact with the meat. \let stand for ten minutes, then toss again and press down with your palms again. Now it's time to warm up your oil.

In a 12 inch cast iron skillet heat 1 inch canola or corn oil with 1/2 cup real dairy butter until it reaches 35O degrees F. Just below medium heat works well on my stove but use a thermometer to be sure.  A cast iron skillet is the best for fried chicken. Be extra careful to regulate the heat properly of using anything other than cast iron. Even cooking is essential.

Drop the dredged chicken pieces into the hot oil/butter mix and cook for approximately 35- 40 minutes depending on the size of your chicken pieces, turning at least once halfway through the  cooking time. I start with the dark meat pieces and add the breasts about 10-15 minutes into the cooking time because these will cook faster. I always use my meat thermometer to ensure that the largest pieces have reached an internal temperature of 165 degrees F, which is perfect for fried chicken. The chicken should be a beautiful golden brown when it comes out of the oil. Let it rest on a wire rack to drain for 5 minutes before serving.


reade more... Résuméabuiyad