Pages

.

Biscoff white chocolate chip blondies

Several months ago, I bought a container of Trader Joe's Speculoos (cookie butter) spread. I'd already fallen in love with Biscoff spread (see Biscoff chocolate chip cookies, Biscoff cupcakes with Swiss meringue buttercream and Biscoff swirl gelato) and wanted to try the Trader Joe's equivalent. It helped that it was a few dollars cheaper too.

The Speculoos spread was hanging around in my pantry waiting to be used. I probably should have added some to my boring English muffins for breakfast, but for some reason, I did not. The jar of glorious cookie butter finally got opened when a friend invited us over to their house for a cookout. Biscoff blondies were practically begging to be made.

I baked up a double batch of these blondies and found that the original suggested baking time for a 9x13 inch pan was too much. If you double the recipe like I did, reduce your baking time to 30 minutes and add more time as needed.

These blondies were one of the highlights of the party, as I am told. I wasn't able to stick around the entire night since it was Addie's bath night. The bars have a nice chewy texture like a traditional blondie but have a distinct cookie butter flavor profile (in other words, super yum). The white chocolate chips are a nice feature that add a bit of sweetness and fun crunch in every bite. If you're not a fan of white chocolate, you can certainly substitute with other baking chips (milk chocolate, semi-sweet chocolate, peanut butter, butterscotch or even cinnamon). I bet any of those would taste just as good.

Biscoff white chocolate chip blondies
  • 1 cup all-purpose flour
  • 1/2 teaspoon baking powder
  • 1/8 teaspoon baking soda
  • 1/2 teaspoon salt
  • 5 Tablespoons (1/3 cup) unsalted butter, melted
  • 1 cup light brown sugar, packed
  • 1 large egg
  • 1 egg yolk
  • 1 teaspoon vanilla extract
  • 1/2 cup Biscoff spread (or Trader Joe's Cookie Butter/Speculoos)
  • 1 and 1/4 cups white chocolate chips
Directions
Preheat oven to 350 degrees F.

Grease an 8x8 inch baking pan or line with parchment paper. Set aside.
In a medium sized bowl, whisk together the flour, baking powder, baking soda, and salt. Set aside.

In a large bowl, mix together the melted butter and brown sugar until well combined. Add in the
egg and egg yolk, and vanilla. Mix thoroughly.  Add in the Biscoff/cookie butter and mix well. 
Gently add the flour mixture into the Biscoff mixture and use as few strokes as possible to blend everything together. The blondie batter will be extremely thick. Finally, stir in the white chocolate chips, and again making sure to not overmix the batter.

Transfer the mixture into the prepared baking pan and smooth the top with a spatula. 
Bake for about 25-26 minutes or until the tops and/or sides are a light golden brown. The bars may look a bit underdone but will continue baking and firm up as they cool.

Let the bars come to room temperature (around 3 hours) before slicing them into squares.

Note: If you double the recipe like I did (and bake in a 9x13 inch pan), bake for about 30 minutes. I baked mine for 35 minutes as the original recipe suggested and found that my bars were a bit overdone.

Yield: About 16 bars

Source: Sally's Baking Addiction

Photobucket
reade more... Résuméabuiyad

Desserts for Dudes: That's Some Pig!

pig cookies ::: bake at 350 blog
Cuts of meat: the only way to make a pink, decorated cookie look manly.

pig cookies ::: bake at 350 blog
When I saw this cookie cutter on etsy, I knew I must have it.  (I bought the cow, too.)


I toyed with the idea of baking up a chocolate-bacon cut-out cookie, but I really wanted these to be pink.  For the pink, you can either tint your cookie dough pink with food coloring, or use a pink dough.  I used some leftover watermelon cookie dough, but I will say, it's a little disconcerting eating a watermelon-flavored pig.
pig cookies ::: bake at 350 blog
The cookie cutter really does all of the decorating work for you.  The imprints are nice and deep and remain throughout baking.

When cutting, though, some of the smaller sections wanted to stick in the cookie cutter.  I nudged them out with a chopstick.  You can see a little of it here...
pig cookies ::: bake at 350 blog
...I think it's ok, though.

To decorate, I used a #3 tip and white royal icing.
pig cookies ::: bake at 350 blog
Bada-bing. Bada-boom. Done.

pig cookies ::: bake at 350 blog
Sooie!  Here piggy, piggy!!!


reade more... Résuméabuiyad

Raspberry Buttercream Mille Feuille

Raspberry Buttercream Mille Feuille
What I love about this classic French pastry is that it looks impressive but is actually not difficult to make. In French mille-feuille (pronounced mil fie) when literally translated means a thousand leaves, named for the many layers in the puff pastry upon which it is based. Traditionally they are filled with pastry cream but because it's summer I decided to fill them with some simple vanilla buttercream frosting  and raspberry jam to make them more portable and picnic friendly. This version is once again inspired by another popular Vachon snack cake that I ate as a kid.

Raspberry Buttercream Mille Feuille

Makes 8 pastries but these are quite rich so I most often cut 16 squares out of them and serve them at that size.
  • 1 pound package frozen puff pastry
Roll out the puff pastry into three 8 inch squares. Place on a parchment lined cookie sheet. You may have to bake these one at a time depending on the size of your cookie sheet. Dock the pastry by stabbing holes in it with a fork about every half inch over the entire surface of the pastry. Chill it in the freezer for 10 minutes to ensure that it is well chilled. Puff pastry MUST be baked very cold. Place another sheet of parchment paper on top of the pastry and weight it down with another cookie sheet on top. This keeps the pastry from puffing too much and ensures that it is crispy when baked.

Bake in a preheated 425 degree oven for about 15 minutes. Decrease the heat to 375 degrees F, remove the top pan and top sheet of parchment paper and bake for about another 5 minutes or so until it is evenly medium golden brown throughout. Cool the baked pastry sheets completely before filling.

Vanilla Buttercream Frosting
  • 4 cups icing sugar (powdered sugar
  • 1 cup butter
  • 2 tsp vanilla extract
  • a few tbsp milk
Blend together until smooth. Only add a little milk at the beginning, then add more if you need it. You want a very thick frosting here. It should still be easily spreadable but as thick as possible is best.
Take one quarter of the frosting and spread it evenly on one layer of the baked pastry. On top of the frosting, spread a thin layer of very good quality
  • raspberry jam
Spread another quarter of the frosting onto the next sheet of baked pastry and invert it on top of the raspberry jam so that the jam is sandwiched between two thin layers of frosting. This technique helps the completed pastry to hold together better.

Next, spread another quarter of the frosting amount onto the top of the inverted pastry layer, followed by another thin layer of raspberry jam. Finally spread the last of the frosting onto the last sheet of baked puff pastry and invert that onto the raspberry jam. Chill the constructed mille-feuille while you prepare the glaze for the top.

Vanilla Glaze
  • 1 1/2 cups icing sugar (powdered sugar)
  • 1 tsp vanilla extract
  • milk
Blend together well using only enough milk to bring the glaze to a very thick consistency. The glaze should be just at the point where it almost isn't pourable but still goes to a flat surface when you stop stirring, even if it takes a couple of seconds to do so. Spread  the glaze evenly over the surface of the constructed mille-feuille.

Melt together:
  • 1/4 cup chocolate chips
  • 1 tsp butter
Spoon the melted chocolate into a Ziploc bag and snip the corner off with scissors. The opening should be quite small, about the size of a pencil lead. Draw lines of chocolate all across the surface of the glaze, parallel to each other and about a half inch apart. Using the back of a knife or a toothpick, draw lines perpendicular to the chocolate lines across the surface of the glaze, about every inch, alternating the direction of the lines as you go.

Chill the completed mille-feuille for at least a couple of hours, preferably longer. Trim all four edges of the pastry so that you have straight sides before cutting into 8 rectangles or 16 squares. The trimmings are the bakers bonus, enjoy. ;)
reade more... Résuméabuiyad

Best Grilled Pork Chops (with a sweet and smokey sauce) #SundaySupper

     It's hot outside.  Not that I'm complaining because I'd rather it be 90 degrees then 30 degrees.  I can't stand the cold.  I just get irritated that the summer is when I have some time off and can really get cooking and baking but I hate turning the oven on because it heats up the house.  No we do not have air conditioning.  We do have ceiling fans, and they do help, but when it's hot and humid no one wants to be in the kitchen cooking.

     So in the summer we grill a lot.  Well, let me rephrase that.  I prepare the food and my husband does the grilling.  It's not that I can't grill, because I can, but it's just that he's so much better at it and it works well having me do the prep work and him cook the actual food.  This week #SundaySupper is having a Summer BBQ Party so I thought I better bring something hot off the grill!

     While I like marinating meat before we grill it, I don't always remember to do so.  Last night was one of those nights.  I was busy all day and it just slipped my mind.  Thankfully I went onto my Cook's Illustrated account and found grilled pork chops that were basted with a sauce while they were cooking.  The sauce sounded delicious to me but I was worried it would be too sweet for Frank.  However, after I cooked it up on the stove and it thickened, it was absolutely delicious.

       The flavor was slightly sweet but had a tangy, smokey flavor to it.  I really liked it.  I divided the sauce in half, using half to baste the pork chops and the other half to serve on the side.  My husband ended up really liking the sauce.  It's similar to a homemade BBQ sauce, but even better.  I can't wait to try it on chicken next time!

Best Grilled Pork Chops (adapted from Cook's Illustrated)
4 boneless pork chops
1/2 c. ketchup
1/4 c. molasses
2 T. Worcestershire sauce
1 T. Dijon mustard
2 T. white vinegar
1 T. brown sugar
3 garlic cloves, minced
1 T. water

1.  Combine all the ingredients in a small saucepan over medium high heat.  Bring the sauce to a boil then reduce the heat to low.  Simmer for 5-7 minutes or until the sauce has thickened.

2.  Remove the sauce from the heat and divide into two bowls.  Place one bowl in the refrigerator until you are ready to use it.


3.  Take the other bowl outside along with a basting brush.  Grill the pork chops for 4-5 minutes on one side then flip them over.  Cover the tops of the pork chops with the sauce and continue cooking for 4-5 minutes.  Continue basting with the sauce and flipping the pork chops until they are cooked through.

4.  Serve with the remaining sauce on the side.  


Check out what everyone else is sharing for our Summer BBQ Party:


Hot Off the Grill:
On the Side:
Sweet Tooth:
In the Cooler:
Join the #SundaySupper conversation on twitter each Sunday. We tweet throughout the day and share recipes from all over the world. Our weekly chat starts at 7:00 pm ET and you do not want to miss out on the fun. Follow the #SundaySupper hashtag and remember to include it in your tweets to join in the chat. Check out our #SundaySupper Pinterest board for more fabulous recipes and food photos.
reade more... Résuméabuiyad

¿Cómo elegir la mejor tienda Online de torta

Buy things online is becoming a new trend among NET smart people. You go to your favorite, navigate through the menu shop, choose what you want to make the payment and within a few hours or days, you will arrive at your door. How to order things for yourself, you can send things to others also through online media. For example, if you want to send cakes to Delhi from other cities such as Bangalore, Mumbai, etc., an online shop would come to his help. Apart from cakes, you can also send flowers to Delhi, since many of these stores provide other gifts such as flowers, chocolates, fruit baskets, greeting cards, etc.

To send flowers to Delhi along with cakes, you should choose an online store which is the best. As internet is flooded with many shops, picking one can be a daunting task. However, you really need not worry, as there are some tips that will help you to choose the online store that sends flowers and cakes to Delhi.

A quick internet search will take you to various web sites that sell candy and flowers. Choose the web site that you think that it offers you the best variety. Online stores offer cakes of various flavors, some of which cannot be found in a bakery. In that case, you should try to experience buying a flavor that have never heard, but it is attractive. In the case of flowers, you can choose roses, orchids, carnations, gerberas. If you want to buy cakes and flowers, you can go for combo offers some Web sites provide. Some of the combo deals are pretty amazing and give good value for your money.

The part of the selection is the first step of the ordering process. The next step is to provide the direction, for cakes and flowers reach the right place. You should also mention the date at which you want to your gifts to be delivered. Some web sites have midnight delivery services to send cakes and flowers to Delhi. If it is a cake for birthdays and flowers you send, you can choose for this. Mention the exact date when it comes to the delivery of midnight so there is no confusion.

After you provide the address along with the date and time, the payment should be. Only once you make the payment, your order will be processed. The payment can be done through the use of credit or debit card. Once done, cakes and flowers arrive at your destination on time.

Internet, although a friendly world, can cause problems if you are not careful. So before ordering a Web site online, read the policy page, comments and ratings, so you can choose the best thing on the internet.

Robinson Ashley PhotoAshley Robinson is a writer of Indiacakes.com content, a line of cakes and flowers shop in Delhi offering flowers and cakes free delivery in all India.
reade more... Résuméabuiyad

Quick reminder - Google Reader is shutting down on 7/1

Most of you probably already know this, but I wanted to quickly remind you all that Google Reader is shutting down on July 1. There are a few alternatives out there, but two of the services that I have found to be pretty good are Feedly and Bloglovin.

If you want to follow me on Bloglovin, I have a button on the right-hand side of the page underneath the social media buttons. Please click that to follow me on Bloglovin.

If Feedly is more your cup of tea, it should automatically transfer all of your subscriptions over. I think there's a glitch with the starred items (I've heard that it only transfers 1000 starred items), so be forewarned.

Or, you can keep reading my posts via Facebook.

Hope you are able to find a subscription service that works for you!

Photobucket
reade more... Résuméabuiyad

Sweet 'n Salty: What's Baking Round Up!

      I am part of a wonderful community of food bloggers.  On our cooking board we have two monthly groups.  With one group we do a recipe swap each month and the other group we make a baked item each month.   This month I was the host for our What's Baking group and I chose our theme to be Sweet 'n Salty.  There were so many wonderful things I wanted to bake and wait to see you what everyone else made as well!

Carrie from Carrie's Sweet Life shared this delicious White Chocolate Puff Corn 


Joanna from Kosher Kitchen made this time consuming but totally worth it Milk Chocolate Tart with Pretzel Crust


I shared my insanely good, bet you can't eat just one, Salted Caramel Cookie Bars


These drool worthy Salted Fudge Brownies come from Eva of Eva Bakes


These amazing Chocolate Chip Peanut Butter Pretzel Cookies were shared by Kate of Kate's Recipe Box


Allison of Sparks in My Kitchen made these Dreamy Vanilla Fleur de Sel Caramel Krispies


     Are you hungry yet?  I am!  I can't wait to see what we will come up with next month.  For now, don't forget to click on the links to see the recipes!


reade more... Résuméabuiyad

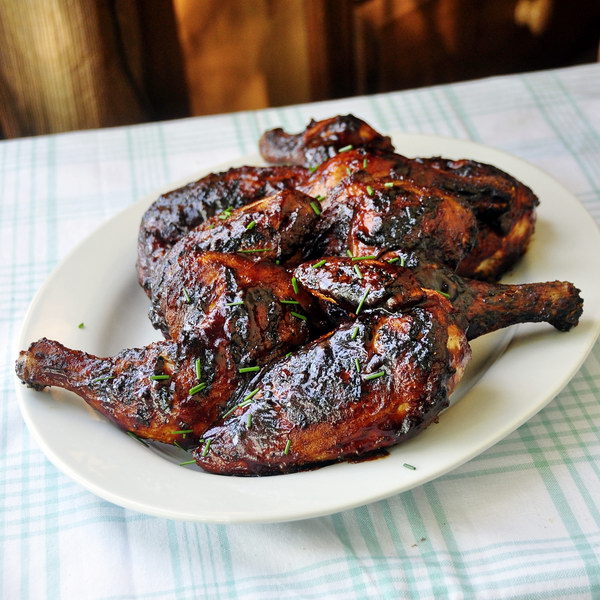
Double Barbequed Chicken

Double Barbequed Chicken
So what's double barbeque chicken? In recent years since experiencing more southern barbeque, I have come to enjoy dry rubbed barbequed meats of all kinds including chicken. In general, I like to dry rub my favorite spice rubs onto the meat the night before and let the rub permeate the flesh long before it ever hits the heat.

Now don't get me wrong, I still love my barbeque sauces! There's nothing better than licking a sweet sticky barbeque sauce or honey barbeque glaze from your fingers in a messy carnivorous feast but I have come to appreciate dry barbeque as well. In this recipe I don't have to choose! I both dry rub the chicken the day before and slowly build up glazed layers of sticky barbeque sauce toward the end of the cooking time. The result here is phenomenally flavorful, especially when slowly cooked over indirect heat on a charcoal barbeque. I just love it and I hazard to say you will not eat a better barbequed chicken this summer; certainly not a more intensely flavored one.

I like to use my recipe fro Brown Sugar Balsamic BBQ Sauce (recipe below) but I also like my Bourbon Barbeque Sauce that I normally use on ribs. Get that recipe by clicking here.

Begin by rubbing some of my chicken dry rub all over the outside of all your chicken pieces. Cover and store in  fridge. The longer you leave the rub on the chicken the better. As little as a couple of hours is good but overnight is best for the flavor of the spices to permeate the meat.

Chicken Dry Rub

Makes about 2 cups dry rub.
  • 3 tbsp paprika
  • 2 tbsp smoked paprika
  • 1 tsp chili powder
  • 3 tbsp kosher salt
  • 1 tbsp powdered ginger
  • 1 tbsp chipotle powder
  • 3 tbsp brown sugar
  • 1 tbsp black pepper
  • 1 tbsp ground thyme
  • 2 tbsp ground sage or poultry seasoning
  • 2 tbsp dry mustard powder
  • 2 tbsp garlic powder
  • 3 tbsp onion powder
  • 1 tsp ground cumin
  • 2 tsp crushed or ground fennel seed
Mix together well and store any unused dry rub in an airtight container in a cool place or in the freezer.
If you are using your gas grill to barbeque, place the chicken piesces on one side of the grill and use the burner or burners on the opposite side so that it is not directly over heat. Regulate the gas to keep the temperature at about 300 - 325 degrees F for slow barbequed flavor. The same technique can also be used with a charcoal grill, just keep the charcoal on one side and the chicken pieces on the opposite side. 
{Smoking instructions (optional) If you like, you can add smoke flavor by soaking hardwood chips like mesquite, apple, cherry or hickory in warm water for about a half hour. A couple of handfuls will do. Wrap the soaked wood chips in a double layer of heavy duty aluminum foil and poke only two holes in the foil, one at either end to allow the smoke to escape. I place the foil packets in a vegetable grill pan so that the packet is not sitting directly on the gas burner. The packet can be directly placed on the coals if you are using a charcoal barbeque.}

Cook the chicken until the internal temperature reaches about 150 -160 degrees F on a meat thermometer, then begin to brush the barbeque sauce on the chicken, turning it several times, every few minutes. I like to use my recipe for I like to get at least 3 or 4 layers of barbeque sauce on the chicken. When the internal temperature of the chicken reaches 170 degrees F it is done.

Brown Sugar & Balsamic Barbeque Sauce 

  • 1 large red onion, diced
  • 6 cloves minced garlic
  • 3 tbsp olive oil
  • 1 large apple thinly sliced

Saute all together in a medium sized saucepan until the onions and apples have softened. Add:
  • 8 large very ripe diced tomatoes with the skins removed ( or a 28-32 ounce can crushed tomatoes)
Saute together until the tomatoes begin  break down and get mushy (or until the sauce is reduced by 1/4 if using canned tomatoes), then add:
  • 1 1/4 c ups brown sugar
  • 1/2 cup balsamic vinegar
  • 1 teaspoon ground thyme
  • 1 tsp crushed chili paste (or 1/2 tsp cayenne pepper, more or less to taste of either if you want to better control the heat)
  • 2 tbsp smoked paprika
  • 2 tbsp chili powder
  • 1/2 whole nutmeg, finely grated
  • 2 tbsp fresh finely grated ginger
  • 1 tsp kosher salt
  • 1 tsp freshly ground black pepper

Simmer all together over low heat for about a half hour or until the sauce reaches the consistency of a good barbeque sauce. I like mine a little thicker than most because it is easier to brush on whatever is being grilled.

Puree the sauce to make it extra smooth if you prefer. I always do.
Store in airtight container in the fridge if you are using it within a week or so or freeze it in airtight containers. Properly preserving it in mason jars will make it last all summer.
reade more... Résuméabuiyad

Fulfill The Chocolate Dream

They say a diamond is a girl's best friend but chocolate is a close competition in that case. It has many benefits when it comes to health. Apart from its enchanting taste, it can be had in times of stress as it helps in relieving the stress. It works as a feel good factor in stress, and many researches have indicated its use in dealing with heart related issues. But when it comes to medicinal use, we talk about dark chocolate which is bitter in taste. But it's hard to believe that common folk can also make it at home without the help of fancy machines and industrial set up. Attending chocolate making classes, Mumbai, can help anyone to learn the art of chocolate making.

There are so many places where one can learn choco making. So many institutes offer professional chocolate making courses in Mumbai, where one can master the art of choco making and then use the skill further. It has its origin in primeval history where Mayans used it as offerings to god and was considered a pious drink. Europeans added, sugar and milk to the bitter cocoa paste which they used to eat as desserts. The name Chocolate was originated from a Spanish word which means bitter water.

After a brief look into the history, let's take a look at some of the best Chocolatiers in the world.

TeuscherVosges Haut-ChocolatNorman Love ConfectionsValrhona

These are the best chocolate companies in the world; one can be an expert at choco making after learning the art from chocolate making classes Mumbai. There are some of the myths which are related to it, are stated below:

Myth: It increases cholesterol

Fact: Researches has shown it does not increase cholesterol level

Myth: It leads to hyperactivity

Fact: According to experts it is not responsible for any hyperactivity

Myth: its consumption leads to teeth cavities

Fact: Studies tell that it helps fight teeth cavities

Myth: It leads to obesity

Fact: Its consumption in small amounts can help reduce calories

Myth: It does not have any nutritional value

Fact: Researchers have found out that chocolate is high on nutritional value

One may also make chocolate at home and surprise everyone with a sparkling dessert. It can be used in cakes to give a special taste or may be used as a stand alone dessert like chocolate mousse which is some of the favorites.

reade more... Résuméabuiyad

Skating Fridays

Adult Gold Freestyle program elements

Coach S is in the midst of choreographing my Adult Gold Freestyle program. Because it will be judged via the IJS system, there are lots of things we have to factor in to gain additional points.  I'm having a hard time figuring out which 3 spins I want to include.  I know that swapping out spins is fairly easy, but I'd still like to quickly finalize which three I will use so I can do some hard-core practicing on the selected spins. Plus, once I finalize my spins, I can ask Coach B to help me perfect them and get them competition-ready.

So far, this is what we are thinking for the spins and the things I need to work on for each:
  • Cannonball (sit) - for at least 8 revolutions. I need to work on consistently hitting the 8 revolutions. Sometimes I get 6-7 and then lose my balance and fall on my heel. I also need to condition myself so I stop getting so dizzy afterwards. This is much easier said than done.
  • Death drop - I'm actually just learning this spin and am working on the preparation exercises. I can hit a flying camel, but since it's hard to achieve (and receive credit for) features on a flying camel, we decided to nix it and change it into a death drop. Coach B thinks the death drop will be easy once I understand the mechanics. After it's fairly comfortable, I may add a twist on the back sit in order to gain an additional feature.
  • Camel/broken leg/attitude - I need to work on the transition between the three spins and ensure that I hit 3 revolutions for each (technically, I only need 2, but I want to focus on achieving 3). The broken leg position needs to be nice and low, which I am still working to get.
For my maximum of 5 jump elements (of which no more than 3 can be combinations or sequences), I will probably end up doing:
  • Axel - Need to focus on jumping up and out instead of pre-rotating.
  • Lutz - Must get rid of the flutz!
  • Lutz/toe loop - Ditto above. Once I can get the lutz more comfortable, I should be able to easily add the toe loop at the end.
  • Flip - I need to work on landing on less of a curve since Coach S has me holding the landing for 3 counts, and then doing a back outside three turn out of it (for bonus points to show control).
  • Loop - We'll see about this one. Maybe I'll switch this out for something a bit more challenging or doing a combination. I had talked to Coach S about doing a walley, but it's not an official jump, so I wouldn't get credit for it. Bummer.
I'll let you all know what I end up including as part of my program, and once the choreography is done, I'll try to videotape a practice of the run-through.

Here are two attempts (one not successful) at the death drop spin walkthrough exercise.

Unsuccessful attempt

Successful attempt, though not 100% correct 

And just for fun, here are two separate attempts at the flying camel, but from a standstill.


Until next Friday!

Photobucket
reade more... Résuméabuiyad

Swept Up By The Sea: A Romantic Fairy Tale by Tracy Hickman & Laura Hickman

     Determined to seek his fortune, Percival Taylor leaves behind his sleepy hometown and sets out to become a legendary pirate—only no one at the roguish seaport of Blackshore will allow him any- where near a ship!

     Percival must find other means to win the heart of the beautiful Tuppence Magrathia-Paddock, who has mistaken him for a pirate rogue out of one of her romantic tales. She is entirely willing to swoon into his arms if he can prove his buccaneer soul—and she is willing to arrange her own kidnapping to prove it. 

     Percival eventually finds himself captain of a broken-down ship, complete with a crew of pirates who make their living selling fake treasure maps, a jilted fiancee, a reclusive Master Shipwright, and an old professor with a secret that could kill them all. It’s Pirates of Penzance meets Princess Bride as this motley group of characters sets sail for treasure and romance.  (-synopsis)


     Percival is set to wed a local girl at the insistence of both their parents but instead he finds himself longing for an adventure.  He dreams of becoming a pirate, even though he becomes easily seasick, and wants to win the heart of beautiful Tuppence in the process. 

     However, when Percival starts on his journey Vestia, the girl he was to marry, follows him in hopes of winning his heart.  The journey takes some funny turns and there are some laugh out loud moments in the book.  There were a lot of characters in this book and it was hard to remember who everyone was but in general this was a fast paced book with a lot of good scenes.  

     While I liked the book, it is definitely geared more towards young adults who would enjoy the adventures and seeking of the treasure. 

I give this book 3 out of 5 stars. 

About the Authors
Tracy Hickman is a New York Times best-selling fantasy author who has published more than 40 novels, many of the co-authored with Margaret Weis. He published the first of his solo novels in 1995. Laura and her husband, Tracy have been collaborating on fantastic works of fiction since their marriage in 1977. Together, Laura and Tracy have written role-playing games, screenplays, and works of fiction, including their first co-authored novel in 2004.
reade more... Résuméabuiyad

Jalapeno Popper Quiche #WeekdaySupper

   Today is my little brother's birthday!  Last year he turned the big 3-0 and this year he is turning 31 as an engaged man.  I can't believe he's getting married but I absolutely love his fiancee and can't wait for her to join our family.  This week for our #weekdaysupper I wanted to share a recipe that I know my baby brother would love.  Since both the #SundaySupper movement and the #weekdaysupper  movement are all about gathering family around the dinner table I thought it would be nice to share a recipe that I can't wait to make for him the next time he comes to my house.  He is a HUGE fan of both cheese and spicy foods and I think he'll love this dish. 

  Do you ever see a picture of a meal and your mouth literally starts to water?  That's exactly what happened to me when I took a look at this Jalapeno Popper Quiche. I love anything that has to do with jalapeno poppers; they are seriously delicious!  I immediately read through the recipe to see if I could make it the day I saw it but I needed a few ingredients so it went on the menu plan for the next week.   It's also super easy to make and pop in the oven so it's perfect for a weeknight meal.


      I ended up leaving out the bacon and adding in a little extra cheese.  Unfortunately I had a slight mishap after putting it in the oven.  Some of the egg leaked over top of the pie crust and went behind it in the pie pan!  I have never had that happen to me before and I was a little upset because I thought the quiche might have been ruined.  I shouldn't have worried because the egg firmed up and even though a small portion was behind the crust, it still tasted great.

      Part of the reason it tasted so good is that we used the eggs from our CSA share and they were amazing.  There's nothing quite like fresh eggs.  The jalapenos in the recipe were definitely spicy but the cream cheese cooled it down while the cheddar cheese really stood out.  My husband and I both really enjoyed our slices and it made for a great summer dinner along with a fresh green salad.

Jalapeno Popper Quiche (adapted from Real Housemoms)
1 Pillsbury refrigerated pie crust
4 oz. Philadelphia 1/3 less fat cream cheese
3 jalapeno peppers, stemmed and seeded
5 large eggs
1 c. low fat milk
1/3 c. shredded gruyere cheese
3 garlic cloves, minced
1 t. salt
1/2 t. black pepper
1 t. paprika
1/2 c. cheddar cheese, shredded

1.  Preheat the oven to 350 degrees.


2.  Place the pie crust in a pie pan and crimp the edges.  Bake for 10 minutes then remove from the oven.

3.  Spread the cream cheese on the bottom of the pie pan.  Slice two of the jalapenos and place them on top of the cream cheese.


4.  In a large bowl beat the eggs.  Add in the milk, gruyere cheese, garlic, salt, pepper, and paprika.  Pour over top of the jalapenos.

5.  Bake for 30 minutes.  Remove the quiche from the oven and sprinkle with cheddar cheese.  Slice the remaining jalapeno and place the slices on top.  Bake for an additional 20-25 minutes or until the cheese is melted and golden.

6.  Remove from the oven and allow to cool for 5 minutes.  Slice and serve hot.


Make sure to check out all of the other delicious #WeekdaySupper meals posted this week:
 Monday – Cravings of a Lunatic - Farmer’s Market Pasta
Tuesday – Basic N Delicious – Salmon Tacos
Wednesday – Noshing With The Nolands – Baked Lemon Sole with Parmesan Crust
Thursday – Shockingly Delicious – Healthier Santa Fe Frito Pie
Friday – Hezzi-D’s Books and Cooks – Jalapeno Popper Quiche
reade more... Résuméabuiyad

Jack Daniels Double Kick Pork Chops


Pork chops are an old family staple, but I hadn't made them on the grill because I didn't want to serve dry pork chops. Who does, right? After figuring out the perfect preparation and cooking method I am happy to tell you that these grilled pork chops are incredibly moist and Chad has declared them his favorite pork chops ever. That is quite an endorsement!

Continue Reading »
reade more... Résuméabuiyad

Wham Bam Thank you Nahm!

Nahm..... the 32nd best restaurant in the world and we were THERE! And it was fabulous - a great culmination of a week of fabulous Thai feasting. Nahm's menu was inspired by David Thompson's studies into old Thai cookbooks. He also produced a cookbook called "Thai Street Food" and we definitely tasted some refined versions of the tasty street vendor fare. How could you choose from a 6 page menu, so we went for the set menu - a selection of canapes for entree, followed by one of each of the soup, salad, stir fry, curry and relish, and then dessert. Our eyes were a bit bigger than our stomachs, but it was delicious. 

Canapes
Our Menu

The canapes arrived at the table to kick the meal off. They were fresh little bites. The smoked fish, peanut and tapioca dumpling reminded us of a dish we'd not been so fond of earlier in the week - this was obviously the right way to cook tapioca! The salted threadfin perch with ginger, chilli and green mango on betel leaves was a flavour combo to be enjoyed in one bite. 

This was so spicy it nearly blew our mouths away, and had us giggling for a while, whilst sipping on our Thai cocktails and beer. We cooled down our mouths with some watermelon and mango dipped in toasted coconut before tackling the prawn and coconut wafers with pickled ginger.

Main
For main, we had the one of all the different sections of the menu:
Salad - Salad of fresh water crayfish with pork and Asian pennywort
Soup - Clear soup of roast duck with Thai basil and young coconut
Relish - Minced prawn and pork simmered in coconut cream with young chillies, red shallots and coriander with fresh vegetables and deep fried cured carp


Curry - Aromatic curry of wagyu beef and sweet potatoes with cucumber relish
Stir Fry - Scallops stir-fried with spring onions and chilli

The wagyu beef curry was definitely the highlight. Melt in your mouth slow cooked falling apart meat infused with delicious spice flavours. The scallops was a close second. Perfectly cooked and tasty!

Dessert
We really didn't need dessert! Sooooo full! But this is what we had 
Lychee in scented syrup with Thai Cup cakes
Sweet Thai wafers with poached persimmons and golden duck egg noodles.

The sweet Thai wafers were definitely an adaption of the street food that we had tried earlier in the week. These wafers though were crispy and creamy and juicy! 

The lychee was cool on our tongues and refreshing. The cup cakes were also a reminder of the markets throughout the week with the surprising (but not as surprising this time) salty, savoury spring onion mixture in the middle of the sweet batter.

32 in the world..... Amazing (but we rekon some Sydney restaurants are better!)


reade more... Résuméabuiyad

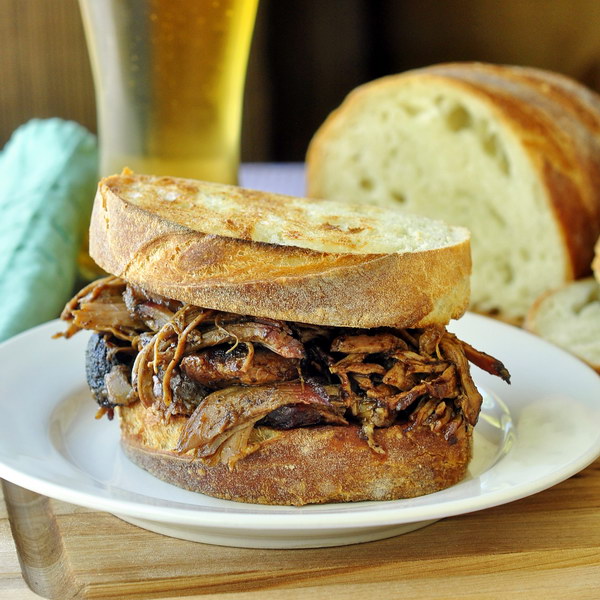
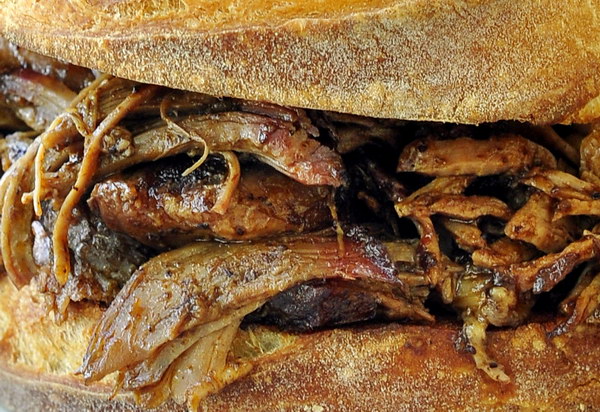
Blueberry Barbeque Pulled Pork

Blueberry Barbeque Pulled Pork
I can't imagine how many times I have tried pulled pork in my travels. It really is one of our family's favorite barbeque foods, especially my son 13 year old Noah who orders it almost every time he sees it on a menu. Last summer we embarked on a southern road trip through some amazing barbeque territory in Tennessee, Louisiana, Alabama, Florida, South Carolina and Georgia. I'm not even going to try and attempt to name my favorite pulled pork destination. They all do it a little differently and they all do it very well.

So, with all that delicious southern pulled pork experience I had to experiment with creating a local twist on the dish, way up here in the great white north. With the recent delicious success of our Blueberry Barbeque Sauce using wild local Newfoundland blueberries, it was, in my mind anyway, a natural marriage of northern and southern flavors and it certainly did not disappoint. My only mistake was not making more at the time because we all wanted even more the next day. I served it on toasted artisan bread from our neighborhood Georgestown Bakery as fantastic sandwiches. Next time I will be serving it with some great cornbread and Bacon and Brown Sugar Baked Beans for another southern feast. Can't wait for that one!

Blueberry Barbeque Pulled Pork
 Begin by dry rubbing a 5 to 6 pound pork shoulder roast with a mixture of
  • 1 tbsp paprika
  • 2 tsp smoked paprika
  • 1 tbsp kosher salt
  • 1 tsp powdered ginger
  • 1 tsp chipotle powder
  • 1 tsp black pepper
  • 1 tsp ground nutmeg
  • 1 tsp ground thyme
  • 2 tsp dry mustard powder
  • 2 tsp garlic powder
  • 1 tbsp onion powder
  • 1/2 tsp ground cumin
  • 1/2tsp cinnamon
Rub all over the surface of the roast, cover and let sit in the refrigerator for several hours or overnight.

There are two ways to approach beginning to cook the pork. A stove top method and a BBQ smoking method. I of course prefer the smoked version but in the winter months, I will be using the stove top method.


STOVE TOP METHOD

Heat 4 tbsp oil in a large heavy bottomed skillet over medium heat and brown the roast lightly  on all sides. Transfer the roast to a covered roasting pan. 


BBQ METHOD

If you are using your gas grill to barbeque, place the meat on one side of the grill and use the burner or burners on the opposite side so that it is not directly over heat. Regulate the gas to keep the temperature at about 250 for slow barbequed flavor. The same technique can also be used with a charcoal grill, just keep the charcoal on one side and the meat on the opposite side.
You can add smoke flavor by soaking hardwood chips like mesquite, apple, cherry or hickory in warm water for about a half hour. A couple of handfuls will do. Wrap the soaked wood chips in a double layer of heavy duty aluminum foil and poke only two holes in the foil, one at either end to allow the smoke to escape. I place the foil packets in a vegetable grill pan so that the packet is not sitting directly on the gas burner. The packet can be directly placed on the coals if you are using a charcoal barbeque. Smoke for only a only an hour or so, you don't want to heavily smoke the pork too much in this particular recipe. After an hour, transfer the roast to a covered roasting pan.


To the roasting pan, along with the roast, add:

  • 1 medium sized onion chopped
  • 4 medium sized firm apples peeled and chunked

Mix together well:
  • 4 cloves minced garlic
  • ½ cup apple cider vinegar
  • ½ cup brown sugar
  • ¼ cup Worcestershire sauce
  • 6 tablespoons hot sauce (adjust to taste)
  • 1 ½ tsp salt
  • 1 tsp freshly ground black pepper
  • 1 1/2 cups apple juice
  • 2 cups Blueberry Barbeque Sauce ( find that recipe by clicking here)
Pour all over the roast, apples and onions in the roasting pan. Cover with aluminum foil then the lid of the roasting pan. Roast in a 300 degree oven for several hours ( approximately 4-5) until the meat is very tender and falling off the bone.
Remove the braising liquid to a saucepan, skim all the excess fat and reduce the liquid if necessary until it slightly thickens. At this point you can puree the sauce with an immersion blender or in a food processor to smooth it out and incorporate the cooked onions and apples. Serve over the pulled pork.
reade more... Résuméabuiyad

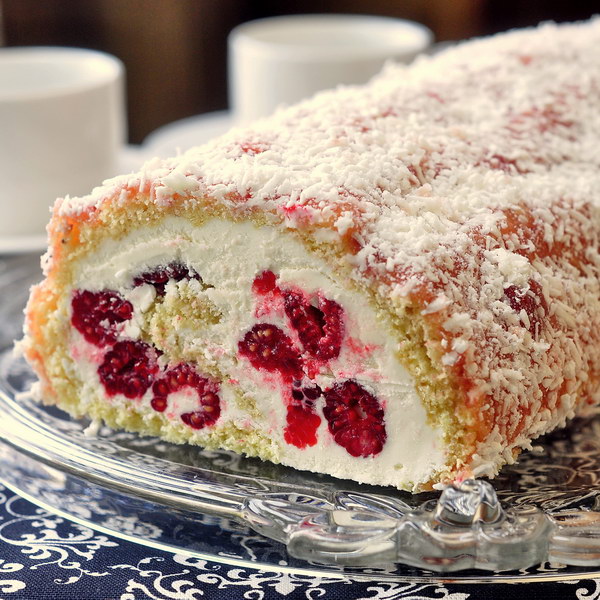
Billot Log Cake a.k.a. Raspberry Buttercream Log

Billot Log Cake a.k.a. Raspberry Buttercream Log
With the Canada Day weekend just a few days away I decided to create a dessert for our nation's 146th birthday based yet again on another popular snack cake from my childhood, Vachon's Billot Log cake, a mini sponge roll cake filled with raspberry jelly and sweet frosting and rolled in coconut. We've previously featured another Vachon inspired cake in our Jos Louis Cake.

The red and white coloring of the little treats is reflective of the Canadian flag, so with some sweet fresh raspberries in the fridge I decided to take inspiration from it and create a homage to the Billot Log cake, in particular for my son Noah who absolutely loves raspberries and specifically asked  for a cake with lots of frosting. He thought this cake was the best thing ever. I know he'll be asking for it again and I wouldn't be surprised if it makes another appearance as his birthday cake later this summer.

Billot Log Cake a.k.a. Raspberry Buttercream Log

For those of you unfamiliar with the Billot Log, I thought this YouTube "un-boxing" of the snack cake was quite amusing.  Happy Canada Day!


Sponge Cake

Line the bottom of a 12 x 18 inch jelly roll pan or ridged cookie sheet with parchment paper cut to it's exact size. Do not grease the pan. Preheat oven to 300 degrees F.


Sift together and set aside:
  • 1 cup flour
  • 1 tsp baking powder
For the meringue base of the batter you will need:
  • 6 eggs separated, room temperature
  • 1/4 tsp cream of tarter
  • 1  cup sugar, separated in 2 portions of  1/2 cup
  • 1 1/2tsp vanilla extract
Beat egg whites and cream of tarter until foamy. Add 1/2 cup sugar gradually until egg whites are stiff.
 
Beat egg yolks and 1/2 cup sugar until foamy and thickened.

 
Fold beaten egg yolks into the beaten egg whites along with the vanilla for only a few turns before slowly and gradually folding in the flour and baking powder mixture very gently BY HAND using a rubber spatula until just incorporated into the meringue mixture. I mix in the dry ingredients in 3 equal portions. Do not over mix, you just want the flour to be incorporated; over mixing will deflate the egg whites and result in a tough textured final product.


Spread the batter evenly into the prepared pan and bake for 25 minutes until the center springs back when touched. 

Cool in the pan for about 15 minutes. Run a sharp knife around the edge of the pan to release the cake. Cover the top of the cake wit h another sheet of parchment paper and invert onto the counter top. Beginning at the shortest side, loosely roll the cake up, letting it rest with the edge seam on the bottom. Let it cool completely. This technique will allow the cake to be more easily rolled later without cracking when the filling is added.

Vanilla Buttercream Frosting

In the bowl of an electric mixer blend together until the butter is well incorporated:
  • 6 cups icing sugar (powdered sugar)
  • 1 1/2 cups butter
Add:
  • Approximately 3-4 tbsp milk
  • 2 tsp vanilla extract
Add the milk a little at a time until the frosting is light, fluffy and smooth. I like to beat the frosting for an additional 5 minutes once I get the consistency correct in order to beat in more air and make it lighter and creamier.

To construct the cake:

Unroll the sponge cake and remove the top parchment paper. Spread the frosting evenly over the cake. Sprinkle the surface of the frosting evenly with:
  • 1 1/2 cups fresh raspberries
Starting at a short side of the cake, begin to roll the cake up, removing the bottom parchment paper as you go. The parchment paper is a great help in rolling the cake.

Let the cake rest on a serving plate with the seam side down. Mix together:

  • 3/4 cup raspberry jam or jelly
  • 2 tbsp water
Heat the jelly and water in the microwave or in a small pot on the stove until it is smooth and evenly blended. Brush the heated jelly all over the surface of the cake roll. Finally sprinkle the entire surface of the cake roll with
  • 3/4 cup sweetened dried coconut
Chill the cake in the refrigerator for a couple of hours before serving. I like to make this cake the day before to give time for the raspberries to meld with the sugar in the frosting making it even better.


reade more... Résuméabuiyad