Pages

The Ottolenghi Cookbook

Sweet potato galette
Mmm... here's a delicious sweet potato galette, from my new favourite cookbook: the Ottolenghi Cookbook.  You may remember my friend Clarice introduced me to this fabulous book in Paris, and after cooking some fantastic recipes together, I just had to buy it for myself.

N.B. This is a photo we took of the book cover itself
Ottolenghi, for those of you who don't know, is a famous cafe / restaurant / bistro with four locations in London (plus a restaurant, Nopi).  The book is written by business partners Sami Tamimi and Yotam Ottolenghi, who both hail from Jerusalem, and their passion for fresh, delicious food is evident on the pages.

Before I even got stuck into cooking the recipes, I knew it was my type of book.  Firstly, they use the soaked-bread-in-water trick that I love for meatballs; they acknowledge that their macarons are imperfect-looking-yet-tasty, and even recommend Ladurée for perfect ones; and finally, their cupcakes are the serious kind - lusciously thick ganaches and mascarpone based icings, none of that nasty crusty hard pink buttercream stuff!  Love!

Clarice described the book as having a similar style to Bill Granger, in that there's a balance between fresh, vibrant healthy savouries, and very decadent desserts.  Of course, they're also both based on well-renowned cafes!  However, I would say Ottolenghi definitely has the edge on Bill.  Even though I'm a fan of Bill, with Ottolenghi there is a level of technical skill and knowledge on the page that just doesn't come through with Bill's books.  Not to imply that Bill himself lacks technical skill, far from it, but just that his recipes seem too simplified to sustain my prolonged interest.

A clear theme I've noticed through the book is unexpected but well thought out flavour combinations and techniques - a sweet potato galette is perked up with raw garlic and chilli; blanched brocolli is given extra smoky depth by being cooked on a char grill, and so on.

I've been cooking heaps from the book, and I haven't come across a single dud recipe yet.  If I were ever to do another Sarah Discovers How to Eat-type project, it would be with this book.  In fact, I'm putting off buying the Yotam's next book (Plenty), because I'm afraid I won't ever leave the kitchen!  Let's have a look at what I've been cooking so far...


Sweet Potato Galettes

I'll start with the sweet potato galettes, as this is my absolute favourite recipe in the book! Since we've come home from Europe, I've made it at least four  times - perfect for relaxed dinners with friends, or an easy yet treaty meal at home.  These days I don't need the recipe anymore, but can simply wing it - yay!  It's just puff pastry, layered up with sour cream, roast slices of sweet potato, goat's cheese, pepitas and chillies.  I always use Carême puff pastry, for super flaky-buttery goodness!


After baking, you brush the tart with a punchy mixture of olive oil, raw garlic and parsley, really lifting what would otherwise be a uniformly sweet-ish tart into something memorable and delicious.


Turkey and Sweetcorn Meatballs with Roasted Pepper Sauce

I must admit I wasn't convinced by the name "turkey meatballs", turkey mince always reminding me of dry, uninspiring diet-foods.  But these were really good!  See the squished bread roll in the mixture? That's what makes the finished meatballs balls (heh) soft and bouncy!  As you can see, there are heaps of herbs and other ingredients to add interest.  The corn kernels are also roasted in a pan before being added to the mixture, giving a nice smoky flavour and tortilla-like aroma.


Ta-dah!

It's a bit of a pain to fry the meatballs and then bake them, but the results are worth it!  The accompanying red pepper sauce (not pictured) is pretty intensely sour, so I like to tone down the vinegar and add a pinch of sugar.  I like these served as a starter, or as a full meal with some rice.


Mixed Mushrooms with Cinnamon and Lemon
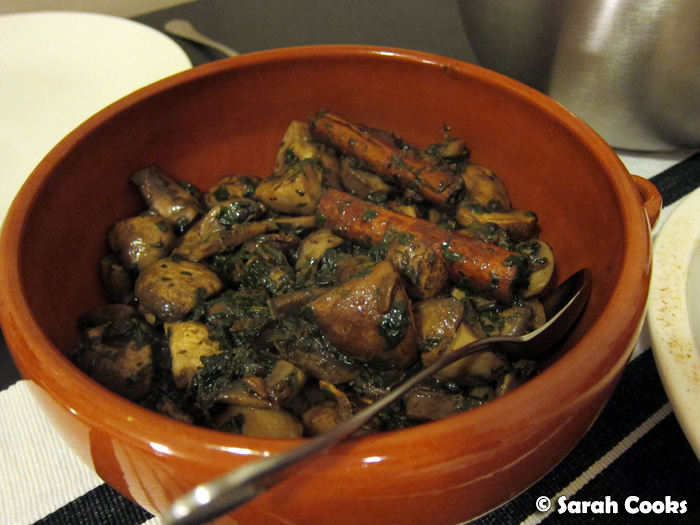

The cinnamon and lemon in this dish differentiates it from your standard garlic-butter mushrooms, and I served these as an accompaniment to barbecued chicken and polenta.  You'll see I just used plain old button mushrooms - if I were to use the suggested mix of button, chestnut, shiitake, oyster and enoki mushrooms, it would have cost me about $25 for the mushies alone!  It still tasted good though.


Brown Rice and Quinoa with Orange and Pistachios
with spicy tomato sauce (from the Kosheri recipe)

This healthy and substantial recipe contains rice and quinoa (obviously), brightened up with a sparkly mixture of dried apricot, spring onions, rocket, pistachios, lemon juice and orange juice.  I think it's meant to be served as a room-temperature salad, but I served it hot for dinner.  The fried egg was my addition - very Asian of me, I know.

The original recipe specifies camargue red rice and quinoa, but I couldn't find red rice, so I substituted brown basmati.  I also made the spicy tomato sauce to go with it as I was worried it might be a little dry - it certainly wasn't dry, but I did love the warming, spicy tomato sauce with the rice and egg.


Marinated Rack of Lamb with Coriander and Honey


This was a very simple recipe for lamb (I clearly used chops instead of a rack), and I thought the pungent herby marinade took the lamb above a standard grilled lamb.  Very nice!


Butternut, Carrot and Goat's Cheese Tartlet

This tart recipe is a bit more involved than the galette above - you start by making a poppyseed shortcrust pastry, and fit it into individual little tins.


There is also a jammy-type relish from grated carrots...

... as well as goat's cheese, a creamy-eggy filling and roasted cubes of butternut pumpkin.  Phew!  Interestingly, the recipe says it will fill six 2x10cm tartlets, which I used, but I had enough mixture to fill those, plus an extra 20cm tart!


I brought these sturdy little babies to a picnic, along with the cucumber and poppyseed salad (another recipe from the book!)  I've made the cucumber salad almost as often as the sweet potato galette - it's definitely a staple in my house now.

They were very tasty, but quite a bit of work - I'd definitely like to make them again, but probably not as frequently as the sweet potato galette.  Perhaps for a future dinner party!


Blueberry Crumble Muffins
 

These are a simple muffin recipe, topped with a generous spoonful of crumble and studded with fresh blueberries.  I added walnuts for extra crunch.  The muffins were great - very tender crumbed and moist.  However, being based purely on white flour and with the crumble topping, they were a little sweet and soft; I think of them as more of an afternoon tea treat than a breakfast item.


Chocolate Fudge Cake

And finally I present the chocolate fudge cake! It's one of those sunken flourless chocolate cakes: rich with melted chocolate and lightened with whipped egg whites.  It's slightly different though, in that you bake two thirds of the mixture first, let it cool, add the remaining mixture and bake it again. This is to give different textures in the cake (although you can bake it all at once if you want!)


When I made it, I was too impatiently greedy to let it cool in between baking and after it was completely cooked, so it was very, very dense and fudgy, almost falling apart when we ate it. Oops!  It still tasted amaaazing though. Next time I'll be more patient and let it firm up completely before digging in. Maybe.


Check out the following for more Ottolenghi goodness: both Laura from Hungry and Frozen and Cindy & Michael from Where's the Beef have been cooking heaps from PlentyKeiko from Nordljus has visited Ottolenghi twice to talk to Yotam in '08 and '10; and Yotam himself has a column in The Guardian.  Enjoy!
Sweet potato galette
Mmm... here's a delicious sweet potato galette, from my new favourite cookbook: the Ottolenghi Cookbook.  You may remember my friend Clarice introduced me to this fabulous book in Paris, and after cooking some fantastic recipes together, I just had to buy it for myself.

N.B. This is a photo we took of the book cover itself
Ottolenghi, for those of you who don't know, is a famous cafe / restaurant / bistro with four locations in London (plus a restaurant, Nopi).  The book is written by business partners Sami Tamimi and Yotam Ottolenghi, who both hail from Jerusalem, and their passion for fresh, delicious food is evident on the pages.

Before I even got stuck into cooking the recipes, I knew it was my type of book.  Firstly, they use the soaked-bread-in-water trick that I love for meatballs; they acknowledge that their macarons are imperfect-looking-yet-tasty, and even recommend Ladurée for perfect ones; and finally, their cupcakes are the serious kind - lusciously thick ganaches and mascarpone based icings, none of that nasty crusty hard pink buttercream stuff!  Love!

Clarice described the book as having a similar style to Bill Granger, in that there's a balance between fresh, vibrant healthy savouries, and very decadent desserts.  Of course, they're also both based on well-renowned cafes!  However, I would say Ottolenghi definitely has the edge on Bill.  Even though I'm a fan of Bill, with Ottolenghi there is a level of technical skill and knowledge on the page that just doesn't come through with Bill's books.  Not to imply that Bill himself lacks technical skill, far from it, but just that his recipes seem too simplified to sustain my prolonged interest.

A clear theme I've noticed through the book is unexpected but well thought out flavour combinations and techniques - a sweet potato galette is perked up with raw garlic and chilli; blanched brocolli is given extra smoky depth by being cooked on a char grill, and so on.

I've been cooking heaps from the book, and I haven't come across a single dud recipe yet.  If I were ever to do another Sarah Discovers How to Eat-type project, it would be with this book.  In fact, I'm putting off buying the Yotam's next book (Plenty), because I'm afraid I won't ever leave the kitchen!  Let's have a look at what I've been cooking so far...


Sweet Potato Galettes

I'll start with the sweet potato galettes, as this is my absolute favourite recipe in the book! Since we've come home from Europe, I've made it at least four  times - perfect for relaxed dinners with friends, or an easy yet treaty meal at home.  These days I don't need the recipe anymore, but can simply wing it - yay!  It's just puff pastry, layered up with sour cream, roast slices of sweet potato, goat's cheese, pepitas and chillies.  I always use Carême puff pastry, for super flaky-buttery goodness!


After baking, you brush the tart with a punchy mixture of olive oil, raw garlic and parsley, really lifting what would otherwise be a uniformly sweet-ish tart into something memorable and delicious.


Turkey and Sweetcorn Meatballs with Roasted Pepper Sauce

I must admit I wasn't convinced by the name "turkey meatballs", turkey mince always reminding me of dry, uninspiring diet-foods.  But these were really good!  See the squished bread roll in the mixture? That's what makes the finished meatballs balls (heh) soft and bouncy!  As you can see, there are heaps of herbs and other ingredients to add interest.  The corn kernels are also roasted in a pan before being added to the mixture, giving a nice smoky flavour and tortilla-like aroma.


Ta-dah!

It's a bit of a pain to fry the meatballs and then bake them, but the results are worth it!  The accompanying red pepper sauce (not pictured) is pretty intensely sour, so I like to tone down the vinegar and add a pinch of sugar.  I like these served as a starter, or as a full meal with some rice.


Mixed Mushrooms with Cinnamon and Lemon


The cinnamon and lemon in this dish differentiates it from your standard garlic-butter mushrooms, and I served these as an accompaniment to barbecued chicken and polenta.  You'll see I just used plain old button mushrooms - if I were to use the suggested mix of button, chestnut, shiitake, oyster and enoki mushrooms, it would have cost me about $25 for the mushies alone!  It still tasted good though.


Brown Rice and Quinoa with Orange and Pistachios
with spicy tomato sauce (from the Kosheri recipe)

This healthy and substantial recipe contains rice and quinoa (obviously), brightened up with a sparkly mixture of dried apricot, spring onions, rocket, pistachios, lemon juice and orange juice.  I think it's meant to be served as a room-temperature salad, but I served it hot for dinner.  The fried egg was my addition - very Asian of me, I know.

The original recipe specifies camargue red rice and quinoa, but I couldn't find red rice, so I substituted brown basmati.  I also made the spicy tomato sauce to go with it as I was worried it might be a little dry - it certainly wasn't dry, but I did love the warming, spicy tomato sauce with the rice and egg.


Marinated Rack of Lamb with Coriander and Honey


This was a very simple recipe for lamb (I clearly used chops instead of a rack), and I thought the pungent herby marinade took the lamb above a standard grilled lamb.  Very nice!


Butternut, Carrot and Goat's Cheese Tartlet

This tart recipe is a bit more involved than the galette above - you start by making a poppyseed shortcrust pastry, and fit it into individual little tins.


There is also a jammy-type relish from grated carrots...

... as well as goat's cheese, a creamy-eggy filling and roasted cubes of butternut pumpkin.  Phew!  Interestingly, the recipe says it will fill six 2x10cm tartlets, which I used, but I had enough mixture to fill those, plus an extra 20cm tart!


I brought these sturdy little babies to a picnic, along with the cucumber and poppyseed salad (another recipe from the book!)  I've made the cucumber salad almost as often as the sweet potato galette - it's definitely a staple in my house now.

They were very tasty, but quite a bit of work - I'd definitely like to make them again, but probably not as frequently as the sweet potato galette.  Perhaps for a future dinner party!


Blueberry Crumble Muffins
 

These are a simple muffin recipe, topped with a generous spoonful of crumble and studded with fresh blueberries.  I added walnuts for extra crunch.  The muffins were great - very tender crumbed and moist.  However, being based purely on white flour and with the crumble topping, they were a little sweet and soft; I think of them as more of an afternoon tea treat than a breakfast item.


Chocolate Fudge Cake

And finally I present the chocolate fudge cake! It's one of those sunken flourless chocolate cakes: rich with melted chocolate and lightened with whipped egg whites.  It's slightly different though, in that you bake two thirds of the mixture first, let it cool, add the remaining mixture and bake it again. This is to give different textures in the cake (although you can bake it all at once if you want!)


When I made it, I was too impatiently greedy to let it cool in between baking and after it was completely cooked, so it was very, very dense and fudgy, almost falling apart when we ate it. Oops!  It still tasted amaaazing though. Next time I'll be more patient and let it firm up completely before digging in. Maybe.


Check out the following for more Ottolenghi goodness: both Laura from Hungry and Frozen and Cindy & Michael from Where's the Beef have been cooking heaps from PlentyKeiko from Nordljus has visited Ottolenghi twice to talk to Yotam in '08 and '10; and Yotam himself has a column in The Guardian.  Enjoy!
reade more... Résuméabuiyad

If Music be the Food of Love...


Chocolate Gunge

...We'd better feed the musicians!

In my offline life I play the violin in the Eastern Sydney Chamber Orchestra. Every concert the orchestra members pitch in a contribution to the afternoon tea for the audience to look forward to during the first half and to keep the sugar rush and adrenalin of the players high to see them through till the end of the concert!

This time I decided to bake an old favourite family recipe originally passed to us from a great family friend. It is a simple but amazing moreish kid friendly snack called Chocolate Gunge! Gooey and chocolatey, it attracted audience and orchestra members young and old!

When I say "recipe" I mean I kinda remember from my childhood what we put in and how we made it, so to help me commit it to memory for next time and to give a quick, easy and cheap ($7.36 for the whole lot) winner dish for the next kids party, or orchestra afternoon tea, I am sharing it here!

Chocolate Gunge

250g butter ($1.55)
395g can of condensed milk - ($1.79)
Cocoa powder (in the pantry)
250g scotch fingers - ($0.95)
250g milk arrowroot - ($1.09)
375g Milk chocolate - ($1.92)


  • Melt butter in a large saucepan. Remove from heat;
  • Add condensed milk and coca powder and stir well;
  • Crush the biscuits with a rolling pin or in a food processor till broken into small (approx 1cm pieces) but not crumbs;
  • Add biscuits to cocoa mixture and mix well;
  • Turn out into a rectangular baking tray;
  • Chill;
  • Meanwhile, melt the milk chocolate in a double boiler - a heat proof bowl sitting on top of a saucepan of water (but not touching the water) on the boil;
  • When biscuits are chilled, pour over the melted chocolate;
  • Spread the chocolate evenly over the biscuit and then make a swirly pattern using a fork;
  • Return to the fridge overnight or till the chocolate is solid;
  • Slice into 2cm square pieces and serve.


Don't expect it to last long!

Chocolate Gunge

...We'd better feed the musicians!

In my offline life I play the violin in the Eastern Sydney Chamber Orchestra. Every concert the orchestra members pitch in a contribution to the afternoon tea for the audience to look forward to during the first half and to keep the sugar rush and adrenalin of the players high to see them through till the end of the concert!

This time I decided to bake an old favourite family recipe originally passed to us from a great family friend. It is a simple but amazing moreish kid friendly snack called Chocolate Gunge! Gooey and chocolatey, it attracted audience and orchestra members young and old!

When I say "recipe" I mean I kinda remember from my childhood what we put in and how we made it, so to help me commit it to memory for next time and to give a quick, easy and cheap ($7.36 for the whole lot) winner dish for the next kids party, or orchestra afternoon tea, I am sharing it here!

Chocolate Gunge

250g butter ($1.55)
395g can of condensed milk - ($1.79)
Cocoa powder (in the pantry)
250g scotch fingers - ($0.95)
250g milk arrowroot - ($1.09)
375g Milk chocolate - ($1.92)


  • Melt butter in a large saucepan. Remove from heat;
  • Add condensed milk and coca powder and stir well;
  • Crush the biscuits with a rolling pin or in a food processor till broken into small (approx 1cm pieces) but not crumbs;
  • Add biscuits to cocoa mixture and mix well;
  • Turn out into a rectangular baking tray;
  • Chill;
  • Meanwhile, melt the milk chocolate in a double boiler - a heat proof bowl sitting on top of a saucepan of water (but not touching the water) on the boil;
  • When biscuits are chilled, pour over the melted chocolate;
  • Spread the chocolate evenly over the biscuit and then make a swirly pattern using a fork;
  • Return to the fridge overnight or till the chocolate is solid;
  • Slice into 2cm square pieces and serve.


Don't expect it to last long!
reade more... Résuméabuiyad

Well, THAT Was Interesting...

So, I participated in my first craft fair on Friday night.  I happily talked and talked...and talked to all the lovely folks who came to the fair.  Handed out my card.  Politely thanked people when they exclaimed how adorable my items were. 

But I only made THREE sales.   And two of them were to family!  {Whom I love, adore and am eternally thankful for their support!}  Disappointed doesn't begin to describe the feeling as I packed everything back up for the night. I don't even want to know how the lady did it - but she got 4 dozen {at least} Angry Birds hats from a manufacturer!  I had the dumb luck of being two tables down from this lady and didn't stand a chance against the cosmic pull of those darn birds. {FYI...I do actually like Angry Bird.}

Luckily...the night wasn't a loss!  I learned a few things:
  • Make an early request to be close to the front door.  That way, people need to walk past you coming and going.
  • This place could have made a killing if they charged the kids each time they participated in the cake walk. {For those of you not "in the know", a cake walk is like musical chairs...but slower and the child in the chosen space when the music stops wins a cake.}
  • Sometimes, you end up next to REALLY "interesting" people.
My vendor space was directly next to a woman selling Lia Sophia.  Great jewelry, and the woman seemed nice enough. And then she started talking...  In the first 90 seconds of our introduction, she tells me that she works as a social worker and asks if I'd like to adopt.  SERIOUSLY!!!!  Five minutes later, she taps my on the shoulder and shares that her undies are too tight!

The vendor on my other side?  Tells me that she'll be at another craft fair tomorrow.  But one where she think she can sell her homemade bongs!

If nothing else... my evening was entertaining!

Oh, and just because I love you all {seriously, I do!}, you get 10% off my Etsy site through Monday night.  Just enter: SANTAPAWS2011 as your coupon code.  :-) 


I love this song!  It's one of my favorite Christmas "silly songs".


So, I participated in my first craft fair on Friday night.  I happily talked and talked...and talked to all the lovely folks who came to the fair.  Handed out my card.  Politely thanked people when they exclaimed how adorable my items were. 

But I only made THREE sales.   And two of them were to family!  {Whom I love, adore and am eternally thankful for their support!}  Disappointed doesn't begin to describe the feeling as I packed everything back up for the night. I don't even want to know how the lady did it - but she got 4 dozen {at least} Angry Birds hats from a manufacturer!  I had the dumb luck of being two tables down from this lady and didn't stand a chance against the cosmic pull of those darn birds. {FYI...I do actually like Angry Bird.}

Luckily...the night wasn't a loss!  I learned a few things:
  • Make an early request to be close to the front door.  That way, people need to walk past you coming and going.
  • This place could have made a killing if they charged the kids each time they participated in the cake walk. {For those of you not "in the know", a cake walk is like musical chairs...but slower and the child in the chosen space when the music stops wins a cake.}
  • Sometimes, you end up next to REALLY "interesting" people.
My vendor space was directly next to a woman selling Lia Sophia.  Great jewelry, and the woman seemed nice enough. And then she started talking...  In the first 90 seconds of our introduction, she tells me that she works as a social worker and asks if I'd like to adopt.  SERIOUSLY!!!!  Five minutes later, she taps my on the shoulder and shares that her undies are too tight!

The vendor on my other side?  Tells me that she'll be at another craft fair tomorrow.  But one where she think she can sell her homemade bongs!

If nothing else... my evening was entertaining!

Oh, and just because I love you all {seriously, I do!}, you get 10% off my Etsy site through Monday night.  Just enter: SANTAPAWS2011 as your coupon code.  :-) 


I love this song!  It's one of my favorite Christmas "silly songs".


reade more... Résuméabuiyad

Craft Fair!

Girls, I'm doing my first craft fair tonight!! I'm excited. And nervous! I have no clue why I'm nervous. I mean, I like everything I've made! I just hope they do too!

Oh...and rumor has it that I *may* share with you all a coupon code this weekend for my Etsy store. Details coming over the weekend!

Also, one my favorite ladies will be guest posting on Monday! Anyone want to guess who it is?!


I fuzzy pink heart Glee!  Blaine and Kurt's performance of Baby, It's Cold Outside is so adorable and innocent.  :-)


Girls, I'm doing my first craft fair tonight!! I'm excited. And nervous! I have no clue why I'm nervous. I mean, I like everything I've made! I just hope they do too!

Oh...and rumor has it that I *may* share with you all a coupon code this weekend for my Etsy store. Details coming over the weekend!

Also, one my favorite ladies will be guest posting on Monday! Anyone want to guess who it is?!


I fuzzy pink heart Glee!  Blaine and Kurt's performance of Baby, It's Cold Outside is so adorable and innocent.  :-)


reade more... Résuméabuiyad

'Tis the Season...

...the season to get engaged!  
You know that along with it being Christmas and all, this is also known as "engagement season."
Now, let me give you (three) guys out there reading a tip.  Engagement rings do not count as a year's worth of presents all in one little black velvet box.  I knew there would be trouble years ago when a friend of mine got engaged and her fiance, who shall remain nameless (Matt), made it clear that this ring was her birthday, Christmas and Valentine gift all rolled into one.  Don't do that.

OK...on to these ring cookies.  These were made for two of kiddo's teachers who have gotten engaged over the last year.  They are the sweetest teachers you could ask for.  You know as a mom, you pray that your kid is blessed with good teachers...teachers who *enjoy* teaching...and *enjoy* KIDS?!?  Well, we lucked out.  And I think their fiances lucked out, too.  We're so, so happy for them.

{I hope they don't mind that I broke out the vintage wedding stuff and had a little photo shoot before boxing them up!}

To make these engagement ring cookies, you'll need:

First, as soon as the cookies comes out of the oven, lightly press a small circle cutter in the center.  This will help with piping the opening of the ring.  You'll see in a second, mine still aren't perfect circles, but it helped!

With a #2 tip, outline the ring in grey icing. (We're trying for a silvery look.)

With a #2 tip, outline the diamond in white icing.  Reserve some of this icing for later.


Thin the white and grey icings with water, a bit at a time, until it is the consistency of thick syrup.  Cover with a damp dish towel and let sit several minutes.

Stir gently with a rubber spatula and transfer icings to squeeze bottles.

Fill in the rings in grey and the diamonds in white.  Use a toothpick to spread to edges and pop large air bubbles.

Wait at least 30 minutes, then use a #2 tip to add the detail on the diamond with the unthinned white icing.

Let dry overnight.

Time to add the bling.  (Do people still say "bling?"  I'm thinking, not.)

Mix some silver luster dust with a few drop of vodka.  Brush on the ring.  Add more vodka as needed to thin the luster dust as it will thicken.

Mix 1/4 tsp. meringue powder with 1/4 tsp. water.  With a small paintbrush, apply to the detail part of the diamond.  Sprinkle on the disco dust, then shake off the excess.  You may want to use a dry paintbrush to help remove the excess.  By no means (no matter how tempted) should you blow on the cookie...you will be wearing disco dust in your eyebrows for a week.
{It's hard to capture *just* how brilliant the disco dust is...this picture is the best, I think.  In real life, when the light catches it just so, it's dazzling.}

So, happy wedding, happy engagement to all of you this "engagement season."  Sending special love and best wishes to kiddo's teachers!  We couldn't be happier for you!!! ♥
...the season to get engaged!  
You know that along with it being Christmas and all, this is also known as "engagement season."
Now, let me give you (three) guys out there reading a tip.  Engagement rings do not count as a year's worth of presents all in one little black velvet box.  I knew there would be trouble years ago when a friend of mine got engaged and her fiance, who shall remain nameless (Matt), made it clear that this ring was her birthday, Christmas and Valentine gift all rolled into one.  Don't do that.

OK...on to these ring cookies.  These were made for two of kiddo's teachers who have gotten engaged over the last year.  They are the sweetest teachers you could ask for.  You know as a mom, you pray that your kid is blessed with good teachers...teachers who *enjoy* teaching...and *enjoy* KIDS?!?  Well, we lucked out.  And I think their fiances lucked out, too.  We're so, so happy for them.

{I hope they don't mind that I broke out the vintage wedding stuff and had a little photo shoot before boxing them up!}

To make these engagement ring cookies, you'll need:

First, as soon as the cookies comes out of the oven, lightly press a small circle cutter in the center.  This will help with piping the opening of the ring.  You'll see in a second, mine still aren't perfect circles, but it helped!

With a #2 tip, outline the ring in grey icing. (We're trying for a silvery look.)

With a #2 tip, outline the diamond in white icing.  Reserve some of this icing for later.


Thin the white and grey icings with water, a bit at a time, until it is the consistency of thick syrup.  Cover with a damp dish towel and let sit several minutes.

Stir gently with a rubber spatula and transfer icings to squeeze bottles.

Fill in the rings in grey and the diamonds in white.  Use a toothpick to spread to edges and pop large air bubbles.

Wait at least 30 minutes, then use a #2 tip to add the detail on the diamond with the unthinned white icing.

Let dry overnight.

Time to add the bling.  (Do people still say "bling?"  I'm thinking, not.)

Mix some silver luster dust with a few drop of vodka.  Brush on the ring.  Add more vodka as needed to thin the luster dust as it will thicken.

Mix 1/4 tsp. meringue powder with 1/4 tsp. water.  With a small paintbrush, apply to the detail part of the diamond.  Sprinkle on the disco dust, then shake off the excess.  You may want to use a dry paintbrush to help remove the excess.  By no means (no matter how tempted) should you blow on the cookie...you will be wearing disco dust in your eyebrows for a week.
{It's hard to capture *just* how brilliant the disco dust is...this picture is the best, I think.  In real life, when the light catches it just so, it's dazzling.}

So, happy wedding, happy engagement to all of you this "engagement season."  Sending special love and best wishes to kiddo's teachers!  We couldn't be happier for you!!! ♥
reade more... Résuméabuiyad

Key lime cheesecake

My hard-working husband enjoyed a successful year in his job and found out that he had earned an all-expenses paid trip from his company! We got to choose between 3 or 4 cities to visit, and while we really wanted to go to San Diego (since neither of us has been), we thought it would be easier to stick closer to home this time around. After all, we'd be bringing our daughter, and with the travel and recent Daylight Savings time change, we wanted to keep things simple. So we opted to go to Miami, Florida.

One of the restaurants we'd been dying to try is Joe's Stone Crab.  They have been featured on countless food and travel channel programs for their stone crabs. During one travel program, the host ordered stone crabs and had a slice of key lime pie for dessert. It sounded amazing, so we did the same.

And my, oh my! That key lime pie was like a slice of heaven! I'm not usually a fan of tart desserts, but this was an exception. The tartness from the citrus was offset by the sweetness in the graham cracker crust. I wanted to make something to remind us of the time we spent in Miami, so I made a key lime cheesecake. My coworkers loved this cheesecake, so my ode to Miami was a success!

Ingredients
  • 1 1/2 cups graham cracker crumbs
  • 6 tablespoons butter, melted
  • 24 ounces cream cheese, softened
  • 1 cup white sugar
  • 1 tablespoon cornstarch
  • 3 eggs
  • 1 tablespoon grated lime zest (I did not include)
  • 2/3 cup key lime juice (I read the user reviews and only used 1/2 cup to cut down on the tartness)
Directions
Combine cookie or graham cracker crumbs with butter or margarine. Press into bottom and partially up sides of 9 inch springform pan. Refrigerate. (I did not refrigerate)

In a large bowl, beat with an electric mixer the cream cheese, sugar, lime peel, and cornstarch until smooth and fluffy. Beat in eggs one at a time, blending just until smooth. Add key lime juice with mixer on low. Finish mixing by hand. Do not overbeat, or cake will crack during baking. Pour batter into prepared crust.

Bake at 300 degrees F (150 degrees C) for 55 to 65 minutes, or until set. To minimize cracking, place a shallow pan half full of hot water on lower rack during baking. I skipped this step, and my cheesecake did not crack.

Turn oven off, and let cheesecake stand in oven 30 minutes with the door open at least 4 inches. Remove from oven. Refrigerate cake overnight, and up to three days. 

Source: slightly adapted from Allrecipes.com
My hard-working husband enjoyed a successful year in his job and found out that he had earned an all-expenses paid trip from his company! We got to choose between 3 or 4 cities to visit, and while we really wanted to go to San Diego (since neither of us has been), we thought it would be easier to stick closer to home this time around. After all, we'd be bringing our daughter, and with the travel and recent Daylight Savings time change, we wanted to keep things simple. So we opted to go to Miami, Florida.

One of the restaurants we'd been dying to try is Joe's Stone Crab.  They have been featured on countless food and travel channel programs for their stone crabs. During one travel program, the host ordered stone crabs and had a slice of key lime pie for dessert. It sounded amazing, so we did the same.

And my, oh my! That key lime pie was like a slice of heaven! I'm not usually a fan of tart desserts, but this was an exception. The tartness from the citrus was offset by the sweetness in the graham cracker crust. I wanted to make something to remind us of the time we spent in Miami, so I made a key lime cheesecake. My coworkers loved this cheesecake, so my ode to Miami was a success!

Ingredients
  • 1 1/2 cups graham cracker crumbs
  • 6 tablespoons butter, melted
  • 24 ounces cream cheese, softened
  • 1 cup white sugar
  • 1 tablespoon cornstarch
  • 3 eggs
  • 1 tablespoon grated lime zest (I did not include)
  • 2/3 cup key lime juice (I read the user reviews and only used 1/2 cup to cut down on the tartness)
Directions
Combine cookie or graham cracker crumbs with butter or margarine. Press into bottom and partially up sides of 9 inch springform pan. Refrigerate. (I did not refrigerate)

In a large bowl, beat with an electric mixer the cream cheese, sugar, lime peel, and cornstarch until smooth and fluffy. Beat in eggs one at a time, blending just until smooth. Add key lime juice with mixer on low. Finish mixing by hand. Do not overbeat, or cake will crack during baking. Pour batter into prepared crust.

Bake at 300 degrees F (150 degrees C) for 55 to 65 minutes, or until set. To minimize cracking, place a shallow pan half full of hot water on lower rack during baking. I skipped this step, and my cheesecake did not crack.

Turn oven off, and let cheesecake stand in oven 30 minutes with the door open at least 4 inches. Remove from oven. Refrigerate cake overnight, and up to three days. 

Source: slightly adapted from Allrecipes.com
reade more... Résuméabuiyad

Twenty Five Days of CHRISTMAS MUSIC!!!!

Happy December!!!  I'm kicking it off right - with the first day of Christmas music.  Some days the video will just be at the bottom of a regular post.  Some days I'll be really lazy and just post the video. {What?  I'm being honest here!}

And...if you have suggestions, I'm all ears!

I love me some Muppets, so we're starting with their version of "The Most Wonderful Time of The Year". Muppets + Christmas music = AWESOMENESS!


Happy December!!!  I'm kicking it off right - with the first day of Christmas music.  Some days the video will just be at the bottom of a regular post.  Some days I'll be really lazy and just post the video. {What?  I'm being honest here!}

And...if you have suggestions, I'm all ears!

I love me some Muppets, so we're starting with their version of "The Most Wonderful Time of The Year". Muppets + Christmas music = AWESOMENESS!


reade more... Résuméabuiyad