Pages

Cranberry White Chocolate Magic Bars

Cranberry White Chocolate Magic Bars
Magic bars are one of the most popular Holiday baking recipes out there. I remember making them even as a very young child. Its popularity owes much to its ease of preparation which essentially just layers the ingredients before baking.This is a baking recipe even for those who do not bake.

I've seen many variations of this recipe over the years using different nuts and dried fruits too but I really like the contrast of the tart cranberries with the sweet white chocolate...and it looks a bit more festive too.


Cranberry White Chocolate Magic Bars

Recipe by Barry C. Parsons
Cranberry White Chocolate Magic Bars - a differently delicious take on one of the easiest and quickest bar cookies ever invented. The tart pop of the cranberries works well with the sweet white chocolate and the crunch of the toasty almonds. A perfect Holiday baking recipe.

Prep time: 10 minutes
Cook time: 50 minutes
Total time: 1 hour
Yield: 24 cookie bars

Ingredients
  • 2 cups graham cracker crumbs
  • 3 tbsp white sugar
  • 1/2 cup melted butter
  • 1 1/4 cups white chocolate chips
  • 1 1/2 cups fresh cranberries
  • 1 3/4 cups (14 oz can) sweetened condensed milk
  • 2 cups roughly chopped almonds
Directions
  1. First choose the size of pan you prefer. The bars in the photo are baked in a 9x9 pan because I like them thicker but if you prefer these can be baked in a 9x13 pan for thinner bars. Lightly grease the pan and line it with parchment paper.
  2. Mix together the graham crumbs, sugar and butter and press firmly into the bottom of the prepared pan.
  3. Sprinkle the white chocolate chips evenly over the base.
  4. Sprinkle the cranberries evenly over the chocolate chips.
  5. Pour the sweetened condensed milk over the cranberries and white chocolate.
  6. Finally sprinkle on the nuts and press down lightly.
  7. The 9x9 pan will bake for 45-50 minutes and the 9x13 pan for 30-35 minutes at 350 degrees F.
  8. Cool completely in the pan before cutting in bars or squares.
  9. These freeze exceptionally well when stored in airtight containers.
Cranberry White Chocolate Magic Bars
Magic bars are one of the most popular Holiday baking recipes out there. I remember making them even as a very young child. Its popularity owes much to its ease of preparation which essentially just layers the ingredients before baking.This is a baking recipe even for those who do not bake.

I've seen many variations of this recipe over the years using different nuts and dried fruits too but I really like the contrast of the tart cranberries with the sweet white chocolate...and it looks a bit more festive too.


Cranberry White Chocolate Magic Bars

Recipe by Barry C. Parsons
Cranberry White Chocolate Magic Bars - a differently delicious take on one of the easiest and quickest bar cookies ever invented. The tart pop of the cranberries works well with the sweet white chocolate and the crunch of the toasty almonds. A perfect Holiday baking recipe.

Prep time: 10 minutes
Cook time: 50 minutes
Total time: 1 hour
Yield: 24 cookie bars

Ingredients
  • 2 cups graham cracker crumbs
  • 3 tbsp white sugar
  • 1/2 cup melted butter
  • 1 1/4 cups white chocolate chips
  • 1 1/2 cups fresh cranberries
  • 1 3/4 cups (14 oz can) sweetened condensed milk
  • 2 cups roughly chopped almonds
Directions
  1. First choose the size of pan you prefer. The bars in the photo are baked in a 9x9 pan because I like them thicker but if you prefer these can be baked in a 9x13 pan for thinner bars. Lightly grease the pan and line it with parchment paper.
  2. Mix together the graham crumbs, sugar and butter and press firmly into the bottom of the prepared pan.
  3. Sprinkle the white chocolate chips evenly over the base.
  4. Sprinkle the cranberries evenly over the chocolate chips.
  5. Pour the sweetened condensed milk over the cranberries and white chocolate.
  6. Finally sprinkle on the nuts and press down lightly.
  7. The 9x9 pan will bake for 45-50 minutes and the 9x13 pan for 30-35 minutes at 350 degrees F.
  8. Cool completely in the pan before cutting in bars or squares.
  9. These freeze exceptionally well when stored in airtight containers.
reade more... Résuméabuiyad

The Dead of Winter by Lee Enderlin

College student Christy Brewer lives in a personal hell at home with an increasingly unreasonable and violent father while balancing school and a love life. Meanwhile, over a hundred miles away, in a small ski resort town, Police Chief Wayne Marski is suddenly dealing with local people who are being dispatched in a particularly grisly manner. Worse, the few clues indicate that he is dealing with some sort of animal--or a human adversary.

Which is it?

Their stories coincide in a suspenseful and action-filled climax as a centuries-old curse comes home.  (-synopsis)


This novel parallels the lives of people in  two different towns and in two different time periods.  Christy has a scare in high school when her father has a heart attack.  Her mother, a nurse, is able to use CPR to bring him back but once he's back he is never the same.  He's angry, he's hateful, and he's becoming violent. 

Fast foward four years and Christy is working at her summer job before the start of her senior year.  She meets Todd and the two become close.  When Christy goes back to school she wants to come home to see Todd but she doesn't want to be in her house.  Her father has become increasingly mean to both her and her mother.  Then she and Todd have a fight.  Christy and her mother decide the safest place to go for Christmas is their ski condo in New York. 

Wayne Marski is the sole police office for 4 small towns in New York.  He finally gets a partner when things start to go wrong.  Bodies start turning up half eaten by something that isn't quite animal.  Then his partner turns up murdered in the same grisly way.  As the holidays draw closer Wayne isn't sure he can keep the town safe.  


Back in the 1700's White Moon and her tribe were hunting for food in the time of famine.  While the men are out hunting the beardfaces come and slaughter everyone in the tribe except White Moon.  She receives a bullet wound in her arm but manages to survive.  She spends many nights trying to keep herself alive with no food or help in sight.  When she begins to get dizzy with hunger she does the only thing she can; she starts to eat one of the women killed in her tribe.  The next day the men of her tribe return and find out she is a windingo and bury her alive to save her soul.


But now White Moon is back in spirit...and she's hunting the beardfaces one at a time.  With the New Year coming Wayne, Christy, her dad, Todd, and White Moon will meet in a horrific bloodbath that will leave everyone changed forever.

This story had a lot of background to it.  There were a lot of characters that were at times hard to keep track of.  I had a difficult time with the Indian spirit eating the present day humans.  It was creepy but it was also bizarre. 

The novel was well written and had several good story lines besides White Moon coming back for revenge.  The characters are well developed and the story had me peering over my shoulder while I was reading.  The evil lurking at Saugill Mountain was enough to scare anyone!

I give this book 3 out of 5 stars.  


reade more... Résuméabuiyad

Crafting the Perfect Christmas Party


The Christmas season is the best time of year and our annual holiday party is my absolute favorite party! Simplifying a Christmas party makes it so much more fun for you and your guests. We are so excited to be partnering with Smirnoff to help you craft your holiday party.

I always start party planning by choosing a theme. It can be a simple choice of colors or you can go all out and create a Winter Wonderland Celebration. I like simple. Old world colors of deep reds and golds make me happy. I will send out an invitation that reflects that theme. My invitations will include a lovely image on the front cover and You Are Invited: Our Annual Christmas Party. I actually used to mail out our invites, but in the last few years I have started using online invites and I like it so much more. Simple.


The details for the party are inside the invite. We are serving appetizers, desserts and cocktails. Therefore the party will start a little later than an actual dinner party. Our party starts at 7:30pm. The perfect time. I also let our guests know that it will be appetizers, desserts and cocktails. Lastly I will tell them what the appropriate attire is and to bring a gift to exchange if they would like to participate and the value of the gift.

Menu planning is next.


Continue Reading »
reade more... Résuméabuiyad

Caramel Stuffed Brown Butter Cookies

Caramel Stuffed Brown Butter Cookies
I love brown butter. It is one of those wonderful processes where a simple ingredient transforms into something just that more flavorful and special. I've used it in everything from frosting to Hollandaise sauce but I recently decided that it would be a terrific thing to use in baking to add extra hints of caramel. When I wanted to make a caramel candy stuffed cookie, what could be a better opportunity to try an experiment.

I can tell you that the result was spectacular. When spouse and the kids bit into them, warm from the oven, I thought their eyes would pop out of their heads. These are seriously delicious and an absolute must try. I'm off now, before the kids get home from school, to hide a couple for late night snack. Don't judge! ...I'll bet you'll be hoarding a few for yourself too.

Caramel Stuffed Brown Butter Cookies
Recipe by Barry C. Parsons
Caramel Stuffed Brown Butter Cookies - so simple and so simply delicious. Soft and chewy with triple the caramel flavor from brown butter, brown sugar and soft caramel candy stuffed into the center of the cookies. Absolutely irresistible!

Prep time: 30 minutes
Cook time: 15 minutes
Total time: 45 minutes
Yield: 18-20 cookies

Ingredients
  • 2/3 cup brown butter
  • 1 1/3 cups brown sugar
  • 1 extra large egg
  • 2 tsp vanilla extract
  • 2 cups sifted all purpose flour
  • 3/4 tsp baking soda
  • 18 -20 Kraft Caramel Candies
Directions
  1. You will need to make the brown butter in advance and let it cool completely. To brown butter, just melt about 1 cup of butter in a small saucepan over medium heat and watch it carefully until the color turns light golden brown. Pour it off immediately into a heat proof measuring cup, leaving the sediment behind. Allow the brown butter to cool to room temperature and solidify. Use 2/3 cup of the browned butter.
  2. Cream the brown butter with the brown sugar and vanilla extract until light and fluffy.
  3. Add the egg and beat well for 2-3 minutes.
  4. Sift together the flour and baking soda.
  5. Fold into the creamed mixture until all the flour is incorporated and a soft dough forms.
  6. Cover or wrap the dough and chill for at least 30-60 minutes.
  7. The caramel candy works best in these cookies if they are pounded to about half their original thickness. You can pond them with a flat meat mallet, a marble rolling pin or just press them hard with a wooden spoon; whatever works.
  8. Preheat oven to 350 degrees F.
  9. Roll the dough into 1 1/2 inch balls. I used 1 1/2 ounces of dough per cookie or about 43-45 grams.
  10. Push a flattened caramel candy right into the center of the dough ball, pushing and pressing the dough completely around the candy and pinching together well to seal.
  11. Flatten slightly with the palm of your hand to form into thick disks.
  12. Place the prepared dough disks onto a parchment lined baking sheet about 2 inches apart.
  13. Bake for 15-17 minutes or until they just start to turn brown at the bottom edges.
  14. Let them cool on the baking pan for 5 minutes before transferring to a wire rack to cool completely.
  15. Store in airtight containers. the cookies also freeze well.
  16. These are best served warm from the oven but 10-20 seconds in the microwave before serving will also soften the caramel and give them that gooey, fresh from the oven taste and texture.
Caramel Stuffed Brown Butter Cookies
I love brown butter. It is one of those wonderful processes where a simple ingredient transforms into something just that more flavorful and special. I've used it in everything from frosting to Hollandaise sauce but I recently decided that it would be a terrific thing to use in baking to add extra hints of caramel. When I wanted to make a caramel candy stuffed cookie, what could be a better opportunity to try an experiment.

I can tell you that the result was spectacular. When spouse and the kids bit into them, warm from the oven, I thought their eyes would pop out of their heads. These are seriously delicious and an absolute must try. I'm off now, before the kids get home from school, to hide a couple for late night snack. Don't judge! ...I'll bet you'll be hoarding a few for yourself too.

Caramel Stuffed Brown Butter Cookies
Recipe by Barry C. Parsons
Caramel Stuffed Brown Butter Cookies - so simple and so simply delicious. Soft and chewy with triple the caramel flavor from brown butter, brown sugar and soft caramel candy stuffed into the center of the cookies. Absolutely irresistible!

Prep time: 30 minutes
Cook time: 15 minutes
Total time: 45 minutes
Yield: 18-20 cookies

Ingredients
  • 2/3 cup brown butter
  • 1 1/3 cups brown sugar
  • 1 extra large egg
  • 2 tsp vanilla extract
  • 2 cups sifted all purpose flour
  • 3/4 tsp baking soda
  • 18 -20 Kraft Caramel Candies
Directions
  1. You will need to make the brown butter in advance and let it cool completely. To brown butter, just melt about 1 cup of butter in a small saucepan over medium heat and watch it carefully until the color turns light golden brown. Pour it off immediately into a heat proof measuring cup, leaving the sediment behind. Allow the brown butter to cool to room temperature and solidify. Use 2/3 cup of the browned butter.
  2. Cream the brown butter with the brown sugar and vanilla extract until light and fluffy.
  3. Add the egg and beat well for 2-3 minutes.
  4. Sift together the flour and baking soda.
  5. Fold into the creamed mixture until all the flour is incorporated and a soft dough forms.
  6. Cover or wrap the dough and chill for at least 30-60 minutes.
  7. The caramel candy works best in these cookies if they are pounded to about half their original thickness. You can pond them with a flat meat mallet, a marble rolling pin or just press them hard with a wooden spoon; whatever works.
  8. Preheat oven to 350 degrees F.
  9. Roll the dough into 1 1/2 inch balls. I used 1 1/2 ounces of dough per cookie or about 43-45 grams.
  10. Push a flattened caramel candy right into the center of the dough ball, pushing and pressing the dough completely around the candy and pinching together well to seal.
  11. Flatten slightly with the palm of your hand to form into thick disks.
  12. Place the prepared dough disks onto a parchment lined baking sheet about 2 inches apart.
  13. Bake for 15-17 minutes or until they just start to turn brown at the bottom edges.
  14. Let them cool on the baking pan for 5 minutes before transferring to a wire rack to cool completely.
  15. Store in airtight containers. the cookies also freeze well.
  16. These are best served warm from the oven but 10-20 seconds in the microwave before serving will also soften the caramel and give them that gooey, fresh from the oven taste and texture.
reade more... Résuméabuiyad

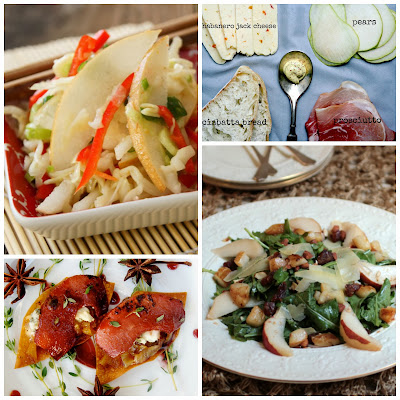
Pear Palooza! 30+ Sweet and Savory Pear Recipes


     Pears were never one of my favorite fruits.  I thought they were boring and didn't have much flavor.  Turns out that's because I only ever had the plain green pears.  Years later I began eating different variety of pears and started to enjoy them more then ever.  I finally made a pear butter that was out of this world and I've been hooked on pears ever since.

     Since pears are usually considered a fall to winter fruit, I thought this would be the perfect time to share some sweet and savory pear recipes from some seriously talented food bloggers!

Sweet Pear Recipes:

1.  Pear Almond Graham Cracker Tart from Vintage Kitchen Notes
2.  Pear and Ginger Bites 
3.  Salted Caramel Pears from 52 Kitchen Adventures 
4.  Mini Pear Walnut Crisps with Blood Orange Caramel Sauce from Chocolate Moosey
5.  Honey Glazed Baked Korean Pears in Wonton Crisps from Cooking on the Weekends
6.  Spiced Pear Bread Pudding from Snappy Gourmet 
7.  Baked Pear Vanilla French Toast from Taste and Tell
8.  Pear Bourbon Clafoutis from Eat the Love 

9.  Apple Pear Crumble from Because I Like Chocolate 
10.  Slow Cooker Spiced Pear Butter from Frugal Foodie Mama 
11.  Oatmeal Cookie Pear Bars
12.  Pear and Almond Tart from Karen's Kitchen Stories
13.  Pear and Cranberry Cornmeal Cake from Ricki Heller
14.  Pear Butter
15. Vanilla Roasted Pears from An Edible Mosaic
16. Pear, Apple, and Pistachio Crumble from Cravings of a Lunatic
17.  Port Wine Mascarpone Pear Tart from
18.  Spiced Pear Ginger Scones
19.  Brown Butter Pear Cake from Crumb 
20. Southern Comfort Pear Almond Frangipane Pie from Eat the Love
21. Autumn Poached Pears from The Little Ferraro Kitchen
22. Pear Walnut Crisp from The Kitchen is My Playground
23. Winter Fruit Crisp from Keep It Sweet Desserts
24. Pear Pecan Upside Down Cake from Vintage Kitchen Notes
25. Red Wine Poached Pear Rustic Tart from Eat the Love

Savory Pear Recipes: 


27. Asian-Style Slaw with Korean Pears from Cooking on the Weekends
28.  Caramelized Onion Cabrales Pear Crisp from Cooking on the Weekends

30.  Pomegranate, Pear, and Gorgonzola Salad from What Jew Wanna Eat
32.  Fennel & Pear Crostini from The Hungry Goddess
 
reade more... Résuméabuiyad

Skating Fridays

My skating journey

Many people have asked how I got into figure skating or how long I have been skating. I figures that it would be fun to tell you all my skating story and what got me started.

In fourth grade, one of my classmates had a birthday party at an ice rink. I distinctly remember being very proud I myself for only falling 5 times that day. After that, I asked my mom to enroll me in lessons.

I participated in a Learn to Skate program on Saturday mornings that was organized in the ISI system. We also did ice dance. I passed through ISI freestyle 4 and ice dance 3 before I went to high school. At that point I had to make a decision since band conflicted with skating. I chose to stick with flute and postpone skating. In college, I did not have a car so I didn't get to skate then.

After college graduation, I picked up skating again but only sporadically. I was involved in some team sports at work so I only skated in the winter. One of the coaches at the rink made fun of me for this but thought I showed promise. He asked me to take lessons with him.

Several years later, I agreed and also skated year round. That is when I got serious. I didn't start testing until fairly recently since I had no desire to compete (I was a competitive gymnast back in the day and did not miss the competition aspect at all).

And here I am today. You can find me at the rink about 3 times a week. I take one half hour lesson each week and mostly focus on freestyle.

I hope to keep skating as long as possible. Hopefully that will be when I am well into my 80s or 90s!

Photobucket
reade more... Résuméabuiyad

Latke Party!

Latkes with apple sauce and creme fraiche

Hey hey! Happy Hanukkah everyone! I must admit this year it totally snuck up on me - it's already the third day of Hanukkah! Normally I'm totally on top of the major Jewish holidays, remembering to SMS my Jewish friends Chag Sameach during Passover or L'Shanah Tovah on Rosh Hashanah. But this year, I only realised it was Hanukkah yesterday when I saw loads of tweets saying "Happy Thanksgivukkah" and posts on Facebook about latkes. Whoops! It reminded me that I had these photos of latkes sitting in my drafts folder, and what better time to share them?

As you may already know, Hanukkah is the Jewish Festival of Lights, which, just quietly, I first learnt about from watching The Nanny as a kid, haha! (Don't judge me!) From a purely culinary perspective, it is celebrated by eating fried food like latkes, fritters and sufganiyot (donuts). My hero, Nigella Lawson, describes the festival as a "divine ordinance to eat fried food" - one of the many reasons I think she is The Best.

Today at work, a coworker of mine brought in sufganiyot to share - there were salted caramel, chocolate and jam ones. I went traditional and chose a jam one. Super yum!

Sufganiyot

But back to the topic at hand - latkes! Last year during Hanukkah, my friend Jess invited us over for a little latke party! We sat around, gossipping and grating potatoes...

Grating potatoes

... squeezing out the excess water, and mixing the little potato shards with flour, egg and some salt.

Latke mixture

We then fried tablespoons of the mixture in hot oil until cooked through and crispy.

Latkes frying

These were so good! This is Jess' mum's "recipe", but really she just makes it by eye, adding enough flour and egg until it looks right. I like them better than Nigella's latkes (from How to Eat) which have onion in them and I find a little strongly flavoured. I much prefer these plain ones - just potato, bound with egg and flour. We had them with creme fraiche and apple sauce, but I think they'd be good with cream cheese and smoked salmon too!

Latkes

We decided to make dessert latkes too - one type of latke is a meal, two types of latke is a party - using this recipe for apple latkes from Smitten Kitchen. (We eschewed the apple caramel sauce in the recipe, and just had them with creme fraiche and sugar).
Grated apple

Apple latke mixture

Apple latkes frying

Apple latkes
They were, unsurprisingly, less crisp than the potato latkes, but wonderfully juicy and sweet - almost like fried apple sauce. They were pretty much all apple, with only a tiny amount of flour and eggs to hold them together. Love!

Apple latkes with creme fraiche

Apple latkes

Jess and I have been friends for almost nine years now, and as we sat down to eat these crisp fried little patties of deliciousness, we wondered why we waited so long to start this tradition. Obviously, we are frantically trying to schedule another latke party to celebrate this year's Hanukkah!

And remember, Hanukkah goes for eight days, so there's a good week left to make latkes! (Not that you need an excuse). Enjoy!
reade more... Résuméabuiyad

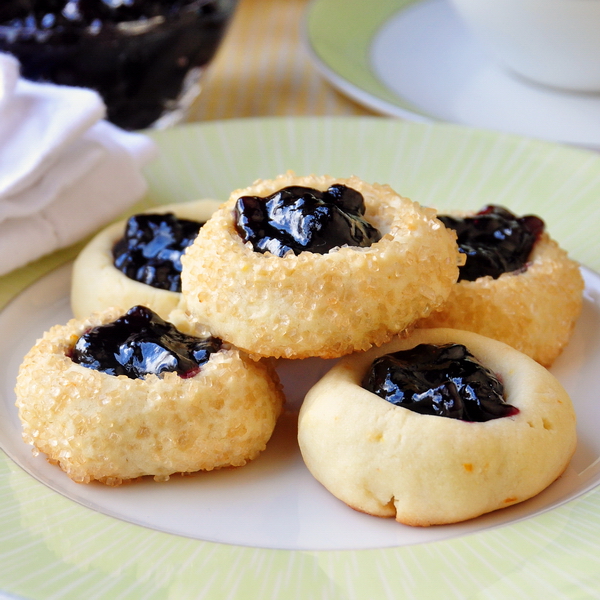
Lemon Blueberry Thumbprint Cookies

Lemon Blueberry Thumbprint Cookies
Lemon and blueberry have made many a duet appearance here on Rock Recipes; our Lemon Blueberry Cream Cake has been a particularly popular example. Today we have a recipe for one the lemon and blueberry lovers in a delicious and very pretty little cookie.

These are baked in two stages, the first stage to almost completely bake the cookie and the second, for just a few minutes after you add the jam to help set in and make it adhere in the little well at the center of the cookie. The turbinado sugar on the outside of the cookies is optional but I think it  does make them look more appealing. I usually split the batch and roll half the cookies in the sugar so that folks have a choice and I think the slightly look great together on the plate too.


Lemon Blueberry Thumbprint Cookies

Recipe by Barry C. Parsons
Lemon Blueberry Thumbprint Cookies - very pretty little lemon cookies filled with blueberry jam. A perfect cookie flavor combination.

Prep time: 15 minutes
Cook time: 25 minutes
Total time: 40 minutes
Yield: 3 1/2 dozen cookies.

Ingredients
  • 1 cup butter
  • 1/2 cup white sugar
  • 2 large egg yolks
  • zest of 2 small lemons, finely minced
  • 1 tsp lemon extract
  • pinch salt
  • 2 1/2 cups flour
  • 1 cup blueberry jam
  • 1/2 cup turbinado sugar (optional)
Directions
  1. Cream the butter and sugar well.
  2. Beat in the egg yolks and lemon extract.
  3. Stir in the lemon zest.
  4. Fold in the flour and salt until fully incorporated and a soft dough forms.
  5. Wrap the dough in plastic wrap and chill for about an hour.
  6. Preheat the oven to 350 degrees F.
  7. Roll the dough into 1 inch balls and roll the balls in coarse sugar. I like turbinado. (this is an optional step)
  8. Place the dough balls on a parchment paper lined baking sheets, about 2 inches apart.
  9. Using your finger or the handle of a wooden spoon make a deep indentation in the center of each dough ball.
  10. Bake for 16-18 minutes until they start to appear golden at the bottom edges.
  11. Remove from the oven and spoon blueberry jam into the centers to fill the little wells.
  12. Return the cookies to the oven for 3-4 minutes.
  13. Transfer the cookies to a wire rack to cool completely. Store in airtight containers.
  14. These will freeze well in a single layer in a plastic container. 
Lemon Blueberry Thumbprint Cookies

    Lemon Blueberry Thumbprint Cookies
    Lemon Blueberry Thumbprint Cookies
    Lemon and blueberry have made many a duet appearance here on Rock Recipes; our Lemon Blueberry Cream Cake has been a particularly popular example. Today we have a recipe for one the lemon and blueberry lovers in a delicious and very pretty little cookie.

    These are baked in two stages, the first stage to almost completely bake the cookie and the second, for just a few minutes after you add the jam to help set in and make it adhere in the little well at the center of the cookie. The turbinado sugar on the outside of the cookies is optional but I think it  does make them look more appealing. I usually split the batch and roll half the cookies in the sugar so that folks have a choice and I think the slightly look great together on the plate too.


    Lemon Blueberry Thumbprint Cookies

    Recipe by Barry C. Parsons
    Lemon Blueberry Thumbprint Cookies - very pretty little lemon cookies filled with blueberry jam. A perfect cookie flavor combination.

    Prep time: 15 minutes
    Cook time: 25 minutes
    Total time: 40 minutes
    Yield: 3 1/2 dozen cookies.

    Ingredients
    • 1 cup butter
    • 1/2 cup white sugar
    • 2 large egg yolks
    • zest of 2 small lemons, finely minced
    • 1 tsp lemon extract
    • pinch salt
    • 2 1/2 cups flour
    • 1 cup blueberry jam
    • 1/2 cup turbinado sugar (optional)
    Directions
    1. Cream the butter and sugar well.
    2. Beat in the egg yolks and lemon extract.
    3. Stir in the lemon zest.
    4. Fold in the flour and salt until fully incorporated and a soft dough forms.
    5. Wrap the dough in plastic wrap and chill for about an hour.
    6. Preheat the oven to 350 degrees F.
    7. Roll the dough into 1 inch balls and roll the balls in coarse sugar. I like turbinado. (this is an optional step)
    8. Place the dough balls on a parchment paper lined baking sheets, about 2 inches apart.
    9. Using your finger or the handle of a wooden spoon make a deep indentation in the center of each dough ball.
    10. Bake for 16-18 minutes until they start to appear golden at the bottom edges.
    11. Remove from the oven and spoon blueberry jam into the centers to fill the little wells.
    12. Return the cookies to the oven for 3-4 minutes.
    13. Transfer the cookies to a wire rack to cool completely. Store in airtight containers.
    14. These will freeze well in a single layer in a plastic container. 
    Lemon Blueberry Thumbprint Cookies

      reade more... Résuméabuiyad

      Happy Thanksgiving


      Happy Thanksgiving Slow Roasters! It has been a year filled with blessing and we are thrilled to spend Thanksgiving remembering them all.

      Continue Reading »

      Happy Thanksgiving Slow Roasters! It has been a year filled with blessing and we are thrilled to spend Thanksgiving remembering them all.

      Continue Reading »
      reade more... Résuméabuiyad

      Woman cannot live by cookies alone.

      Happy Thanksgiving Eve!!!  

      I hope you guys have just the loveliest Thanksgiving with family and friends.  And pie.  Lots of pie.
      the vintage pearl golden eternity heart necklace, plus giveaway!
      Here's a little treat for you. {Psst...it's JEWELRY!
      It's a little treat to hold you over until the shopping starts on FRIDAY.  Do you hear me Macy's?  Target?  FRIDAY.

      the vintage pearl gold jewelry
      Anyhoo...I just love stamped and personalized jewelry.  I was so so thrilled to find that The Vintage Pearl offers beautiful hand-stamped jewelry in gold tone!!!  YAY!!!  I think gold looks better on my skin, so I was ecstatic to see their pieces.

      This is my new favorite piece:  it's the Golden Eternity Heart necklace.
      vintage pearl instagram photo vintagepearlinstagram.jpg
      You can have it stamped with names, or a favorite quote.  I chose this quote from George Bernard Shaw,

      "A happy family is but an earlier heaven."  


      I love it.  It's perfect...just big enough, but still delicate

        the vintage pearl golden eternity heart necklace, plus giveaway!

      We're having a Vintage Pearl giveaway! 

      The Vintage Pearl is offering TWO $50 gift certificates to you guys!  Yay!

      To enter, go visit The Vintage Pearl, come back and leave a comment here telling me one of the items you love.

      For an extra entry, leave a separate comment stating whether you're a silver or gold person (or both)!

      *If you are reading this post in an email, click the post title to open it in your web browser.  Then, leave a comment.*

      Entries accepted through 11:59pm CST, December 2nd.
      (I cannot believe that I just typed "December.")

      Happy, happy Thanksgiving!  
      I YAM so thankful for you all.
      (See what I did there?) ;) 

      And, Houston area folks...they now have a shop in Sugarland!!! 


      reade more... Résuméabuiyad

      Ballpark Samoa Bars


      For over 150 more tried and tested cookie recipes be sure to browse our 

      Ballpark Samoa Bars
      Ballpark Samoa Bars
      One of my favorite cookies from last years November cookie marathon was the Easy Samoa Bars recipe that featured toasted coconut and caramel on a shortbread like base with a drizzle of chocolate. While I love coconut, I know that others are not so fond, so I wondered what else might work in this recipe. I've seen so many cookie recipes on Pinterest lately that use pretzels I decided to use those ...and what goes with pretzels? Peanuts of course! The result was crispy, crunchy, caramely delicious!


      Ballpark Samoa Bars

      Recipe by Barry C. Parsons
      Ballpark Samoa Bars - a new take on delicious caramel samoa bars that replaces the toasted coconut with favorite ballpark snacks peanuts and pretzels.

      Prep time: 20 minutes
      Cook time: 25 minutes
      Total time: 45 minutes
      Yield: About 3 dozen cookie bars.

      Ingredients
      • 1/2 cup sugar
      • 3/4 cup butter
      • 1 large egg
      • 2 tsp vanilla extract
      • 2 cups flour
      • 12 oz good quality chewy caramel candies
      • 4 tbsp milk
      • 1 tsp vanilla extract
      • 1 1/2 cups dry roasted unsalted peanuts
      • 2 1/2 cups broken pretzel pieces broken pretzel pieces
      • 1 ½ cups chocolate chips
      Directions
      1. Cream together sugar, butter and vanilla until well combined.
      2. Beat in the egg until fluffy.
      3. Slowly fold in the flour.
      4. Press into the bottom of a parchment lined 9x13 inch pan and bake at 350 degrees F for bout 25 minutes or until it gets golden brown at the edges and is well baked through the center of the pan.
      5. Cool completely on a wire rack before adding the top layer.
      6. For the top layer, melt together the caramel candies, milk and vanilla extract over low heat. You can also do this in the microwave. Just check it every 30-60 seconds and stir.
      7. Stir in the peanuts and broken pretzel pieces.
      8. Spread the peanut, pretzel and caramel mixture over the cooled shortbread base and cool in the fridge for a couple of hours before cutting into squares.
      9. Melt the chocolate chips in a double boiler. You can dip the bottoms of the squares in chocolate if you like or just drizzle the chocolate over the top of the squares, or both. Place dipped squares on parchment or waxed paper to cool completely until the chocolate hardens.
      reade more... Résuméabuiyad

      Turkey cranberry wreath


      Can you believe that tomorrow is Thanksgiving? My family and I will be spending it at my brother and sister-in-law's house. It should be a great time since my parents and my brother's in-laws will be there as well. I'm looking forward to seeing everyone.

      This recipe is something that uses up some of your Thanksgiving leftovers. It's a meal that everyone in my family enjoys. And yes, I am fully aware that it uses refrigerated crescent rolls, but I just haven't had the time to experiment with an alternative yet. We only eat crescent rolls once or twice a year, so I don't feel too guilty about it. I've had this recipe since 2000, when I attended one of my first Pampered Chef parties. It was a hit back then, too.

      My friend Joanna of Kosher Kitchen challenged the What's Baking gals to bake with cranberries this month, and this Pampered Chef recipe happens to use sweetened dried cranberries. Perfect. They add just the right amount of sweetness to this wreath, and the mayonnaise provides just enough moisture to keep the filling plump and juicy. If you wanted, you could add chopped walnuts into the filling for some extra crunch.

      Addie originally wasn't a fan of this until we started calling them "pizza rolls." Once we started referring to the wreath as a pizza roll, then she gobbled it up.

      Happy Thanksgiving, everyone!

      Turkey cranberry wreath

      • 2 packages (8 ounces each) refrigerated crescent rolls
      • 1/2 cup mayonnaise
      • 1/2 teaspoon ground black pepper
      • 2 cups cooked turkey or chicken, chopped (I like using rotisserie chicken)
      • 1/2 cup celery, diced
      • 1/2 cup dried cranberries
      • 4 ounces (1 cup) Swiss or mozzarella cheese, shredded
      Directions
      Preheat your oven to 375 degrees F.

      Unroll one package of the crescent rolls. Arrange them on a large pizza stone (or a lined baking sheet) into a circle - you will want the long points of the triangles sticking outward like the shape of a sun. The short, flat sides of the triangular roll pieces may overlap.

      Unwrap the other package of crescent rolls. This time, arrange them so they fill up the center of the circle. The long points of the triangles should face in towards the center of the circle, and the wide ends should overlap with the first batch of crescent rolls you laid down.

      In a large bowl, combine the mayonnaise, black pepper, turkey or chicken, celery, cranberries and cheese. Mix well.

      Scoop the filling onto the seams of the crescent rolls shape so that it forms a ring.

      Using your hands, lift one end of a piece of dough over the filling and tuck it underneath. Alternate lifting from the outside and inside of the filling. Continue lifting and tucking until all the crescent roll ends have been used.

      Bake in your preheated oven for about 25-30 minutes or until the tops are golden brown.

      Yield: About 10 servings

      Source: Slightly adapted from the Pampered Chef's Season's Best Recipe Collection, Fall/Winter 2000


      Photobucket
      reade more... Résuméabuiyad

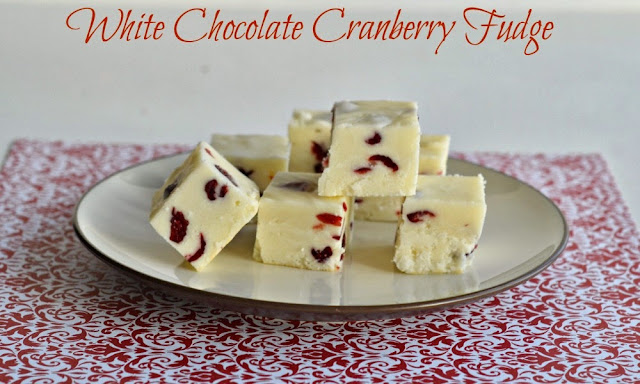
      White Chocolate Cranberry Fudge: What's Baking and #12WksofXmasTreats

           Tomorrow is Thanksgiving!  My favorite food holiday of the year.  It's not even the turkey that I love it's actually more the homemade stuffing, mashed potatoes, and other side dishes.  Plus it's the start of the Christmas season which of course has me thinking about what treats I'll be making this year.

      White Chocolate Cranberry Fudge
            This week I am sharing a quick and easy holiday treat.  It's doing double duty this week as my recipe for The 12 Weeks of Christmas Treats hosted by Meal Planning Magic, as well as my recipe for this months What's Baking, hosted by Joanna from Kosher Kitchen. This month Joanna chose cranberries as our theme which I think is perfect for this time of year.


           I decided to make fudge.  I had a hard time finding a recipe that sounded good.  Most recipes I looked at simply combined sweetened condensed milk and white chocolate which is fine, but I wanted fudge with a more delicate texture. I definitely found that in this delicious version!

            I  just made the fudge on Sunday and am having a hard time not eating it all!  I'm supposed to be sharing it at our Thanksgiving dinner so I hope it makes it that long.  The white chocolate fudge literally melts in your mouth and is sweet and silky.  The cranberries give it a bit of tartness and cut into the sweetness.  It's the perfect holiday pairing and it only takes minutes to make!

      White Chocolate Cranberry Fudge (adapted from Good Eats 'n Sweet Treats)
      2 c. sugar
      3/4 c. heavy cream
      1 stick butter, cut into 8 pieces
      1/2 t. salt
      3 c. mini marshmallows
      2 c. white chocolate chips
      1 c. dried cranberries, chopped

      1.  Line a 9 x9 pan with foil.  Spray with cooking spray and set aside.

      2.  In a medium saucepan combine the sugar, heavy cream, butter, and salt.  Cook over low heat, stirring occasionally, until butter is melted and everything is blended.

      3.  Increase heat to medium and bring to a boil.  Boil for 5 minutes while stirring constantly.

      4.  Remove from heat and stir in the marshmallows and white chocolate chips.  Once the chocolate has melted fold in the cranberries.  

      5.  Quickly pour into the prepared pan and place in the refrigerator for at least two hours. 

      6.  Remove from refrigerator and use the foil to lift the fudge out of the pan.  Cut into 36 squares and serve.  

      Note:  To store, place in an air tight container in the refrigerator for up to 30 days.  


      White Chocolate Cranberry Fudge from Hezzi-D's Books and Cooks

      reade more... Résuméabuiyad

      Top 5 Best Ever Thanksgiving Day Side Dishes


      The Best Thanksgiving Day sides to ever grace your table. With easy recipes that are virtually no fail. Our top 5 Best Ever that will make your table complete.

      Thanksgiving dinner would not be the same without the fabulous sides. Potatoes, sweet potatoes, rolls, gravy and a bucket of corn. Not to mention some pecan pie for dessert. More than once I have admitted that I am a carbivore. So, you can imagine what my Thanksgiving plate looks like.

      You have your favorite turkey and need some sides that will knock your socks off? Look no further here are our Top 5 Best Ever Thanksgiving Days Side Dishes. Enjoy and have an amazing dinner!

      Continue Reading »
      reade more... Résuméabuiyad

      Apricot Almond Jammie Dodgers


      For over 150 more tried and tested cookie recipes be sure to browse our 

      Apricot Almond Jammie Dodgers
      Apricot Almond Jammie Dodgers
      If you are looking for a perfect cookie to enjoy with a calming cup of tea, this may be the best choice yet. I've added finely ground almonds and almond extract to the buttery cookie dough from our original version of Homemade Jammie Dodgers to add an extra flavor dimension to these delicious cookies. Regular readers of Rock Recipes will undoubtedly know that I have a particular fondness for all things apricot and the almond flavor of these cookies is particularly delicious with apricot jam. Truthfully though, you could substitute any favorite high quality or homemade jam in this recipe; raspberry, blackberry and plum are excellent choices.

      Using Christmas cookie cutters is an easy way to add a festive touch to these cookies for the Holidays.


      Apricot Almond Jammie Dodgers

      Recipe by Barry C. Parsons
      A tasty twist on a homemade version of the United Kingdom's favorite cookie. Ground almonds in the cookie dough pair perfectly with the sweet apricot jam but if apricot's not your favorite flavor, any good quality jam can be substituted.

      Prep time: 20 minutes
      Cook time: 20 minutes
      Yield: 12-14 large 3 inch cookies

      Ingredients
      • 2 cups flour
      • 1 cup icing sugar (powdered sugar)
      • pinch salt
      • 1/2 cup finely ground almonds
      • 1 cup + 2 tbsp cold butter, cut in cubes
      • 2 tsp vanilla extract
      • 1/2 tsp almond extract
      • 3 large egg yolks
      • 12-14 rounded tsp homemade or good quality apricot jam
      Directions
      1. Sift together the flour, icing sugar, salt and ground almonds. Set aside.
      2. Rub the butter into the dry ingredients with your fingers until it is well incorporated and the mixture becomes crumbly, like a coarse meal.
      3. Whisk together the egg yolks, vanilla and almond extracts.
      4. Add to the crumbly dry mixture and mix in until a soft dough forms.
      5. Wrap the dough in plastic wrap and chill in the fridge for at least a half hour. Roll the dough out between two pieces of lightly floured parchment paper to about 1/8 of an inch thick.
      6. Cut out cookies using a 3 inch cutter and place on a parchment lined baking sheet.
      7. Cut circles or hearts or whatever shape you like out of the centers of half of the cookies.
      8. Bake at 350 degrees F for 15 - 20 minutes, just until they start to brown slightly at the bottom edges but are still very pale.
      9. Remove from the oven and spoon 1 rounded teaspoon of apricot jam (or your favorite jam) onto the middle of the bottom halves of the cookies and spread out only slightly to about 3/4 of an inch from the edge of the cookie. Carefully lay the top halves of the cookies onto the jam and press down lightly.
      10. Return to the oven for an additional 5 to 6 minutes. This will heat up the jam to a point where it will stick the two cookie halves together.
      11. Cool on the baking sheet for 10 minutes before transferring the cookies to a wire rack to cool completely.
      12. Store in airtight containers.
      reade more... Résuméabuiyad

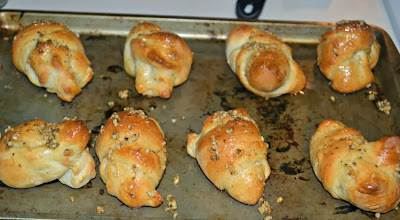
      Browned Butter Garlic Rolls

            Do you ever have one of those day where your intentions to make something are good, you have all the ingredients, and then when 6 o'clock rolls around you realize you're a failure?  Yeah, that was pretty much my Saturday.  I had planned on making homemade garlic rolls to go with our soup dinner and had everything I needed to make them.  When husband asked what was for dinner it suddenly hit me that I hadn't made the dough.

      Easy Brown Butter Garlic Rolls
           I quickly scrambled to look in the refrigerator and see if I had any refrigerated rolls and found a package of French Bread dough.  I quickly unwrapped it, cut it into pieces, and made easy garlic knots.  Twenty minutes later we had piping hot browned butter and garlic knots that while not homemade were still pretty delicious.

      Browned Butter Garlic Rolls (adapted from Cooking Light, November 2013)
      1 package refrigerated French bread dough (such as Pillsbury)
      2 T. butter
      1 t. sage
      4 garlic cloves, minced
      1/2 t. salt
      1 t. pepper

      1.  Preheat the oven to 350 degrees.

      2.  Remove the dough from the package.  Cut into 8 pieces.  Roll each piece into a 9 inch rope.  Tie each strip in a knot.

      3.  Place the knots on a baking sheet and bake for 20 minutes.

      4.  Meanwhile, heat the butter in a small skillet over medium heat.  Cook until lightly browned.  Immediately add in the sage, garlic, salt, and pepper and cook for 1 minute.  Remove from heat.

      5.  Remove the rolls from the over and brush the hot garlic butter over top of them.  Serve immediately. 


      Browned Butter Garlic Rolls

      reade more... Résuméabuiyad

      Comfort Food Made Easy: 30 Minute Meals to Simplify your Life


      Comfort Food in 30 Minutes, what more could you ask for? Simple recipes that are easy to follow that go from prep to plate in half and hour. We have put together a collection of our favorite comfort classic foods that are ready in a snap!

      Everything from soups and stews to casseroles and bakes and everything in between. The Ultimate Guide to 30 Minute Comfort Foods your perfect holiday helper.

      Continue Reading »
      reade more... Résuméabuiyad

      Easy Cherry Almond Macaroons


      For over 175 more tried and tested cookie recipes be sure to browse our 

      Easy Cherry Almond Macaroons
      Easy Cherry Almond Macaroons
      Growing up, while other kids my age turned up their noses at many coconut cookies during the Holidays, I was an obvious exception. Coconut covered snowballs, Partridgeberry Coconut Meringue Squares and Coconut (Macaroon) Haystacks with a bright red glace cherry on top were among my favorites.

      This recipe was inspired by those coconut haystacks, often formed by using a boiled egg cup to make the shape. I always wanted to pick all the cherries off the tops of those cookies when I was a kid, so rather than do that, I thought I'd just add more to the recipe. Cherries and almonds are a natural flavor combination so some toasted ground almonds make a delicious addition to these quick and easy cookies too. These are so easy to make and since there will always be some coconut lovers in any group, so why not add these to your Holiday baking list?


      Easy Cherry Almond Macaroons

      Recipe by Barry C. Parsons
      A very simple, easy coconut macaroon recipe with the added flavors of cherries and almonds. These freeze well making them another great choice for the Holiday freezer.

      Prep time: 20 minutes
      Cook time: 20 minutes
      Total time: 40 minutes
      Yield: 3 dozen cookies

      Ingredients
      • 4 cups sweetened dried coconut
      • 1 1/2 cups toasted ground almonds
      • 1 cup glace cherries, cut in quarters (Maraschino or dried cherries can also be used)
      • 1/2 tsp vanilla extract
      • 1/2 tsp almond extract
      • pinch salt
      • 1 can (300 ml) sweetened condensed milk
      • 2 large egg whites
      Directions
      1. Toast almonds at 350 degrees F in a single layer on a baking sheet for about 5-7 minutes. Cool completely before grinding them in a food processor or blender.
      2. Mix the almonds with all of the other ingredients except the egg whites, stirring well to combine.
      3. Whip the egg whites to soft peaks and fold them gently through the coconut, cherry almond mixture.
      4. Drop the dough by rounded teaspoonfuls onto a baking sheet lined with parchment paper or a silicone liner. These WILL stick to a regular greased baking sheet.
      5. Bake at 325 degrees F until lightly golden brown at the edges, about 20-23 minutes. Do not over bake.
      6. Cool completely on the baking sheet before removing the cookies.
      7. Store in airtight containers.
      reade more... Résuméabuiyad

      Royal Mail Hotel

      So, as I've told you a bunch of times before, we have a tradition with our friend An where we shout each other a fancy meal every year as a birthday gift. (See previous posts: Tetsuya's, Embrasse, and Vue de Monde). This year, we went to the Royal Mail Hotel for a weekend, where An shouted us the nine-course degustation with matching wines. Wow! And for those who are interested in these things, we visited the Royal Mail after chef Dan Hunter left.

      The Royal Mail Hotel

      Royal Mail Hotel
      98 Parker Street
      Dunkeld, VIC 3294
      Ph: (03) 5577-2241
      Website
      Royal Mail Hotel on Urbanspoon

      It was an easy 3.5 hour drive from Melbourne to Dunkeld (and I say "easy" because An was driving - what a treat to be chauffered!), with a stop in Ballarat for lunch. We chose Vegas and Rose, a cute little cafe with a vintage feel and generously portioned toasties. (They have an Etsy and an Instagram, but no menu on their website, hehe).

      Lunch at Vegas and Rose

      And here's Parker street in Dunkeld - quiet and peaceful with a lovely view!

      Dunkeld

      We got there a little early, so checked into our room and freshened up before dinner. We were in a two bedroom apartment on the same property as the restaurant. It was very comfortable and clean, and whilst I thought the beds and amenities were great, (especially the Appelles Apothecary toiletries!), I felt the building itself was tending towards the older side, with some cobwebs in the harder-to-reach corners, and slightly old-fashioned bathrooms.

      Royal Mail Hotel - 2 Bedroom Apartment

      Here is the restaurant itself. The same space houses the formal dining area and the more casual bistro, with tablecloths and carpets in the formal area. We were also seated right next to the fireplace - so cosy!

      The dining room

      Liquors

      The kitchen

      An and I went for the Omnivore menu, whilst our Sandra went for the vegetarian menu. (She's not a vegetarian but doesn't eat seafood or rare meat, and loves vegetables, so this works out well for her.) So yay! I get to show you both menus! 

      We started with excellent house-made bread and soft butter.

      House-made bread

      Soft butter

      The first course was made up of a selection of very pretty canapés.

      First Course
      Flaxseed, nettle, garden blossoms
      NV Larmandier-Bernier Blanc de Blancs, Vertus France
      Flaxseed, nettle, garden blossoms

      The "garden blossoms" canapé, (which I imagine were picked from the Royal Mail's own kitchen garden), was like a flower bouquet on a cracker - a very tasty flower bouquet on a cracker!

      First course continued...
      Oyster and roe, citrus and sea lettuce
      Vegetarian Option
      Asparagus and rye
      Oyster and roe, citrus and sea lettuce
      Asparagus and rye

      The oysters on rye were a little tricky to eat, with the rye base shattering once bitten, but the oyster topping was wonderfully fresh and briney. A great start to the meal.

      The prettiness continued with the second course...

      Second Course
      Pancetta and scampi, rye cream, candied radish
      2011 Kidoizumi Shuzo 'Hakugyukuko', Chiba Japan
      Pancetta and scampi, rye cream, candied radish

      I greatly enjoyed this course, with the lovely strip of stripey, salty pancetta contrasting well against the fresh meatiness of the scampi and the sweet candied radish. The wine match for this was, surprisingly, a sake which was very fragrant, with subtle hints of banana (for real). So cool! While we're here, I should tell you I loved the wine matching throughout the meal. There were some adventurous, unusual choices, most of which I really liked, and all of which complimented the individual dishes well. A special shout-out to the sommelier (who I think was the junior sommelier), who was knowledgeable and enthusiastic about the wines without being overbearing. He was awesome!

      Vegetarian Option
      Carrot and almond, coriander and pickled garlic
      Carrot and almond, coriander and pickled garlic

      Sandra loved this dish! Not only did it look beautiful, but the different textures and flavours - the little carrots, the garlic, the almonds - were a delight.

      Third Course
      Jerusalem artichoke, hazelnut, triple cream
      2012 Schloss Gobelsberg 'Steinsetz' Grüner Veltliner, Kamptal Austria
      Jerusalem artichoke, hazelnut, triple cream

      The third course, which was the same for both veggoes and omnis, was very, very strange. A whole Jerusalem artichoke was roasted, and filled with triple-cream brie cheese, which sounded nice, but as soon as you started slicing...

      Oozy triple cream

      ... yup, the melted cheese started oozing out of a hole in the side, in an incredibly unappetising way. We were all quite confused by the dish, which to be perfectly frank, looked more Embarrassing Bodies than fine dining. On top of that, it was really bland, with the sweetness of the hazelnut, artichoke and cheese crying out for a little salt.

      Fourth Course
      Egg yolk and new potatoes, salt fish and crackling
      2011 By Farr Chardonnay, Geelong Victoria
      Egg yolk and new potatoes, salt fish and crackling

      I much preferred the fourth course, with the liquid egg yolk oozing delectably over the tender little potato pieces and crispy salty fish crackling - it was very well balanced. I also loved the wine match, an oaky 2011 By Farr Chardonnay from Geelong.

      Vegetarian Option
      Egg yolk, toasted rye, legumes, yeast
      Egg yolk, toasted rye, legumes, yeast

      Sadly, the vegetarian option wasn't quite as impressive. The egg yolk with toasted rye, legumes and yeast looked very pretty, but it was very oversalted. (And keep in mind it was being eaten by someone who loves salty food, and when cooking at home routinely adds salt to food that I already find too salty).

      Fifth Course
      Blue eye, salsify, chicken broth and skin
      2010 Nicolas Joly 'Les Vieux Clos', Savennieres France
      Blue eye, salsify, chicken broth and skin

      I wouldn't have thought to pair chicken broth with fish, but it worked really well. I loved the crisp chicken skin too!

      Chicken skin

      Vegetarian Option
      Garden salad
      Garden Salad

      The vegetarian option for this course, the garden salad, sounded like it would be quite plain, but was actually a stunning mixture of different vegetables, salad leaves and flowers. Wow!

      Sixth Course
      Eel and bone marrow, eggplant, pickled vegetables
      2010 Moorooduc Estate 'The Moorooduc' Pinot Noir, Mornington Peninsula Victoria
      Eel and bone marrow, eggplant, pickled vegetables

      Another pretty dish, but I found the large piece of eel stuffed with bone marrow too gelatinously rich, even with the crisp pickled vegetables alongside.

      Vegetarian Option
      Charred young garlic, cauliflower, aged pecorino
      Charred young garlic, cauliflower, aged pecorino

      I didn't try this course, but Sandra thought it was just alright, with the pungent pecorino overpowering the other delicate flavours.

      Seventh Course
      Salt grass lamb, black cabbage, chard leaf and stem
      2004 Crawford River Cabernet Sauvignon, Henty Victoria
      Salt grass lamb, black cabbage, chard leaf and stem

      Sometimes simple things are the best, and I greatly enjoyed the perfectly cooked piece of salt grass lamb!

      Vegetarian Option
      Eggplant in white miso, dried grains, cured kelp
      Eggplant in white miso, dried grains, cured kelp

      The vegetarian option of the seventh course was, again, less successful, with the eggplant being too smoky (although I know some people adore smoky eggplant, so I suppose it comes down to personal taste), and the broth being one-dimensionally salty and not having much depth of flavour.

      Now, dessert!
      Eighth Course
      Milk and apple, golden raisin and almon
      2011 Domaine Dupont 'Dupont Cidre Reserve
      Milk and apple, golden raisin and almond

      I liked the way this dessert looked like a little Valkyrie helmet! The sorbet was delicate and milky, and the golden raisins were plump and juicy, with some tart apple and crunchy almonds underneath. It was a refreshing dessert.

      Ninth Course
      Beetroot and mandarin, cocoa and walnut
      2011 Disznoko Late Harvest Furmint, Tokaji Hungary
      Beetroot and mandarin, cocoa and walnut

      This dessert was made up of a little semi-circle of mandarin sorbet (or ice-cream?), with a pile of chocolate and beetroot crumbs. Sandra found the earthiness of the chocolate and beetroot crumbs a little too earthy, but An and I really liked the subtle hint of chocolate. It was a nice way of having a chocolate dessert without being super rich or filling, and I also liked the texture contrast between the sorbet and crumbs.

      Wine

      On reflection, I must say we were a bit disappointed with the degustation at the Royal Mail. Whilst there were some excellent courses (the little crispbreads that made up the first course, the carrot dish, the garden salad, and the blue eye with crisp chicken skin, for example), there were also many that didn't hit the mark for us - too many to justify the $180/$120 price tag. Naturally, in a nine-course meal of creative and inventive cuisine, you're not going to like everything, but at those prices, and with that reputation, you would expect that any "misses" would come down to personal preference (e.g. someone who doesn't like rare meat might not have liked the lamb dish, but could still appreciate the skill that went into it), rather than actual problems with dishes (as per the oversalted egg yolk with toasted rye, legumes and yeast, and the really unappetising Jerusalem artichoke). The same kitchen services both the fine dining restaurant and the more casual bistro, and I must be honest, we saw a big bowl of amazing-looking hand-cut chips going out, and we were super jealous! I wonder if we might have been better off just having a more casual meal of steak and chips.

      Now, if the dinner wasn't quite as good as expected, I was completely blown away by the breakfast! There was a small but totally luxurious selection of pastries, yogurts, ham, smoked salmon, cereals and more, most of which were house-made or locally supplied, as well as teas and filter coffee. (Hot breakfasts and espresso coffee are available at an extra cost, but I love filter coffee, and there was more than enough food to keep us going!)

      Breakfast at the Royal Mail Hotel

      Breakfast at the Royal Mail Hotel

      I ignored the cereals in favour of the locally made items. Everything on the below plate was delicious, but I particularly loved the bread, the wonderfully oily smoked salmon, the house made ricotta, the Wessex Saddleback ham, the pork rillette and the bread and butter pickle. Ok, so I just realised I listed everything on the plate, haha!

      Bread, Wessex Saddleback smoked leg ham, bread and butter pickle, house made ricotta, pork rillette, house made smoked salmon

      We shared some donuts - they had vanilla custard ones, and quince jam ones. Beautiful!

      Vanilla Custard Donut - my first Instagram photo to hit 100 likes!

      And then, all too soon, it was time to check out and drive back home. Despite the disappointing degustation, we still had a fantastic fun weekend (when you're with good friends I guess it doesn't matter where you go or what you eat!) Would I come back to the Royal Mail? Not for the degustation, which we all agreed was quite disappointing. The accommodation, however, was good, (the breakfast was excellent!), and all the staff were really lovely. Perhaps the next time we visit the Grampians, we'd use the Royal Mail Hotel as a base for exploring the region, but have dinner at the bistro or pub, rather than the restaurant itself.

      View from the Gardens

      View from the gardens

      So, as I've told you a bunch of times before, we have a tradition with our friend An where we shout each other a fancy meal every year as a birthday gift. (See previous posts: Tetsuya's, Embrasse, and Vue de Monde). This year, we went to the Royal Mail Hotel for a weekend, where An shouted us the nine-course degustation with matching wines. Wow! And for those who are interested in these things, we visited the Royal Mail after chef Dan Hunter left.

      The Royal Mail Hotel

      Royal Mail Hotel
      98 Parker Street
      Dunkeld, VIC 3294
      Ph: (03) 5577-2241
      Website
      Royal Mail Hotel on Urbanspoon

      It was an easy 3.5 hour drive from Melbourne to Dunkeld (and I say "easy" because An was driving - what a treat to be chauffered!), with a stop in Ballarat for lunch. We chose Vegas and Rose, a cute little cafe with a vintage feel and generously portioned toasties. (They have an Etsy and an Instagram, but no menu on their website, hehe).

      Lunch at Vegas and Rose

      And here's Parker street in Dunkeld - quiet and peaceful with a lovely view!

      Dunkeld

      We got there a little early, so checked into our room and freshened up before dinner. We were in a two bedroom apartment on the same property as the restaurant. It was very comfortable and clean, and whilst I thought the beds and amenities were great, (especially the Appelles Apothecary toiletries!), I felt the building itself was tending towards the older side, with some cobwebs in the harder-to-reach corners, and slightly old-fashioned bathrooms.

      Royal Mail Hotel - 2 Bedroom Apartment

      Here is the restaurant itself. The same space houses the formal dining area and the more casual bistro, with tablecloths and carpets in the formal area. We were also seated right next to the fireplace - so cosy!

      The dining room

      Liquors

      The kitchen

      An and I went for the Omnivore menu, whilst our Sandra went for the vegetarian menu. (She's not a vegetarian but doesn't eat seafood or rare meat, and loves vegetables, so this works out well for her.) So yay! I get to show you both menus! 

      We started with excellent house-made bread and soft butter.

      House-made bread

      Soft butter

      The first course was made up of a selection of very pretty canapés.

      First Course
      Flaxseed, nettle, garden blossoms
      NV Larmandier-Bernier Blanc de Blancs, Vertus France
      Flaxseed, nettle, garden blossoms

      The "garden blossoms" canapé, (which I imagine were picked from the Royal Mail's own kitchen garden), was like a flower bouquet on a cracker - a very tasty flower bouquet on a cracker!

      First course continued...
      Oyster and roe, citrus and sea lettuce
      Vegetarian Option
      Asparagus and rye
      Oyster and roe, citrus and sea lettuce
      Asparagus and rye

      The oysters on rye were a little tricky to eat, with the rye base shattering once bitten, but the oyster topping was wonderfully fresh and briney. A great start to the meal.

      The prettiness continued with the second course...

      Second Course
      Pancetta and scampi, rye cream, candied radish
      2011 Kidoizumi Shuzo 'Hakugyukuko', Chiba Japan
      Pancetta and scampi, rye cream, candied radish

      I greatly enjoyed this course, with the lovely strip of stripey, salty pancetta contrasting well against the fresh meatiness of the scampi and the sweet candied radish. The wine match for this was, surprisingly, a sake which was very fragrant, with subtle hints of banana (for real). So cool! While we're here, I should tell you I loved the wine matching throughout the meal. There were some adventurous, unusual choices, most of which I really liked, and all of which complimented the individual dishes well. A special shout-out to the sommelier (who I think was the junior sommelier), who was knowledgeable and enthusiastic about the wines without being overbearing. He was awesome!

      Vegetarian Option
      Carrot and almond, coriander and pickled garlic
      Carrot and almond, coriander and pickled garlic

      Sandra loved this dish! Not only did it look beautiful, but the different textures and flavours - the little carrots, the garlic, the almonds - were a delight.

      Third Course
      Jerusalem artichoke, hazelnut, triple cream
      2012 Schloss Gobelsberg 'Steinsetz' Grüner Veltliner, Kamptal Austria
      Jerusalem artichoke, hazelnut, triple cream

      The third course, which was the same for both veggoes and omnis, was very, very strange. A whole Jerusalem artichoke was roasted, and filled with triple-cream brie cheese, which sounded nice, but as soon as you started slicing...

      Oozy triple cream

      ... yup, the melted cheese started oozing out of a hole in the side, in an incredibly unappetising way. We were all quite confused by the dish, which to be perfectly frank, looked more Embarrassing Bodies than fine dining. On top of that, it was really bland, with the sweetness of the hazelnut, artichoke and cheese crying out for a little salt.

      Fourth Course
      Egg yolk and new potatoes, salt fish and crackling
      2011 By Farr Chardonnay, Geelong Victoria
      Egg yolk and new potatoes, salt fish and crackling

      I much preferred the fourth course, with the liquid egg yolk oozing delectably over the tender little potato pieces and crispy salty fish crackling - it was very well balanced. I also loved the wine match, an oaky 2011 By Farr Chardonnay from Geelong.

      Vegetarian Option
      Egg yolk, toasted rye, legumes, yeast
      Egg yolk, toasted rye, legumes, yeast

      Sadly, the vegetarian option wasn't quite as impressive. The egg yolk with toasted rye, legumes and yeast looked very pretty, but it was very oversalted. (And keep in mind it was being eaten by someone who loves salty food, and when cooking at home routinely adds salt to food that I already find too salty).

      Fifth Course
      Blue eye, salsify, chicken broth and skin
      2010 Nicolas Joly 'Les Vieux Clos', Savennieres France
      Blue eye, salsify, chicken broth and skin

      I wouldn't have thought to pair chicken broth with fish, but it worked really well. I loved the crisp chicken skin too!

      Chicken skin

      Vegetarian Option
      Garden salad
      Garden Salad

      The vegetarian option for this course, the garden salad, sounded like it would be quite plain, but was actually a stunning mixture of different vegetables, salad leaves and flowers. Wow!

      Sixth Course
      Eel and bone marrow, eggplant, pickled vegetables
      2010 Moorooduc Estate 'The Moorooduc' Pinot Noir, Mornington Peninsula Victoria
      Eel and bone marrow, eggplant, pickled vegetables

      Another pretty dish, but I found the large piece of eel stuffed with bone marrow too gelatinously rich, even with the crisp pickled vegetables alongside.

      Vegetarian Option
      Charred young garlic, cauliflower, aged pecorino
      Charred young garlic, cauliflower, aged pecorino

      I didn't try this course, but Sandra thought it was just alright, with the pungent pecorino overpowering the other delicate flavours.

      Seventh Course
      Salt grass lamb, black cabbage, chard leaf and stem
      2004 Crawford River Cabernet Sauvignon, Henty Victoria
      Salt grass lamb, black cabbage, chard leaf and stem

      Sometimes simple things are the best, and I greatly enjoyed the perfectly cooked piece of salt grass lamb!

      Vegetarian Option
      Eggplant in white miso, dried grains, cured kelp
      Eggplant in white miso, dried grains, cured kelp

      The vegetarian option of the seventh course was, again, less successful, with the eggplant being too smoky (although I know some people adore smoky eggplant, so I suppose it comes down to personal taste), and the broth being one-dimensionally salty and not having much depth of flavour.

      Now, dessert!
      Eighth Course
      Milk and apple, golden raisin and almon
      2011 Domaine Dupont 'Dupont Cidre Reserve
      Milk and apple, golden raisin and almond

      I liked the way this dessert looked like a little Valkyrie helmet! The sorbet was delicate and milky, and the golden raisins were plump and juicy, with some tart apple and crunchy almonds underneath. It was a refreshing dessert.

      Ninth Course
      Beetroot and mandarin, cocoa and walnut
      2011 Disznoko Late Harvest Furmint, Tokaji Hungary
      Beetroot and mandarin, cocoa and walnut

      This dessert was made up of a little semi-circle of mandarin sorbet (or ice-cream?), with a pile of chocolate and beetroot crumbs. Sandra found the earthiness of the chocolate and beetroot crumbs a little too earthy, but An and I really liked the subtle hint of chocolate. It was a nice way of having a chocolate dessert without being super rich or filling, and I also liked the texture contrast between the sorbet and crumbs.

      Wine

      On reflection, I must say we were a bit disappointed with the degustation at the Royal Mail. Whilst there were some excellent courses (the little crispbreads that made up the first course, the carrot dish, the garden salad, and the blue eye with crisp chicken skin, for example), there were also many that didn't hit the mark for us - too many to justify the $180/$120 price tag. Naturally, in a nine-course meal of creative and inventive cuisine, you're not going to like everything, but at those prices, and with that reputation, you would expect that any "misses" would come down to personal preference (e.g. someone who doesn't like rare meat might not have liked the lamb dish, but could still appreciate the skill that went into it), rather than actual problems with dishes (as per the oversalted egg yolk with toasted rye, legumes and yeast, and the really unappetising Jerusalem artichoke). The same kitchen services both the fine dining restaurant and the more casual bistro, and I must be honest, we saw a big bowl of amazing-looking hand-cut chips going out, and we were super jealous! I wonder if we might have been better off just having a more casual meal of steak and chips.

      Now, if the dinner wasn't quite as good as expected, I was completely blown away by the breakfast! There was a small but totally luxurious selection of pastries, yogurts, ham, smoked salmon, cereals and more, most of which were house-made or locally supplied, as well as teas and filter coffee. (Hot breakfasts and espresso coffee are available at an extra cost, but I love filter coffee, and there was more than enough food to keep us going!)

      Breakfast at the Royal Mail Hotel

      Breakfast at the Royal Mail Hotel

      I ignored the cereals in favour of the locally made items. Everything on the below plate was delicious, but I particularly loved the bread, the wonderfully oily smoked salmon, the house made ricotta, the Wessex Saddleback ham, the pork rillette and the bread and butter pickle. Ok, so I just realised I listed everything on the plate, haha!

      Bread, Wessex Saddleback smoked leg ham, bread and butter pickle, house made ricotta, pork rillette, house made smoked salmon

      We shared some donuts - they had vanilla custard ones, and quince jam ones. Beautiful!

      Vanilla Custard Donut - my first Instagram photo to hit 100 likes!

      And then, all too soon, it was time to check out and drive back home. Despite the disappointing degustation, we still had a fantastic fun weekend (when you're with good friends I guess it doesn't matter where you go or what you eat!) Would I come back to the Royal Mail? Not for the degustation, which we all agreed was quite disappointing. The accommodation, however, was good, (the breakfast was excellent!), and all the staff were really lovely. Perhaps the next time we visit the Grampians, we'd use the Royal Mail Hotel as a base for exploring the region, but have dinner at the bistro or pub, rather than the restaurant itself.

      View from the Gardens

      View from the gardens

      reade more... Résuméabuiyad